how to fit new barrel on glue in

coyote06

New member
looking for advice on best approach to fitting a new barrel on a glued in action obviously screwing on the action to headspace will be an issue on the lathe.
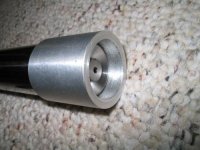
the action is a wichita 1375 the existing barrel has a cone breech I was tempted to machine a false action stub of some sort.

what would be the process of fitting on a new barrel any advice will be greatly appreciated.
 
Last edited:
Cut tenon and thread between centers so you can remove barrel from Lathe to test fit threads. Cut cone and ream chamber and set head space in a steady rest using careful measurements then remove barrel to final check in action. Some of the gunsmith's on here will probably have a better way.
 
Easy

If you don't have the old barrel that was made properly?, this is very basic machine work if doing it through the head-stock. I've made special tools to measure head-space from the glued in action, with the bolt you can measure breech/cone depth. I use 3 wire thread measurement for thread pitch and also have various stubs made for comparison but if it is an unaltered custom action should be no big deal. Just measure/cut/double check, you'll be fine.

Regards
Herb
 
Smiths make fixtures to measure cone to shoulder on the existing barrel and transfer it to the new barrel, beyond that you can probably measure from the action fact to the bolt face with the action in the stock, and use a simple cylindrical sleeve to duplicate that dimension on the new barrel. The pitch, or for that matter unconverted over the wires thread diameter can be measured on the old barrel and reproduced on the new one. If you can manage the depth to the bolt face measurement, you should be able to do the complete threading and chambering in a single setup, without removing the barrel from the lathe, or the action from the stock. https://www.google.com/search?q=bar...sAQIIg&biw=1232&bih=600#imgrc=vN483nEJVXyldM:
(top row, second and fourth pictures)
 
Chet,

you don't live that far way. Come down to my place and I will show you all the fixtures I have made that will let you do the job. I even have blueprints made of all this stuff that you can have.

Richard Brensing
 
You need a gauge home made or bought. Go gauge. Cone gauge. Remove barrel, measure, make new barrel same. Or send it to one of many great gunsmiths here on Benchrest.com. Billy, Dwight, Wayne, the list goes on. Apologizes for gunsmiths not mentioned, these are the ones I know. I use to chamber my own barrels but ever since I turned this job over to Billy I started to win and place..
Trout
 
Cut tenon and thread between centers so you can remove barrel from Lathe to test fit threads. Cut cone and ream chamber and set head space in a steady rest using careful measurements then remove barrel to final check in action. Some of the gunsmith's on here will probably have a better way.

This is the way I would do it.......
bil
 
I was in your exact situation some time back. I made a false tenon in my 3 jaw that could take measurements with. I have also made several fixtures to take these measurements with. Don't stress just set your false piece up so that its easily placed back in your machine just like it came out. also if you can get your hands on some lead bullet squirts, they make great measuring aids to check internal gap spacing.
as was mentioned, the steady rest method also allows you to check your process. I would also suggest that you hit Richard up on his offer. He is a fine machinist, and he will get you on the right path. good luck!! Lee
 
Why do you want to make it so complicated? With the proper gauges this is easy to do. Jees, I think sometime people like to hear themselves talk/type. If it takes this much conversation just send to one of the many great gunsmiths we have in this benchrest community.
Or we can keep this tread going until NewYears!
 
Richard

Thanks for the offer and I just might take you up on the offer to visit you early part of next year. But I don't need any help on doing any type of glue barrels. But do need lots of help on tuners and HBN bullet coating. Would also enjoy seeing some of your barrel fitting method's and just seeing your shop.
Again Thanks and wish you a Merry Christmas.
Chet

P.S. I am coyotechet not coyote06
 
Now it makes more

sense. I thought it seemed strange, knowing how much stuff you have done.

To the other chet, your a long ways away :) but your still welcome.

Richard
 
sense. I thought it seemed strange, knowing how much stuff you have done.

To the other chet, your a long ways away :) but your still welcome.

Richard

will come over after work tonight ;) .

Started making a sleeve with cone and dial indicator that should do the trick if only I could find time to do my own barrel rather than everyone else .
 
My tools. Use the cone gauge to measure cone clearance, Measure headspace, and vertical lines line up to the lettering on the barrel inorder to duplicate it on the new barrel. Write the numbers down in your book and you will never need the receiver in hand.
 
If its a Panda...follow the Kelbly chambering tips. Works to a T.

Thread the tenon 1.0625 inches in diameter by 18 threads per inch. If you are using the three-wire method to measure the threads, the measurement should be 1.0715” plus 0.0000“, minus 0.0020” using 0.032” wires.

For zero headspace on a cone bolt run the chambering reamer in until the head-space gauge is flush with the rear of the barrel. For zero headspace on a flat bolt run the chambering reamer in until the measurement from the base of the head-space gauge to the shoulder of the barrel is 1.115” for Panda, Kodiak and Grizzly actions or 0.692“ for Atlas actions.

For a cone bolt set the compound feed of the lathe to 30 degrees. Touch the tool to be used for cutting the cone at the chamber edge and lock the zeroed saddle stop against the saddle. Now back off the stop 0.135”. Using the compound feed only, cut the cone. This should give approximately 0.007” – 0.010” of space between the bolt and the barrel. On a 338 Lapua Mag. barrel the cone will cut away some of the length if a smaller diameter section is turned at the rear. This will leave the tenon closer to 1.089” in length with a 0.966” diameter rear section.
 
If its a Panda...follow the Kelbly chambering tips. Works to a T.

I have thread mics and wedges and wires. I bought a threaded barrel insert for a Panda and a Stiller. They are excellent thread gauges.I think the Panda one works for my Bats.
 
MeasuringHeadspace.jpgIf you don't have dedicated ring gages for that particular tenon and have the old barrel, use wires. Don't go by the calculations in the Machinists Handbook, go by what the measurement over the wired on the old barrel measured. Same way on headspace. The original action may have been trued or otherwise remachined somewhere earlier in its life.

Thread mikes are basically worthless for measuring for originality but they are great for duplication of an existing thread, IF the profile of the threads are accurate.

On headspace measuring make an oversized sleeve and depth mikes with your headspace gage, or if nothing else use a fired case from the old barrel. For example make a spacer sleeve that is a few thousants over the tenon diameter and some longer than the tenon. Measure the old barrels headspace then duplicate that measurement on the new one. My measuring sleeve is 0.289" longer that the tenon on a Panda but if I measure the old barrel then duplicate that measurement on the new barrel I'm fine, assuming the old barrel worked as it probably did.

Sumpun went screwy hhere but you get the idea. The black thingy is to duplicate the cone with if the gun has a coned bolt.

Measuring off the tenon directly to the gage is tricky at best.


.

.
 

Attachments

  • MeasuringHeadspace.jpg
    MeasuringHeadspace.jpg
    29.4 KB · Views: 348
Last edited:
Damm Jerry, I use the same thing. It sure takes the Sting out of balancing the depth mic over the headspace gauge
 
I thought I posted pics of my tools. I'm probably older and more shaky than you folks. It was easier to thread the ID of my tool and install a Mitutoyo micrometer spindle in the end. One hand operation.

zsok5x.jpg
One tool is to measure the cone and the other is headspace.
 
Jerry----Cone Gauge

Jerry,


I work with the same type devices you use-----except for the cone gauge. The sleeve is so simple but so very useful.

If you're so inclined, I'd appreciate hearing how you use the cone as well as its dimensions. It appears to be fairly easy to make.

Thanks.

A. Weldy
 
Back
Top