A while ago different methods of “truing” a Remington 700 action were discussed. I mentioned I had purchased some tooling and would be testing it shortly… I bought the tooling from Dave Kiff at Pacific Tool and Die in Oregon.
Previously I had been truing 700 actions in the lathe with considerable time involved. This tooling allows me to do the job much quicker and at a savings to the customer.
The test I did was to machine threads on a barrel stub in the lathe and then screw an unaltered 700 action on to this stub.
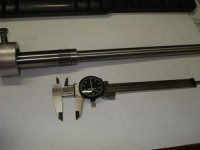
I inserted tight fitting straight bushings in the front and rear of the action in the bolt race way. The front of the action required a bushing of .7015”; the rear was .7025”. I then inserted a ground tool (a long piloted tap) made for those bushings and measured the run out just behind the action as I turned the lathe chuck by hand. It was running out .026”.
I then unscrewed the action and using the piloted tap re threaded the action. It removed threads more on one side than the other. Then I used a piloted cutter that removed a slight amount of the tops of the threads and re-cut the face of the action and the locking lug recesses. I had inspected the recess and the lugs were bearing well but a bit harder on the bottom lug and not particularly smooth.
After this threading and facing operation (done by hand in a vice) I screwed the action back on the threaded stub in the lathe with the same bushings in the bolt race way. I inserted the piloted tool (same as before) and when rotating the lathe chuck by hand found the run out was now less than .003”.
I then set the bolt itself up in the lathe and faced less than .002” of the rear of the bolt lugs. They were quite true. Then I took the bare action and screwed a bolt-facing guide into the action threads. I slipped the carbide bolt-facing tool behind the extractor. It is held there like a shell and I inserted the bolt and the tool into the action and the guide closing the bolt. It is held closed while the bolt facing-tool is pushed against the bolt and slowly turned. This is removed, inspected and redone until the bolt face just cleans up evenly. This assures the bolt face is not crooked to the bore.
Factory 700 barrels can still be used with this method although they require head spacing.
This does not make a 700 into a bench rest action, however it makes it much more accurate with a quality barrel. I feel the end result is as good as setting up and single point cutting in a lathe.
Here are two pictures of the run out, before and after...
Here is one picture of the action with the front bushing still in after re threading and facing.