Has anyone seen this?

Are you saying you can prebore, center up and cut identical chambers in 3 minutes? Without the reamer affixed into a lathe-mounted holder?

In my experience 3-minute chambers are reamed under pressure..... if I'm wrong, please describe :)

If the reamer is already in a holder and “touched off”, yes. Once the barrel is dialed in, tenon is machines and threads fit, it takes about 3 minutes to pre-bore, machine a counterbore, pre-bore the chamber and ream the chamber. The closest to production I get is trying to batch jobs using the same reamer together. If that isn’t an option, I try to batch calibers together. Sometimes it comes together, sometimes not.

Now, this is assuming one of my reamers or one I’ve used before. A new or customer supplied reamer needs to be measured and program written for it. That probably adds about 30 minutes. But once that’s done, I don’t have to do it again.
 
So if I send you a reamer, 3 barrels and an action you can chamber the three such that they'll interchange rounds and share the same die settings and etc....... identical to within a couple tenths????

I might just take you up on that.
 
And furthermore, if I "time" them, ie mark them..... can you make the marks line up? (basically like installing a lettered barrel)
 
So if I send you a reamer, 3 barrels and an action you can chamber the three such that they'll interchange rounds and share the same die settings and etc....... identical to within a couple tenths????

I might just take you up on that.

Because I do not have the ability to qualify finished chamber dimensions to the tenth, I’d never guarantee that dimensional accuracy. But yes, I have no doubt die settings would be the same.
 
Al
How do you measure chamber diameters with pin gages?

I find a size that'll reach down 1/4"-1/2", check the gages for edges and break the corners with crocus cloth or very fine sandpaper if needed, then set them into place and measure how far into the chamber they go


It doesn't "measure" anything per se, but it's very easy to compare chambers for diameter. In most cases comparing depth by holding the rod and marking it with your thumbnail will tell the tale but for heavily tapered chambers or when going for an approximation of actual diameter (like trying to establish whether or not you're cutting to the reamer size) you can get pretty close using a depth gage and appropriate standoff.


Or I make "gages" using 12L40

Or brass

OR, out in the field I simply insert a new case backwards and mark it with a sharpie, or thumbnail it betwixt two chambers.

Headspace is easy but making multiple chambers match diametrically is hard.

I won't live with a chamber that clicks.

BTW, If a person were to try this method, an interesting experiment is to "wiggle waggle" the gage through the compass directions or roll it across the table with an appropriate gage hanging out the chamber end....
 
am thinking

this systrageem might be an advantage to the folks who carry multible barrels with them to matches. For those who only change a barrel evert couple of years, which I think may be the average DYI lad, how would he save any time with this system?

Thanks,

Pete
 
Pete, the bane of my shooting life has been matching dies to chambers...I wear out a barrel and have to start over from scratch

To 99.9% of all shooters this is a non-issue but to those few guys like me who need proper die-to-chamber fit, matching chambers is key.

I started buying my own reamers back in the '80's thinking "this will solve my problems forever"

To quote my friend Waymore..."WRONG!!"
 
Headspace is easy but making multiple chambers match diametrically is hard.


Can you explain why a chamber done on a CNC would be inherently harder to make "identical" chambers than it would on a manual machine?

My prebore diameter, taper and length is identical between chambers. My tool approach to the barrel is identical between chambers. My spindle speed and feed rate is identical between chambers. My peck quantity and depths are identical between chambers. My final HS peck and dwell is identical between chambers on the same action.

It seems to be like doing it on a manual machine has far more variables.

wow,

"where to start?"

First of all, none of the things you listed are relevant to the question and,

secondly, if it were that simple "WHY in 'ELL are there thousands of hours of discussion and a 130pg document on 'various chambering methods' relegated to this single BUTT-simple machining process???"

Do you really think we're all that stupid?

Do you really think all these discussers are trying desperately to get their HEADSPACE to match? Or their T'READS to fit?? Or learning "how to cut the counterbore" ????

That this whole discussion about "pushers VS floaters" and types and fits of bushes and alignment methods and WHERE to mount the toolholder and HOW to mount the toolholder and etc and etc is about how to make 3 holes in a row?
 
I am not calling anyone stupid. You are implying that a chamber cut on a CNC machine produces less consistent chambers than one cut on a manual machine. I am trying to understand the logic behind that. Maybe I am the stupid one?
 
I find a size that'll reach down 1/4"-1/2", check the gages for edges and break the corners with crocus cloth or very fine sandpaper if needed, then set them into place and measure how far into the chamber they go....

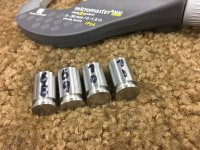
I had a few minutes today so I made some “pin gauges” that should match a datum point at about the halfway point on the body of a 6 or 6.5 Creedmoor chamber. The first one I made got swallowed by a take-off Savage barrel. I made a few more in .001” diameter increments while I was set up.

If I find the time to pull a couple barrels off my inventory barreled actions, and measured which ever of these gauges fits the best in relation to the shoulder, what would you consider an acceptable deviation of gauge stick out between chambers? One thumbnail? One Sharpie mark? Closer?

A precision ball would be better, but I don’t have any in an appropriate size.
 

Attachments

  • B5DF2460-021C-4787-8B61-BB1F3CCD2740.jpeg
    B5DF2460-021C-4787-8B61-BB1F3CCD2740.jpeg
    2.6 MB · Views: 274
what would you consider an acceptable deviation of gauge stick out between chambers? One thumbnail? One Sharpie mark? Closer?

Well, generally 1/10 inch of depth equals a thou of taper in my chambers so for myself, I like the gage engagement to be essentially equal between chambers. When I get a variance of say .050 in depth I can "assume" that there's at least a half-thou (5 tenths) difference....but definitely A DIFFERENCE..... but still, FOR ME the test comes in brass life and interchangeability, ie I only started gaging in an attempt to EXPLAIN poor sizing performance. I started the process over 20 years ago when I had three barrels chambered at the same time and they didn't act the same. One day I lined 'em up and thumbnailed an upside down case down the hole to find out that OOOOPS! they headspaced "within a thou" but weren't all the same diameter...


A precision ball would be better, but I don’t have any in an appropriate size.

I can't see any facility in using a ball, for anything gun-related. Ball mic -maybe??- for casenecks? ....but I'll ALWAYS measure over the bullet anyways because I trust neither math nor measures.... nor bullets nor pressure rings....so WHY do I care??? A properly mandreled cut will show imperfection just as accurately as my fumbley-fingers can mic, plus the inside of the neck is about as smooth and artifact-free as the surface of the moon, and "bridging" ...and thin spots....and smearing... and just WHY???

For ME... this is just my opinion.

The old "balls are better for gaging tapers" fallacy just doesn't work for me. I wasted several dollars and some time trying to make a ball work as a gage for setting cone clearance until finally I set down, drew it up on a sketch-pad and asked myself WHY??? Set your cone angle to anything NEAR 30* and ain't no way any conventional sharp-edged datum measurement can be wrong.... I've still got fitty-hunnerd dollars worth of inch-ish balls kicking about and got ZERO use for em... especially since a lot of my chambers are so big a ball just sets in the hole measuring the broke edge of the chamber mouth....

Only thing you'll gain from dropping a ball into a .010tpi hole is


a stuck ball.


BTW, to add..... I make my datum rods long enough to stick out and be held by my fingers, and I generally concern myself only with that magical ".200 line" on the case. I can't see any advantage to measuring 'way down at the half-way point. If you got wobble, or eccentricity, or uneven reamer pressure, or flex or are trying to crunk into an off-center throat or are off-center at the holder end it'll show up most at the back.

And anyways, that's where cases bust and where the klik occurs


F'rinstance I've got 9 different reamers in .270/.300/.325/.338 WSM all done with the same body, ie .559 @ .200 datum and .010tpi. So I have a 2" long pin at .559 diameter that tells me a lot when I stick it in the hole.
 
Last edited:
Al,
So you've figured out a way that works for you. Good on ya
Seems reasonable that others have their own way that works just as well.
Back when I was building a lot of 1K BR rifles I would order a resize reamer with the finish reamer. I had a set of dimensions that worked for me. I used Newlon 12L14 dies and had them carburized. With a clearance of .0005" after sizing there wasn't room for error. I could swap brass from barrel to barrel with no problems. No sizing die adjustment needed until the brass got old and rigid.
 
Back
Top