Easiest way to true bolt face?

O K guys, Let me level with you on a couple of issues you have shown concern with. I flute my barrels before I chamber and thread and I like to have a flute or a valley straight up. I normally use Pacific Tool's one piece bolts that come with about plus .005 between the rear of the bolt lugs and the bolt face. Then I face the rear of the bolt lugs .001 at a time until I get the desired headspace and the desired alignment of the flutes. For this operation I do what I previously posted. To do any work on a Remington bolt I use my LaBounte fixture indicated in a 4 jaw and checked at the nose end of the bolt. This whole conversation is academic unless you are using an action that has had the mating surfaces of the lugs trued.
 
A facing is a pretty basic machining 101. U sure you want to try this?

Pete

As soon as I figure out how to turn on my lathe ....
Just because I ask for detailed description of others techniques, doesn’t mean I’m ignorant to “basic machining”. There is always a better way
 
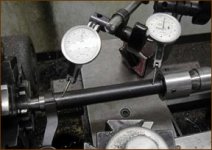
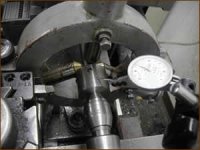
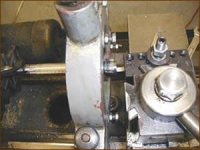
To true the bolt face or lugs in the lathe, you have to make sure that the bolt body is running true in the lathe. I've seen some jigs made for truing bolt faces, that it's beyond me how you tell whether the bolt is running true in the fixture. After years of threading bolt plugs to fit 700's and then turning the bolt around and chucking it up and turning the rear of the plug concentric, I made what looks like a threaded trailer ball in miniature. It's threaded 1/2-13 on one end and a ball on the other. The ball lets the bolt pivot in the chuck. I've been using the same ball for probably 20 years and it looks like it now. But, it still works. You can center the bolt nose on the firing pin hole, but it may or may not be in the center of the bolt body. Instead of centering on the firing pin hole, on the bolt nose end of the bolt there is a fixture that goes around the outside of the bolt nose that has four set screws to move the bolt head around in the lathe. The adjust tru chuck adjusts runout on the rear of the bolt to the minimum for however round or out of round that the rear of the bolt is and the fixture at the front adjusts the front of the bolt to get it running as true as you can get it. The steady rest would be in place with nothing touching the bolt body, but is not in place for clarity of showing how to indicate the bolt in with the first photo. The second photo shows the steady rest in place with a dial indicator resting against the bolt nose fixture to make sure that the steady rest points don't push the bolt out of the lathe centerline when the steady rest points are adjusted. I face bolt faces off under power feeding from the outside of the bolt face in towards the firing pin hole. Then polish the bolt face with a dowel wrapped with 320 grit sand paper to finish off the bolt face. The photos are old photos as I haven't had the lathe in the photo for a number of years. In the third photo, the compound is turned parallel to the lathe bed and turned in to just touch the bolt face. You want to take off the very minimum depth of cut to just clean up the bolt face. Some factory bolt faces are pretty rough and what you want when you are done is a bolt face that is perfectly perpendicular to the bolt body and with a good smooth finish across the bolt face. That's about all there is to it. If you want to center on the firing pin hole, you can make split bushings that epoxy to the bolt body front and back and tighten up the fit of the bolt to the receiver raceway. But, if you are just starting out, I'd wait until you have a lot more experience with your machinery before you go that route.

boltsetup2.jpg steadyrestsetup.jpg boltfacetrue.jpg
 
Mr Bryant, perfect! Great write up and pics. Thanks for the time. Now to get out there with some scrap and try it out.
 
To true the bolt face or lugs in the lathe, you have to make sure that the bolt body is running true in the lathe. I've seen some jigs made for truing bolt faces, that it's beyond me how you tell whether the bolt is running true in the fixture. After years of threading bolt plugs to fit 700's and then turning the bolt around and chucking it up and turning the rear of the plug concentric, I made what looks like a threaded trailer ball in miniature. It's threaded 1/2-13 on one end and a ball on the other. The ball lets the bolt pivot in the chuck. I've been using the same ball for probably 20 years and it looks like it now. But, it still works. You can center the bolt nose on the firing pin hole, but it may or may not be in the center of the bolt body. Instead of centering on the firing pin hole, on the bolt nose end of the bolt there is a fixture that goes around the outside of the bolt nose that has four set screws to move the bolt head around in the lathe. The adjust tru chuck adjusts runout on the rear of the bolt to the minimum for however round or out of round that the rear of the bolt is and the fixture at the front adjusts the front of the bolt to get it running as true as you can get it. The steady rest would be in place with nothing touching the bolt body, but is not in place for clarity of showing how to indicate the bolt in with the first photo. The second photo shows the steady rest in place with a dial indicator resting against the bolt nose fixture to make sure that the steady rest points don't push the bolt out of the lathe centerline when the steady rest points are adjusted. I face bolt faces off under power feeding from the outside of the bolt face in towards the firing pin hole. Then polish the bolt face with a dowel wrapped with 320 grit sand paper to finish off the bolt face. The photos are old photos as I haven't had the lathe in the photo for a number of years. In the third photo, the compound is turned parallel to the lathe bed and turned in to just touch the bolt face. You want to take off the very minimum depth of cut to just clean up the bolt face. Some factory bolt faces are pretty rough and what you want when you are done is a bolt face that is perfectly perpendicular to the bolt body and with a good smooth finish across the bolt face. That's about all there is to it. If you want to center on the firing pin hole, you can make split bushings that epoxy to the bolt body front and back and tighten up the fit of the bolt to the receiver raceway. But, if you are just starting out, I'd wait until you have a lot more experience with your machinery before you go that route.

View attachment 21235 View attachment 21236 View attachment 21237

Thanks, that is exactly what I was trying to say.
 
O K guys, Let me level with you on a couple of issues you have shown concern with. I flute my barrels before I chamber and thread and I like to have a flute or a valley straight up. I normally use Pacific Tool's one piece bolts that come with about plus .005 between the rear of the bolt lugs and the bolt face. Then I face the rear of the bolt lugs .001 at a time until I get the desired headspace and the desired alignment of the flutes. For this operation I do what I previously posted. To do any work on a Remington bolt I use my LaBounte fixture indicated in a 4 jaw and checked at the nose end of the bolt. This whole conversation is academic unless you are using an action that has had the mating surfaces of the lugs trued.

I may not be getting something here, but the only thing I’d do with a Pacific bolt is to either face off the lugs on the bolt or the receiver lugs to allow the one piece Pacific bolt to just go in and close. The more you take off the lugs past that just reduces the amount of primary extraction camming that the bolt and receiver have built in. To get a flute indexed, I take metal off the barrel shoulder to either get a flat straight up or a flute straight up. Any headspacing is done with the reamer and how far it is run in to set the headspace. I’m sure you do likewise and I’m just not reading what you intended correctly.
 
Mike, You are correct. I do set the headspace with the reamer and I face off the shoulder to get a flute indexed the way I want it. However I have been cheating a bit to get several of my rifles as close to the same as I can by facing off a very small bit of the back of the lugs on the bolt which is easier than pulling the barrel. So far it has not caused me any problems and my fired brass as well as my groups are pretty close to identical. I have several squirrel rifles and as my wife and I both shoot, it is important to me to have close to identical chambers. Makes my brass last longer as well and my ammo is completely interchangeable between rifles.
 
The best way to ensure the bolt is true to the spindle centerline is with a collet. Of course, this requires that you remove the bolt handle, but they solder back on just fine--unless you had them TIG'd.

q1mnnl9PdZBDDcJRDwW5gJ1bYgplmvSa2iTWiPMTHK6_dvAOhHcvzNTtNY-XE6gxdpdFhGNEdyKIS8IBJuYIGnP-o_luU-3w0FUGvyXerW5ozd6qZaRzdouLiXUC4_fCSqP64FHvbXZ5ev_xOqoWPGLFg78gESJBv9HA_863To3JdxnTaQ_QBLNupVIhe6zqHiOZ6Lat4Qw_aiqg75bSTcQlRXcdGje5zlO87X4kZrLjDRIqMopDvMPOH7IdRJNZ66iM-rV15RYRBs51ctb9iN5njHG3KYHuWJbchAC4oXbPus-x9A4lJ15LSLDJivP3B3BFIcEavSIL52GqYfcQlidLOHzw3S48nV4EfRBTLYlTVPvwl49_SdmYvoIninDIUb6BN1t6FujDESfBqqHcXvX3PGeAfvFesK3vspGNNbBvg082oEBYAqini4WNuO-zdpMjUEdo9BR8ZNzDXCOMpJUbMK7OWu6udwYcIhcsG-R8G2JnlofRKV5aoBK-qM4mE4s1xyBW_QxyF9zjtNx-PHVnsZW5XDZwAVt2r39UY-Oydm33byvobW-K-xMLUJ7EwIgGIqs6ZILVL4L-Lytepia_M8B_JqoRr5YTzCyAyByTU2X3DpESq6oOcbr_AYblP6X8S1Tv6BiQU9PjVvdH8r-Xa5nzi8ifDw=w1024
 
Really? Those bolts aren't even round, and you still can't guarantee the back end is running true. Enough for me
 
Really? Those bolts aren't even round, and you still can't guarantee the back end is running true. Enough for me

Grabbing the center of the bolt body with a collet has got to be a pretty good average. Considering there’s probably .007”+ clearance between the body OD and receiver ID, any of the mentioned methods are probably going to be equal once ignition takes place.

If the collet method is no good because the rear of the bolt body can’t be qualified, that would mean any method based off the front/rear of the bolt body would also be no good because the center would be out.
 
"Grabbing the center of the bolt body with a collet has got to be a pretty good average"

Maybe average in the middle of the bolt but then both ends aren't necessarily going to run true.
 
"Grabbing the center of the bolt body with a collet has got to be a pretty good average"

Maybe average in the middle of the bolt but then both ends aren't necessarily going to run true.

Every method mentioned is an average, if we agree the bolt body isn’t round and/or straight. We do the best we can with a less than perfect part. Considering the large diameter clearance between a factory 700 bolt body and receiver bore, as long as the bolt face is parallel to the rear of the lugs, and there is room for both lugs to make near full purchase on the abutments, I highly doubt any of the mentioned methods would show better than others on paper or at the loading bench.

Now if you’re doing something to tighten up the bolt body/receiver bore clearance, methods are going to be more critical. Hopefully every op on the bolt done in a single setup.
 
The method Mike Bryant showed is the best imo. I have used it to true bolts in very tight actions and achieve excellent lug contact. If you cant indicate just behind the lugs and in front of the bolt handle your making some assumptions.
 
The best results that I’ve seen accuracy wise is to ream the 700 action with a long piloted reamer opening up the raceway to whatever diameter (I use a.705” reamer) you want and then fit a tight after market bolt to the action. The problem with this though is by the time you go to this much trouble and expense, you’d be better off to use one of the many custom clone actions rather that truing a 700. There comes a point that while it can be made very accurate it crosses a cost effective threshold as to whether it’s worth it or not.
 
The best results that I’ve seen accuracy wise is to ream the 700 action with a long piloted reamer opening up the raceway to whatever diameter (I use a.705” reamer) you want and then fit a tight after market bolt to the action. The problem with this though is by the time you go to this much trouble and expense, you’d be better off to use one of the many custom clone actions rather that truing a 700. There comes a point that while it can be made very accurate it crosses a cost effective threshold as to whether it’s worth it or not.

You are getting up to the cost of some of the dedicated 'BR' grade actions at that point.

My varmint rifle uses a Left port, Right bolt Panda action.

With a .22-250 AI and 6mm Rem AI barrels.
IIRC 26 inches on the .22-250 and 28 on the 6mm.
Jewel 'BT' trigger.
Ounces.
Off a portable bench with a front rest and rear bag.

It is sure death on groundhogs even at longer range.
 
Back
Top