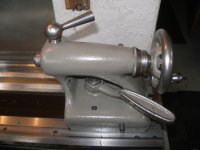
Chambering runout

Chambering runout

I have a very nice South Bend Heavy 10 and for the past few years using my Heavy 10 most of my 6PPC chambers had a runout at the web area of the chamber between .4415 /.4418 which I did not like but was the best I could cut. I tried Floating reamer holders of different types Bald Eagle style pushers and pushing with dead centers. Everything I tried gave me the same results. This past January I decided I was going to find out why I could not cut a smaller chamber. I had already many times checked the lathe bed for both level and twist plus tail stock alignment many times and did the South Bend two bars test chucked up at the headstock and the two bar test between dead centers between at head stock and tailstock. Still always got the .4415 to .4418 or little larger not really very happy.

So the first thing I did was to make me a really nice way to check the tail stock for all types of alignment both for radial and axial plus and most importantly angular. I came up with a two bar and slider ring which really told me a lot about finding the Angular runout which ended up being my trouble with run out. Took me many many hours and days of shimming and even some hand tool scraping to get the tailstock in complete alignment all three ways to under .0005 full travel of the tail stock spindle. The outcome of all this work has really paid off, as I now have cut 5 straight 6 PPC chambers with just using a dead center in the tail stock spindle and getting a runout of .4405 /.4403 best I can check and the last chamber I cut was a 7 LRM with a runout of .5332 (reamer print shows .5530) best I can check Very happy with my outcome.:D:D


Adjusting and checking tail stock alignment using my alignment tool. Chuck up the first half of the test bar at the headstock in the chuck and indicate the test bar to .0001 or less. Then chuck up the second half of the test bar in the tail stock and mic the joint of the two halves and then adjust the tail stock until the joint is true to the test bar diameter. Do this with the tail stock spindle all the way in at zero. Now install the slider ring onto the test bar and move it back and forth should not feel the passing of the joint. (Slider ring should be a very close fit to the test bars .0005 or less.) Now crank the tail stock spindle out the full length and check the joint by sliding the slider ring back and forth should not fill the joint if all is true and no angular is in the tail stock.

Chet
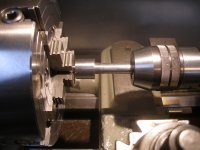
P1010210.JPG P1010211.JPG
 
Chet,
Thanks for sharing, and the pictures.

A friend, who chambers barrels fairly often tried something different a while back. I thought that you might find it interesting. He cut most of the chamber with the back of the reamer on a center, which as you know is a prescription for a well aligned but oversized chamber, if the tailstock is not perfect. Before he finished he switched to a "pusher" that let the reamer self center in the partially cut chamber. The resultant chamber was a very snug fit on the reamer that cut it.
Boyd
 
Hello Boyd

Thank you for the reply. like I said earlier I have tried pushers of different styles and still got the over sized chambers and was not happy. All I know is now I am getting very tight snug fitting chambers at reamer print size and very happy


Chet
 
Chet,
He had not liked the results when he used a pusher all the way. I think that the reason was that the reamer needed more positive guidance until the chamber was established. By holding the back until most of the chamber was cut, but leaving enough to clean up the over size, he got a good result.

Your sharing of your test method was terrific. Sometimes we may think that there is a problem but have no way to properly measure it. You figured that out. Did you read about it somewhere, or did you cook it up yourself?
 
Your sharing of your test method was terrific. Sometimes we may think that there is a problem but have no way to properly measure it. You figured that out. Did you read about it somewhere, or did you cook it up yourself?[/QUOTE]

Hello again Boyd

Long time ago I made a rifle scope alignment tool using my idea of the two piece test bar and slider ring as my alignment tool and it really worked great for me and that is where I came up with the idea for use on the lathe alignment tool which really work for me.

Chet
 
Chambering runout

I have a very nice South Bend Heavy 10 and for the past few years using my Heavy 10 most of my 6PPC chambers had a runout at the web area of the chamber between .4415 /.4418 which I did not like but was the best I could cut. I tried Floating reamer holders of different types Bald Eagle style pushers and pushing with dead centers. Everything I tried gave me the same results. This past January I decided I was going to find out why I could not cut a smaller chamber. I had already many times checked the lathe bed for both level and twist plus tail stock alignment many times and did the South Bend two bars test chucked up at the headstock and the two bar test between dead centers between at head stock and tailstock. Still always got the .4415 to .4418 or little larger not really very happy.

So the first thing I did was to make me a really nice way to check the tail stock for all types of alignment both for radial and axial plus and most importantly angular. I came up with a two bar and slider ring which really told me a lot about finding the Angular runout which ended up being my trouble with run out. Took me many many hours and days of shimming and even some hand tool scraping to get the tailstock in complete alignment all three ways to under .0005 full travel of the tail stock spindle. The outcome of all this work has really paid off, as I now have cut 5 straight 6 PPC chambers with just using a dead center in the tail stock spindle and getting a runout of .4405 /.4403 best I can check and the last chamber I cut was a 7 LRM with a runout of .5332 (reamer print shows .5530) best I can check Very happy with my outcome.:D:


Adjusting and checking tail stock alignment using my alignment tool. Chuck up the first half of the test bar at the headstock in the chuck and indicate the test bar to .0001 or less. Then chuck up the second half of the test bar in the tail stock and mic the joint of the two halves and then adjust the tail stock until the joint is true to the test bar diameter. Do this with the tail stock spindle all the way in at zero. Now install the slider ring onto the test bar and move it back and forth should not feel the passing of the joint. (Slider ring should be a very close fit to the test bars .0005 or less.) Now crank the tail stock spindle out the full length and check the joint by sliding the slider ring back and forth should not fill the joint if all is true and no angular is in the tail stock.

Chet
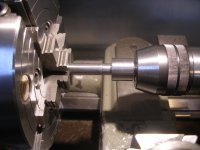
View attachment 19286 View attachment 19287

Are you meaning chamber base being oversize or what?

Same reamer?

Preboring chamber?

Confusing....?? You do know the difference between runout (TIR) and an oversize diameter??

.

.
 
chet, with your setup how much out did you find your tailstock to be? Once you got the alignment where you were happy with it, did you remove the rod in the tailstock drill chuck and remove the MT shank it was connected to, from the quill? Then reinstall? What was the out of alignment after you did that? I'm just curious, as we only hold grills in chunks on my Bridgeport's. On our Machining Centers all drilling is done with drills in collet holders. With drill chucks, drilled holes would always run over.

Like I've said before, pushing a reamer with a tailstock and a floating holder does not make for perfect results. All tailstocks especially on older used equipment are not straight. Not possible, you may get it close in one sweet spot, then be out of align an inch away. There is only one way to get it as perfectly as technically and humanly possible and that's forget about using the tailstock.
Neither is the main spindle perfectly true. On sleeve bearing lathes, you will find the spindles always run down hill in time. There is no way around it.

A tailstock will put side load on the reamer even with a floating holder.
 
Last edited by a moderator:
chet, with your setup how much out did you find your tailstock to be? Once you got the alignment where you were happy with it, did you remove the rod in the tailstock drill chuck and remove the MT shank it was connected to, from the quill? Then reinstall? What was the out of alignment after you did that? I'm just curious, as we only hold grills in chunks on my Bridgeport's. On our Machining Centers all drilling is done with drills in collet holders. With drill chucks, drilled holes would always run over.

Like I've said before, pushing a reamer with a tailstock and a floating holder does not make for perfect results. All tailstocks especially on older used equipment are not straight. Not possible, you may get it close in one sweet spot, then be out of align an inch away. There is only one way to get it as perfectly as technically and humanly possible and that's forget about using the tailstock.
Neither is the main spindle perfectly true. On sleeve bearing lathes, you will find the spindles always run down hill in time. There is no way around it.

A tailstock will put side load on the reamer even with a floating holder.


Tra
You are correct on all of your post. I spent the better part of 60 plus hours working on the tail stock alignment both for radial and axial plus and most importantly angular. I also did as you said removed the chuck and mt from the tailstock spindle and reinstalled it a 3:00 o’clock 6.00, 9:00, 12:00 then remove the spindle from the tail stock and timed it a 3,6,9and 12:00 o’clock. After checking and rechecking many times and lots of lifting the two parts of the tailstock to shim and scrape the lower half of the tailstock. After I got the tail alignment to where I was happy. I then bolted the two parts of the tailstock together with the hole in the up half of the tailstock a little larger in diameter for adjustment if needed later.

Using the two test rods and close fitting sliding ring and checking it with the spindle all the way in and all the way out if there was any error of the joint at all of the two test rods the sliding ring would not move onto the second half,needs more work on alignment. All I can say now is that I am very happy with the results that I am now getting and not going to change anything.:)

Chet

P.s. I was not checking (TIR) (total indicator runout) I was checking (TCR) (Total chamber runout.:rolleyes:
Which some may call oversized.

P1010212.JPG
 
Tra
You are correct on all of your post. I spent the better part of 60 plus hours working on the tail stock alignment both for radial and axial plus and most importantly angular. I also did as you said removed the chuck and mt from the tailstock spindle and reinstalled it a 3:00 o’clock 6.00, 9:00, 12:00 then remove the spindle from the tail stock and timed it a 3,6,9and 12:00 o’clock. After checking and rechecking many times and lots of lifting the two parts of the tailstock to shim and scrape the lower half of the tailstock. After I got the tail alignment to where I was happy. I then bolted the two parts of the tailstock together with the hole in the up half of the tailstock a little larger in diameter for adjustment if needed later.

Using the two test rods and close fitting sliding ring and checking it with the spindle all the way in and all the way out if there was any error of the joint at all of the two test rods the sliding ring would not move onto the second half,needs more work on alignment. All I can say now is that I am very happy with the results that I am now getting and not going to change anything.:)

Chet

P.s. I was not checking (TIR) (total indicator runout) I was checking (TCR) (Total chamber runout.:rolleyes:
Which some may call oversized.

View attachment 19290

Chet, in the end, the only thing that counts is the final results. If your chamber is now truly straight with the other criticle machined surfaces, and truly to size, then you have solved your problem.
 
I know working to make our setups as good as we can is best. But i dont think the small amout you were seeing in your chamber slightly over size would ever show up on the target
Once your brass is made for that chamber it is what it is
 
Back
Top