Action Build Log.

G'day Fellas..


Please also not the lack of reciver threads. If the law hadn't have stopped me i would have also "Thread milled" the receiver thread in this setup to about 80% depth.

Cheers
Leeroy

Pal, what's the law? So far so good, far better than off the shelf Remington body, that's for sure.Rad
 
The Law

Pal, what's the law? So far so good, far better than off the shelf Remington body, that's for sure.Rad

The law in his state here in OZ is that he's not actually making an action until it's been threaded to take a barrel. Leeroy will have to take it to a registered gunsmith to be finished off or the smith could let him do it "supervised".

As for the particular website in OZ. Their access restriction was put in place to keep out the likes of PETA and our local greenies and it's been very effective.
 
Update!

G'day gentlemen..

Well over the last few evenings i've managed to get the bolts started. The turning operations were completed in my lathe at home and at a much more leisurely pace than i would be at work.
I've been going over the drawings this week in preperation for the machining work and i deciding to drop the sako style bolt shroud attachment (push in and twist)and just make them thread in like a remo. This has saved me a lot of time on the machine at work and i'm not realy loosing out on anything.

Heres the pics.

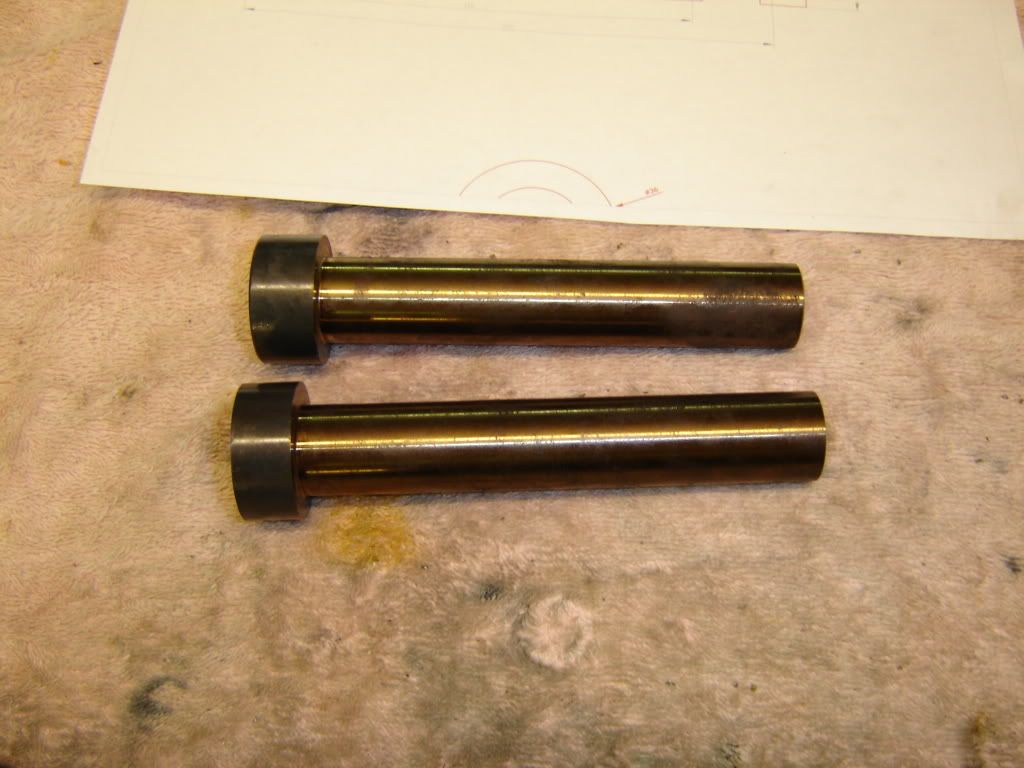
The two bolt's roughed and stress relieved.
IMG_0145.jpg


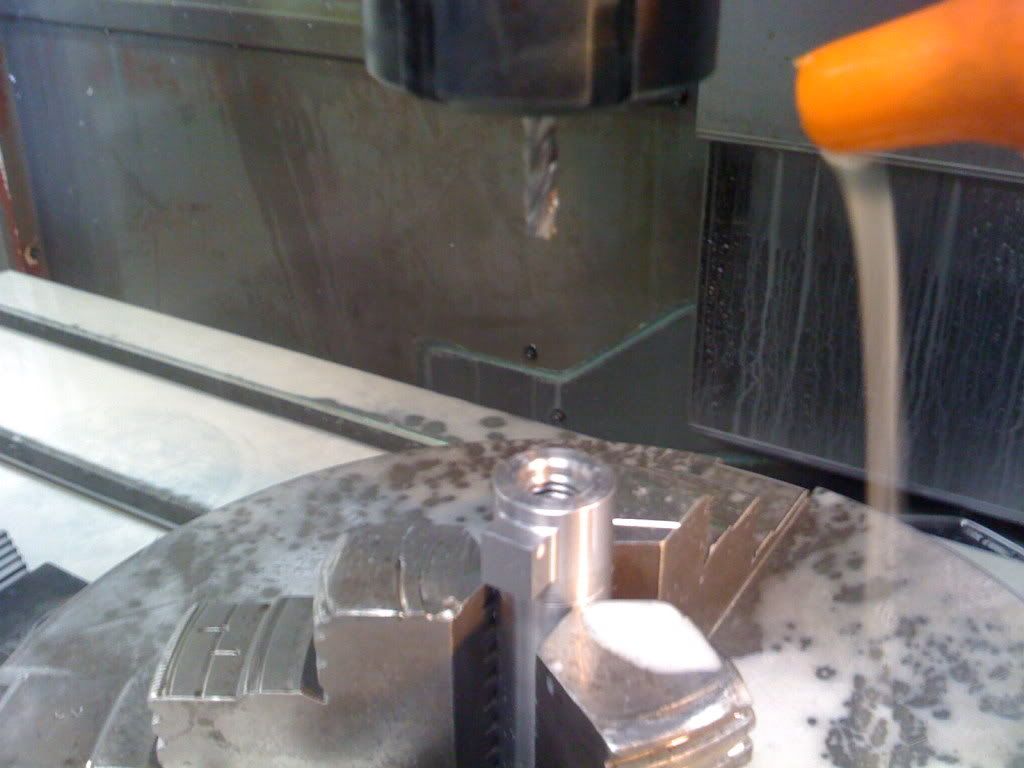
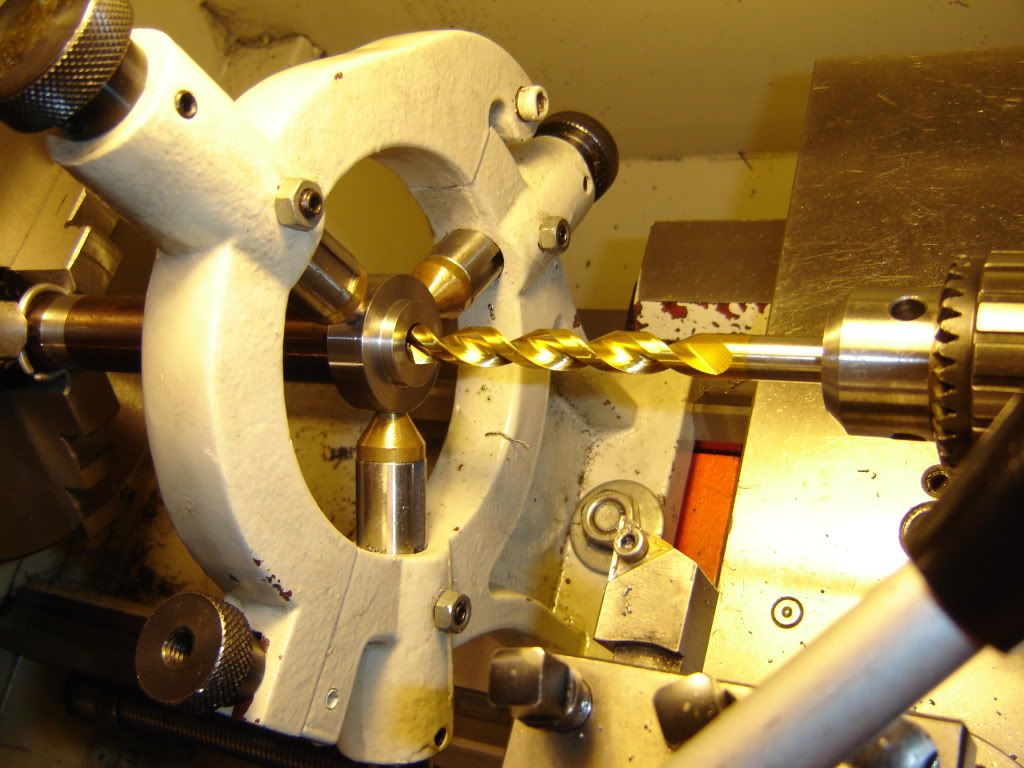
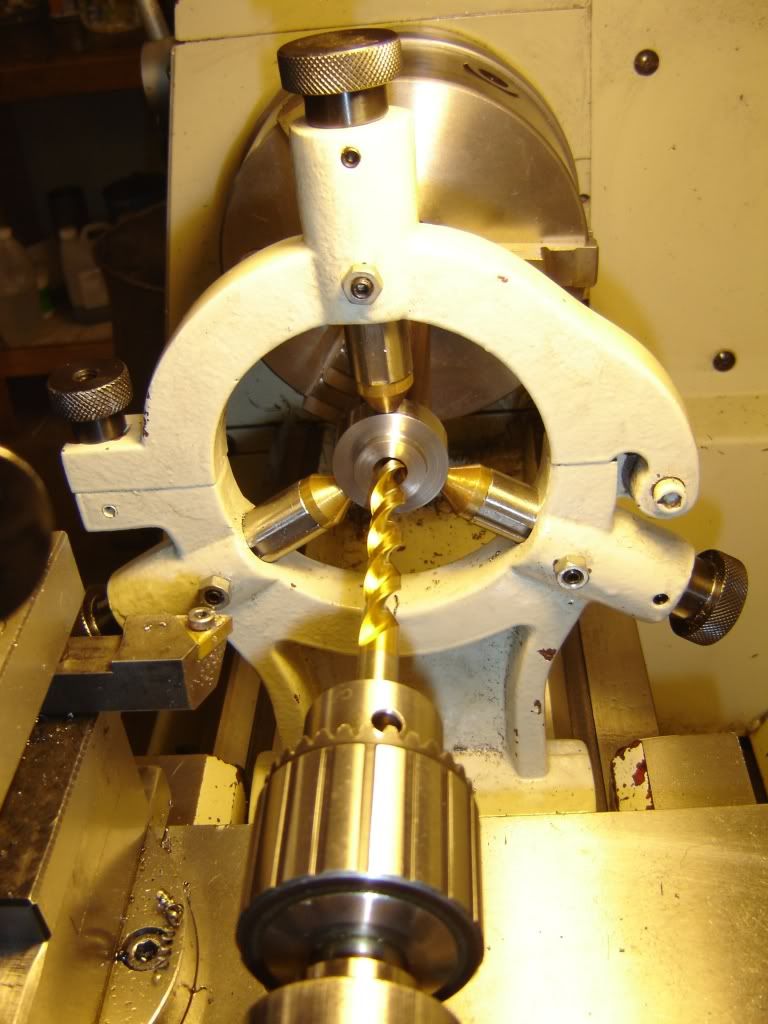
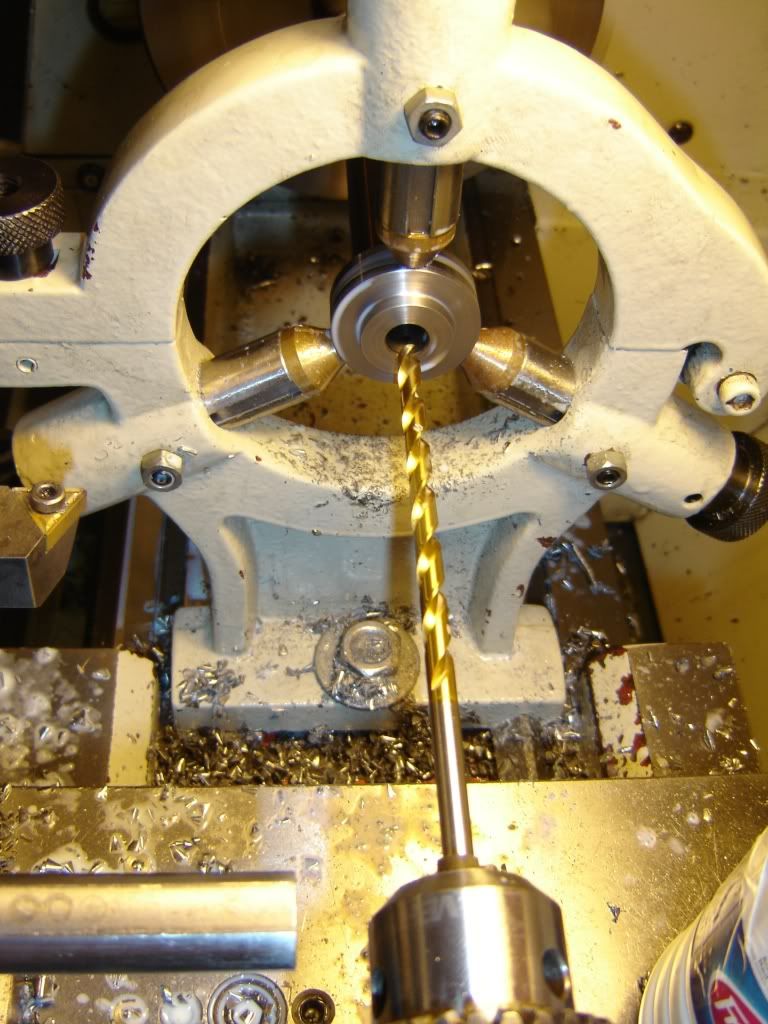
Setup for the rear of the bolt and drilling the large hole for the firing pin to 105mm deep.
IMG_0147.jpg

IMG_0146.jpg


Drilling the small dia hole at the end to 125mm deep.Then tapped to M12 for 30 deep.
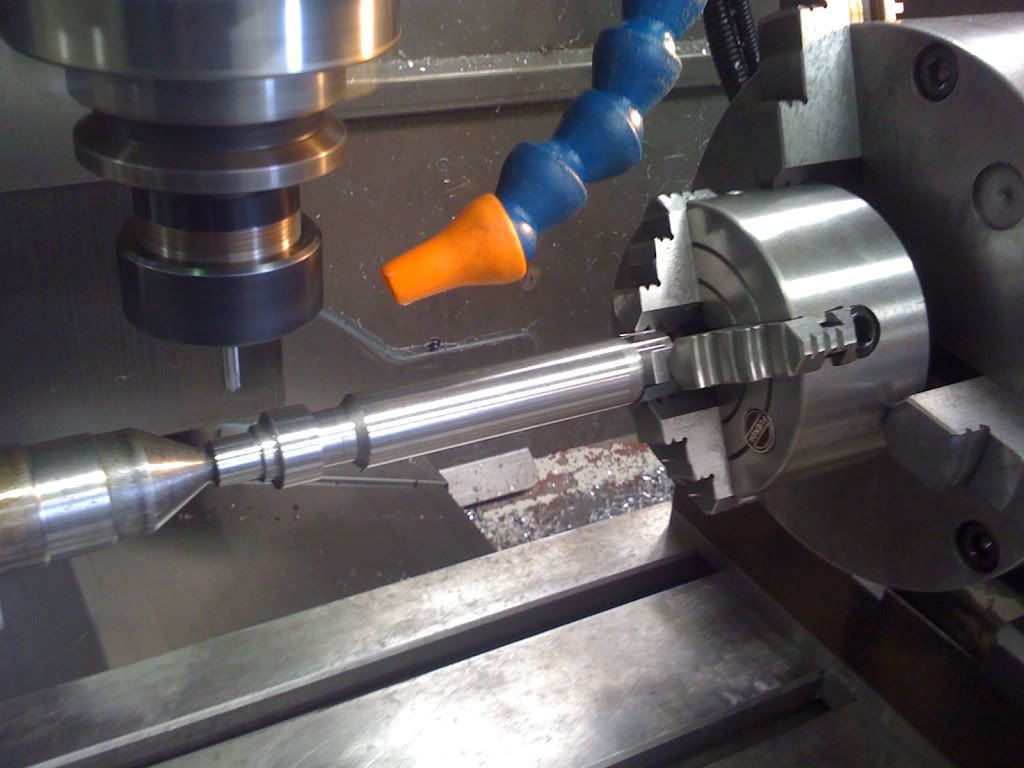
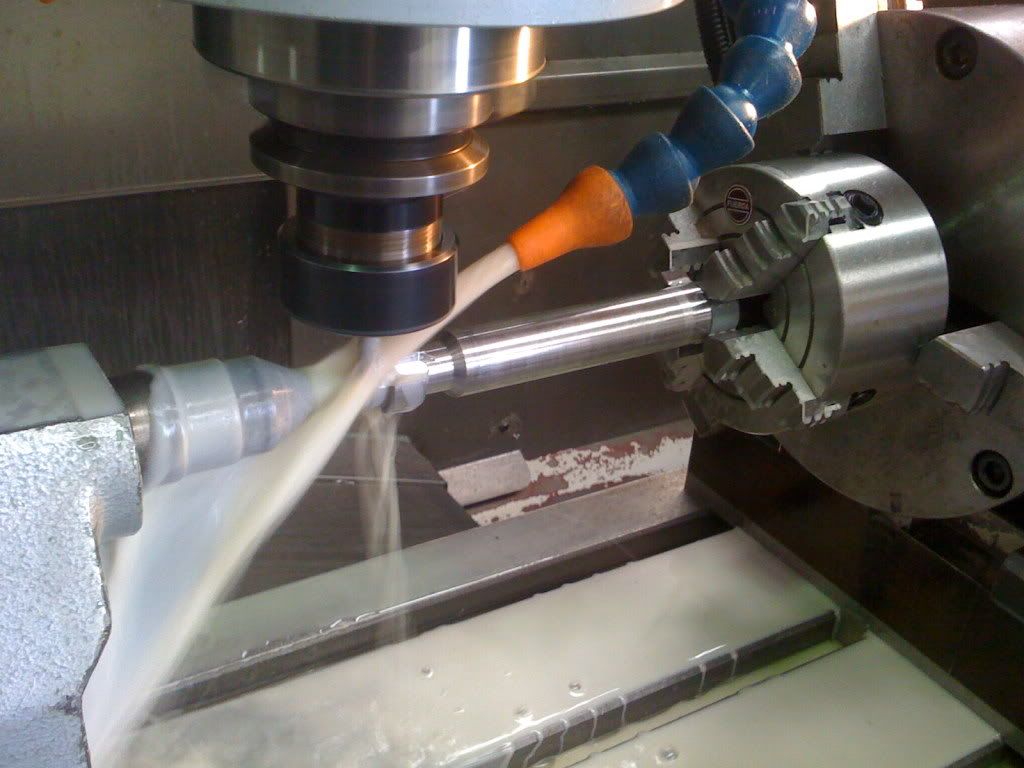
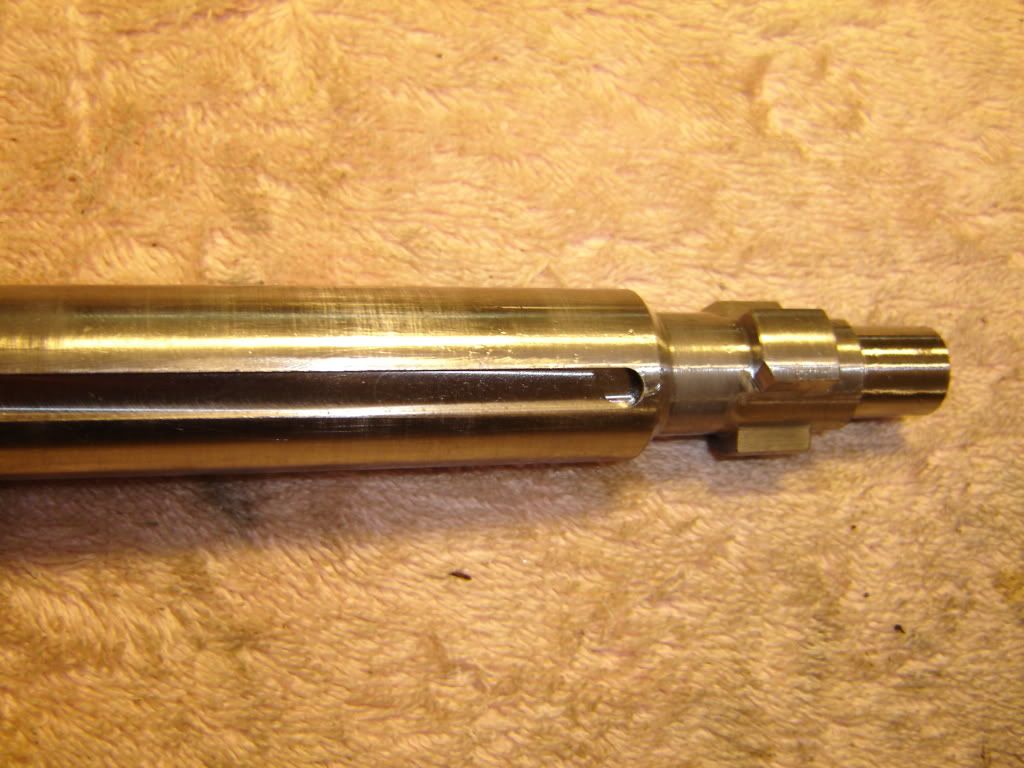
IMG_0148.jpg

One end finished.
IMG_0149.jpg


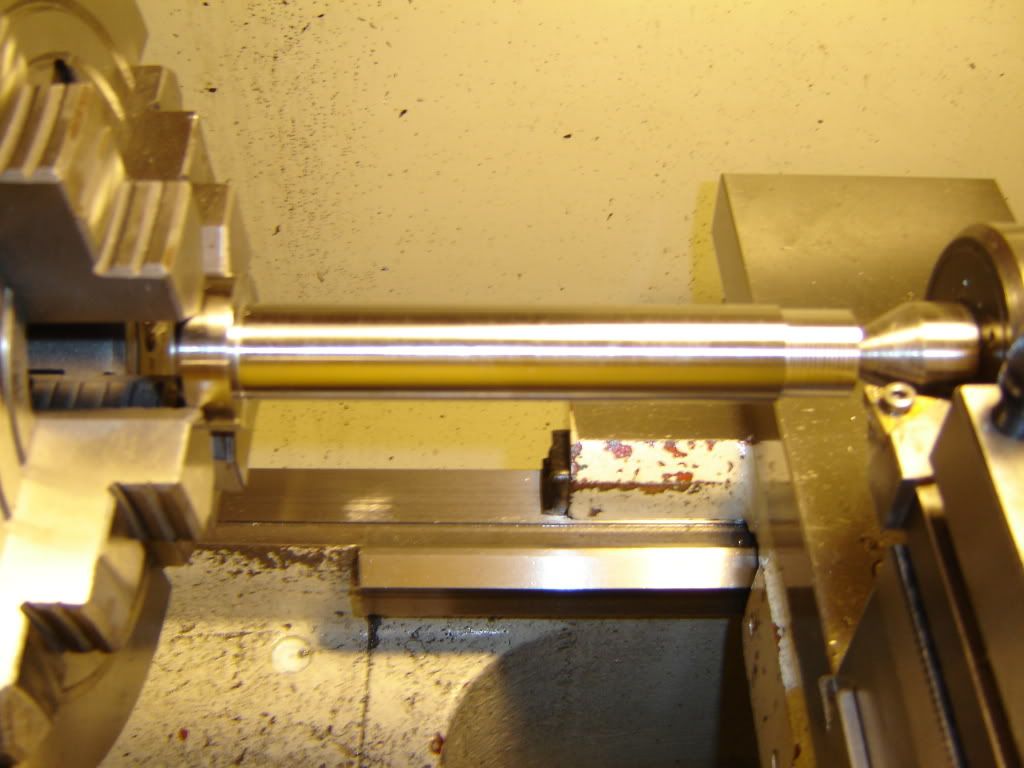
Bolt was then turned arround and dialed up true and the rest of the work done in this setup.
IMG_0150.jpg


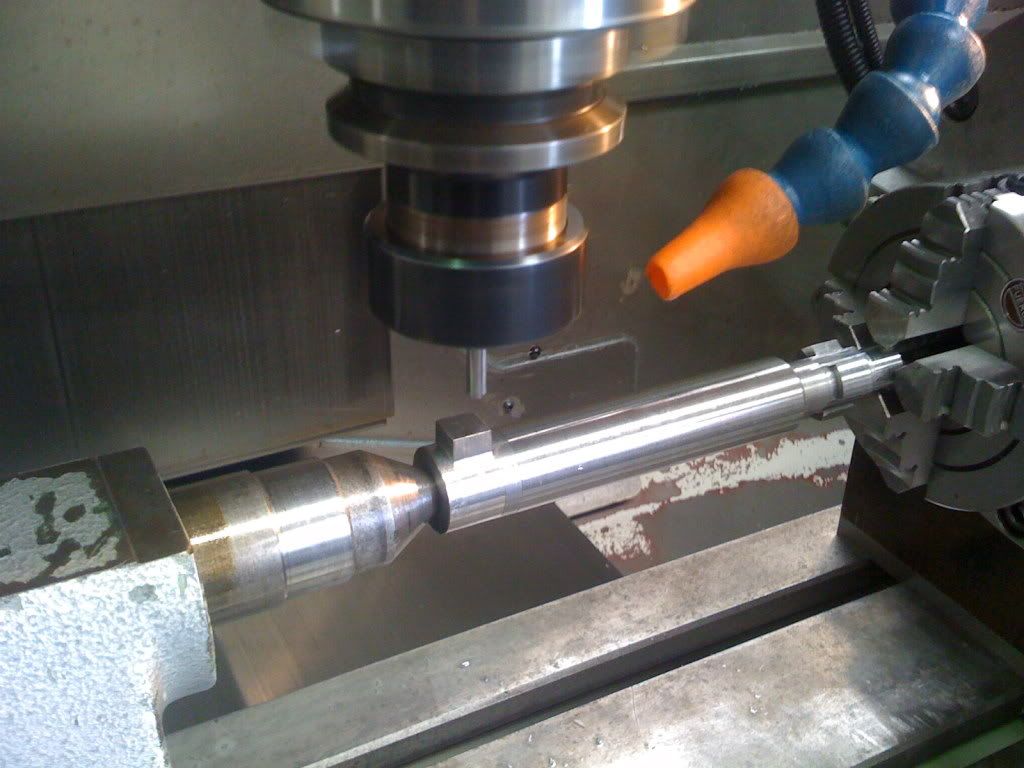
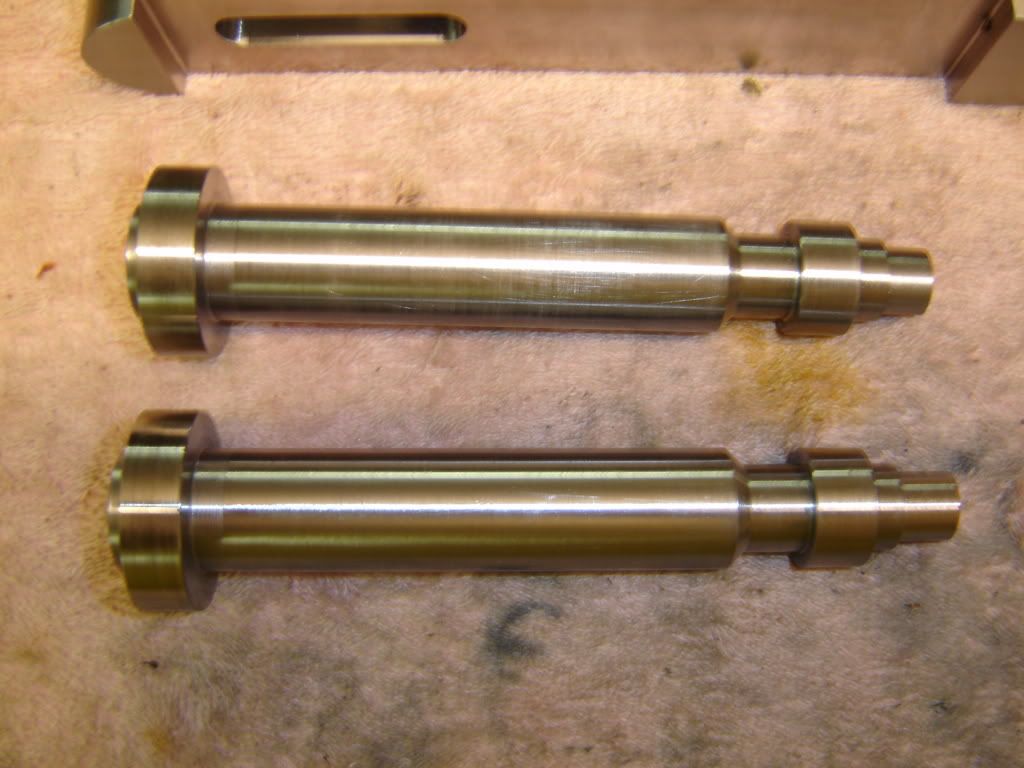
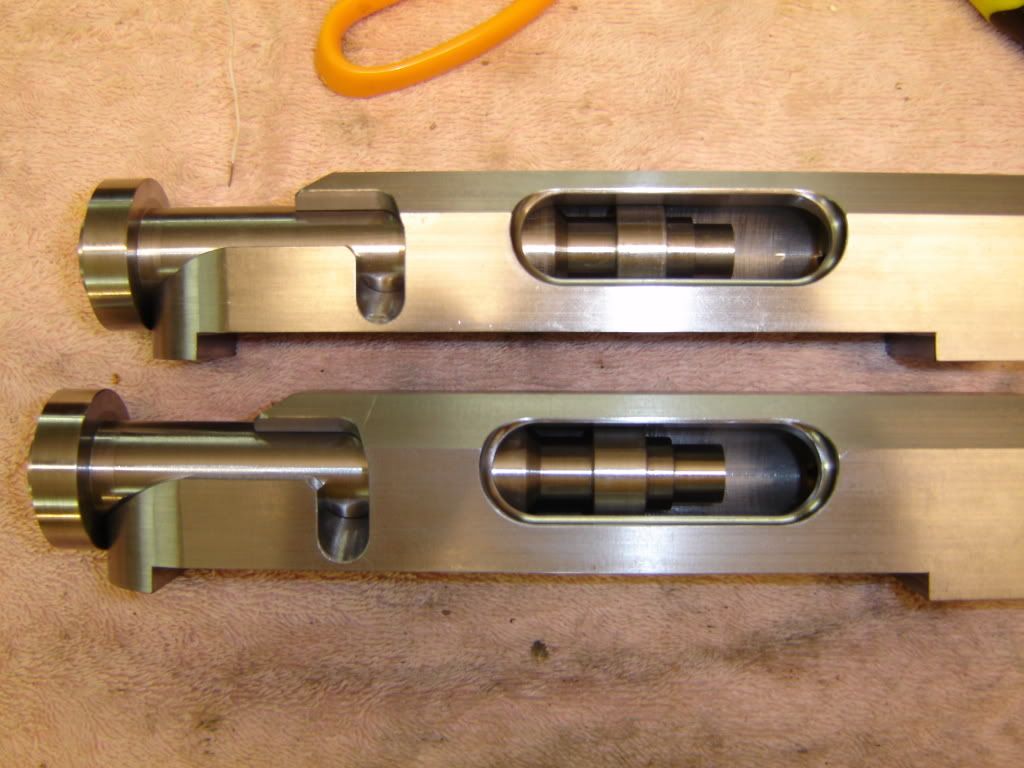
The two bolts with the turning work finished.
IMG_0151.jpg


Fit in the receiver was perfect!
IMG_0152.jpg


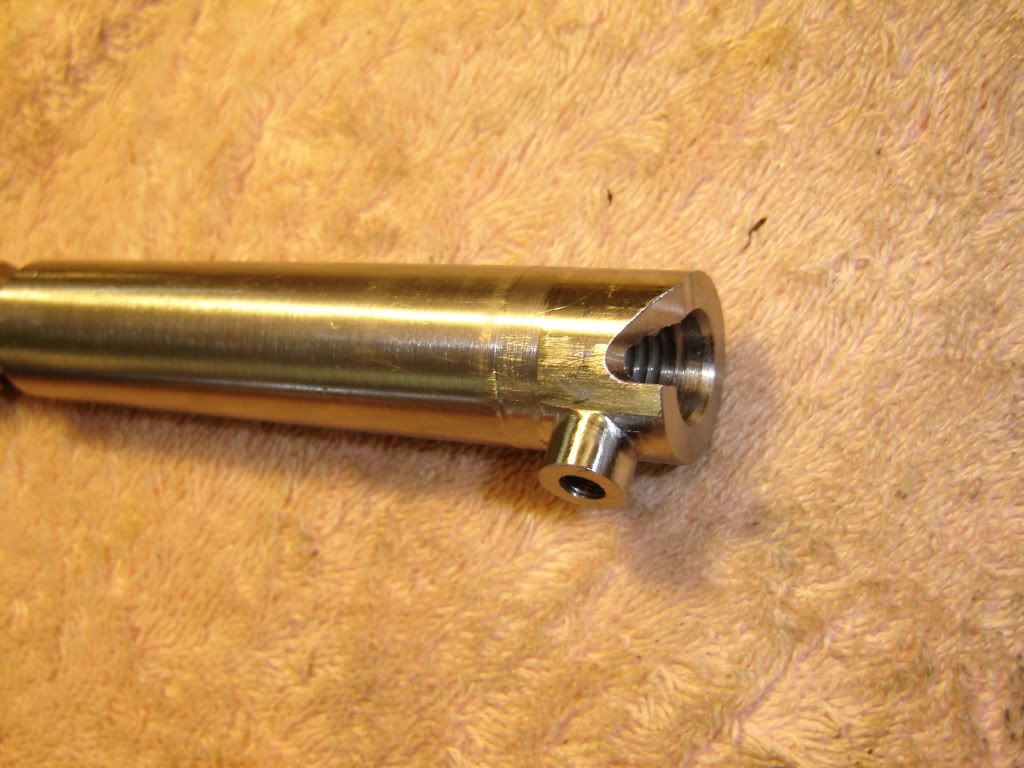
The large flange on the end of the bolt will form the bolt handle stub. About 80% of it will be machined away leaving a cylindrical stub 10mm dia and about 6mm long which will be drilled and tapped to take a longer handle. This stub will also form a very effective safety lug on the bolt.
My next RDO is on Monday week so untill then, thats all folks..

Cheers
Leeroy
 
Mr. Leeroy i appreciate you taking the time to post the pics and the info on your project! Are you gonna take us to the range one day and "we" get to shoot the new action with you??? thanks a lot joe :)
 
Beautiful Work !!

Leeroy, you 'da man. Thanks for sharing this with us. Great photos. Hope this will be an on going series.

Gene Beggs
 
Wow

The joys of CNC Machining.

I feel like I am stuck in the Dark Ages.

This is nice stuff. We appreciate your sharing............jackie
 
I like it. As making a cup of coffee is right at the limits of my handiwork, I dont think I will be trying to copy you. Will you be making any more of these actions?
 
Thanks.

Thanks fellas for the complements. It's nice to have one's work scrutenised buy the people in the know and have it given the thumbs up.. :D

Roo, at this point it's not looking like i'll build any more. My employer has very generously allowed me to use the CNC machinery at work free of charge to do this project, but i think if i went into production he wouldn't appreciate it too much.
He's not realy interested in doing it through the company as its too hard and too much red tape to stay within the law here in OZ.

Cheers
leeroy
 
More Progress

More Progress

I have finished the CNC work on the two bolts. They just need to have the bolt face cut into them and once registered, the firing pin hole will be drilled.


Setup for cutting most of the flange away leaving a small square stub.
IMG_0153.jpg

IMG_0154.jpg


Setup for cutting the bolt lugs and lug helix. I used a small 4J as our 3J dosn't run perfectly true
IMG_0155.jpg

IMG_0156.jpg


Setup for finishing the bolt handle stub and the bolt guide slot. The Tail stock was removed and bolt fitted further into the chuck to cut the cocking helix.
IMG_0157.jpg

IMG_0158.jpg


The finished results..
Still need a good clean up with the jewlers files and a polish to make them look a bit nicer.
IMG_0159.jpg

IMG_0160.jpg


I've go all of next week off work so should get the bolt shrouds and ancilery bits done then,

Cheers
Leeroy
 
Mr. Leroy we appreciate the time your taking to post your project and appreciate you sharing your story with us. Great Skills!! joe:)
 
Mr Leeroy

i am interested in doing a build similar to the one you have here (which is sweet) and i was wondering if you could provide me with some of the CNC files or other drawings you have? i dont plan on building the same one, i want to have the satisfaction of designing and building it myself, but i was hoping to be able to use a remmingon 700 trigger group, as i believe you did. anything you can do to help would be greatly appreciated! thanks!
 
I've been away from this forum for quite a while

but when I started reading this post by Leeroy, I can see that there all still a lot of people still thinking out of the box.

Thanks Leeroy. I've learned a lot from your photos and commentary. They put all the actions into proper perspective.

Again, thanks.

Roy
 
G'day Guys

Sorry it's been a while since my last post here. On the 14th of April 2009 i sent off the paperwork for the actions to my state firearms registry and unfortunatly haven't heard back from them since.:( Despite at least a dozen phone calls to them i still have no idea if my actions will be accepted into the Australian registration system. It seems that while what i have done is technicly legal in my state, they see it as a grey area in the law and so it's up to the "Opinion" of the approving officer weather my actions will be approved or not. The troube is that the "approving officer" has a bit of a reputation as a "by the book" kinda guy and will try and find a reason not to approve them.
So at this point there's every chance that my actions will be confiscated and distroyed if the officer in charge of my case so chooses..:eek: To say i feel gutted is an understatment! :( And there is simply nothing i can do about it.

NateM, as yet the actions are untested and i have still to make the trigger hanger/adaptor for the remington compatable trigger. If the paperwork gets sorted out and the actions get tested and proven to be safe and reliable i may release the drawings for others to use but untill then my conscience wont allow me to publish anyhting..

Cheers
Leeroy
 
Very pretty work

I have loved reading this thread.

Wish I had access to CNC when I built my action.

Then I got a small CNC and found writing G-Code was harder than it looked!

Rob.
 
G'day Leeroy. I thought that this registration thing might turn into a hoop jumping ordeal :(. Only 3 months wait as yet, they are probably trying to work out the difference between a Savage & a star picket.
I wish you very much luck with this rego deal & have my fingers crossed.
Very interesting & good work mate. I hope you dont cop a firearms charge over this. The good ship Aus. has a shocking port list these days & you never really know when your gonna take a dip.
 
WhooHoo!!!

Ok guys i guess it's time to put every one out of there misery. I actualy got my actions back from the armourer over a month ago, all paperwork completed and both registered in my name. :D:D:D:D:D:D Gee it only took 6 months :mad:

The bolts and the receivers are basicly finished and barrels have been chambered and fitted by my gunsmith. I would have liked to have done this work my self but it was a requirement of WLB that they be done by the armourer.
I have been a little off colour over the last few weeks after my dear old grandad passed away (he was 86) and work has (thankfully) gone back to being pretty busy again. Throw in the purchase of a new Nissan Patrol and i've had bugger all time to spend in the workshop.
But i've just returned from a well deserved long weekend away shooting and i feel much better (Thanks Bluey!)..

So there are now some holes left to drill & tap in the receivers and the rest of the parts to make. I should have some time on Monday to make the trigger hangers. I then have to finish off the bolt shrouds, cocking peices and firing pins and fit the sako type extractors to the bolts. Once thats done they are pretty much finished.. I guess i'll have to organise somewhere to test fire them (i can't see the local SSAA range letting me in there to do this.


Cheers
Leeroy
 
Leeroy,
Contact Stuart Elliott, BRT.Com, in Queensland. He lived in Brisbane for many years and can fix you up with a place to shoot.
Butch
 
Back
Top