Trigger Timing Modification Remington

crb

Ray Brooks
Trigger Timing Modification Remington - Update

I have known for awhile that my 40x centerfire is much harder to close than my Vipers. I just assumed that it was due to bolt slop, and possibly some unintended consequence of the Savage bolt head conversion.

Yesterday while messing about with my rebated rim project I noticed that when closing the bolt the Vipers allow the cocking piece to move forward quite a bit before the trigger takes control of the cocking piece. The Vipers have about .200" to .210" of firing pin fall.

I then checked my 40x and the trigger takes control of the cocking piece in the first degree or 2 of bolt closing. This means that the cocking piece ends up sticking farther out of the back of the bolt when the bolt is closed versus where the cocking piece is in the bolt open condition. It measured about .070" out the back of the shroud whereas in the bolt open condition the cocking piece is basically even with the back of the shroud. The Remington had about .280" of firing pin fall.

I decided to try and move the cocking piece engagement surface back about .070 so the firing pin fall would match the Vipers and hopefully this would make a dramatic difference in the bolt closing resisitance.

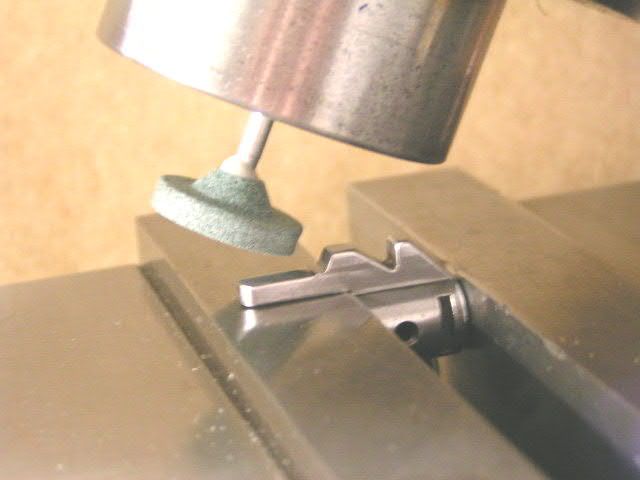
The cocking piece is too hard to cut with a HSS end mill so I had to come up with a way of accurately grinding it and the pic below shows what I came up with. It worked great. I was able to remove just the amount of metal I wanted and the closing force is much better.

I removed the metal in .005" increments with multiple slow passes on each cut. Then radius all the edges with a ceramic disc and polish the new engagement surface and I was done.

If the gun misfires at the match Saturday I will be screwed !!! :eek:

Cockingpiecegrindingcloseup.jpg
 
Last edited:
F/Pin Striker to Sear "HAND-OFF" Timing at it's finest.

Lighten the OEM Rem firing pin by 1/3 it's weight.

Radius the Cocked notch on the aft end of the bolt body for easier bolt manipulation.

Insert a 20-22Lb mainspring to reduce harmonics upon f/pin fall.

Makes for very consistent trigger pull, not dependent on how hard you close the bolt.

The above modifications have been accomplished on my personal OTC & LR Prone Match/hunting rifles that have operated in the arctic in temperatures of +90 to -65 below F for several decades without a mis-fire.
 
Last edited:
Please describe handoff timing.

Thanks
Ray

On a perfectly timed handoff you could lift and lower the bolt handle NOT MOVING REARWARD...... just UP/DOWN and the firearm would be cocked.

Another way to describe it is as you did.... when you close the bolt the striker does not move further back. No cocking force required to close the bolt.

(The depth of the notch on the rear of the bolt does enter into this.)

al
 
After tuning the timing as outlined here, could one then slightly increase the firing pin travel with further modifications? Assuming the cocking piece is not bottomed out in the cocking cam notch, could you take material off of the dry fire stop and an equal amount off of the firing pin tip? And I think that the tip need not protrude more than .050 and less might also work.
Am I ignoring something here or confused about relationships between parts?

I'm also wondering if the cocking piece is through hardened or just surface hardened? Anybody want to sacrafice one to find out? Not me.
 
As I understand it, you want the cocking piece to drop just the tiniest amount as the bolt handle starts its decent. This will prevent a the cocking piece from being slammed into the top lever of the trigger if the bolt is closed hard. If it picks up the trigger before that, it also may mean that you are still on the primary closing ramps rather than on the part of the lug abutments that are perpendicular to the axis of the bolt. This would result in your having to deal with the last of the cocking effort for the firing pin spring as part of the initial bolt closing effort, pushing the weight of the spring up the closing ramps. For this to work properly the cocking piece needs to be held back at the back of the bolt until the leading edge of the rear face of the lugs are past the closing cams on the action abutments that they engage. There are other timing issues, dealing with the position of the cocking cam relative to the lugs, and the bolt handle to both, but I believe that this is the part that you are dealing with.

One caution, I do not think it a good idea to have a long drop onto a 2 oz trigger. I have a Viper, and by the skill of its maker, and some luck in the construction of my Jewel trigger, it hands off perfectly, but so do most of my friends' custom Benchrest actions that have longer pin falls, and shoot as well as mine. For your Remington, I would pick up another cocking piece, and do the fitting for a minimal fall as the trigger picks it up, after making the holding notch shallower as pictured in the previous post.
 
One day I will have to measure the drop on my various actions. The Vipers do drop a long way and this gives the bolt a feeling of almost closing itself. Before I worked on the Remington's cocking piece I used to say that it was harder to close the Rem's bolt than opening the Viper's bolt.

I have often wondered if I was screwing up by reworking the full cock notch on my bolts. With an original notch the first amount of rotation on bolt closing will have the cocking piece moving rearward as the bolt body is moving forward on the lead-in ramps. This would work to delay the handoff and help to make the initial bolt closing a little easier.

One thing you get with the original notch is the cocking piece jumping from one side of it's notch to the other as it breaks over onto the cocking ramp and then into the handoff [ when closing the bolt ].
 
crb-
cocked notch pic-exact mods as I have accomplished,blended to cocking cam.
Roy-
explain your theory.
Jay-
Oem Rem strikers are through hardened,not cased.
 
Dan,

alinwa and Boyd did a good job of explaining above. Timing of cocking action can only be changed by moving the trigger/sear or cocking piece contact position. The mods you listed above will certainly make the action work smoother, but not change the timing.
 
crb,
Some bolts have a very soft or "sticky" metal in the area where you cut the ramp to the cocked notch. A substantial reduction i cocking effort can be gained by flame hardening the ramp/notch with touch up polishing after. I know the handle is soldered on but this is very localized hardening and easy to deal with.
 
One thing I always do is carefully polish the nose of the cocking piece. Every one I have seen has verticle machining marks and polishing these out improves the bolt lift. I also keep this area wet with grease.

On further contemplation I have come to realize that cutting back the sear surface on the cocking piece is required when you recut the full cock notch on the bolt body. Also there is no magic number on how much the sear surface needs to be cut back on a Rem action. Due to tolerance stack what works for one action may be too much or too little for another action.
 
And I think that the tip need not protrude more than .050 and less might also work.

Jay,
I read an article that Fred Moreo wrote about tip protrusion. He said that he had measured the firing pin indention in the primer and the number was .025". He carefully controls his shoulder bump so he doesn't need excess protrusion therefore he sets his at .030" [ iirc ]. The protrusion on my Rem w/Savage bolt head is .035 or so and it has worked perfectly.

On firing pin travel I don't see where you need any excess. When I first did this Savage bolt head conversion I ended up with much less than a std Remington. What I did was move the cocking piece retaining pin hole farther forward on the firing pin.
 
WOW. This mod was a huge success. The bolt closure is wonderful. On par with my Vipers. Of course the bolt opening still sucks.

Leaving my bullets at home was not a huge success. Lots of drama until I figured out the seating depth for the new pills. The gun showed it's potential on the last 2 targets of the day.

Still, I am happy with the handoff timing mod and highly recommend it !!!
 
Does anyone

specalize in this kind of bolt work? I have tried to find text on the whole bolt timing issue and was not able to find anything. What one wants, ideally is for the bolt to lift easily after the rifle has been fired and, if one can pull it off, the bolt to cloes easily as well.

A well known gun Maker worked on a bolt for me and the finished product was absolutely amazing. I wanted to find literature on the HOW to achieve these results but was not able to find anything. It sure would be helpful for the Shade Tree Tinkerer if someone would write down the process or a process for "slicking up' bolt operation on rifles; what to do and not do; how one thing relates to the others and how to make a Silk Purse. A way to make things easier to time would be to have adjustable bolt handles which should be dooable. Instead of afixing bolts by soldering or welding, have slotted , movable handles that could aid in adjustments.
 
I've seen several BAT actions that have a very small, hardened wheel that acts like a cam follower on the front of the cocking piece. This may or may not be on all current BAT actions.
I also have a bolt from a Browning that has this same feature.
Think roller lifters in V8 engines, they work.

Jay, Idaho

:D:D I ordered my TWO LUG BAT this way! Talk about easy-out.....

al
 
The new Farley Black Widow action has a roller on the cocking piece. Jim told me that it lowers the bolt opening effort by a full pound, from five to four. If these little rollers hold up, and I have no reason to think that they won't, they are a major advance in action design.

One advantage that custom actions have is that they usually have just enough firing pin fall to do the job. This usually means that they have less than the ususal factory production action. With similar, or less spring weight, less compression on cocking, and the same bolt rotation (on two lug actions) the amount of total work, and work per degree of bolt lift is less, resulting in less opening effort.
 
Back
Top