Re-locating scope base mounting holes?

B

bigngreen

Guest
I've been wanting to figure out how to set up and re-locate the scope base mounting screw holes and cut to 8-32 on the center axis but can't quite get a method figured out. I have a Brideport mill with a dividing head, I have a couple ideas but I can't quite work them out so I thought this would be the place for some answers on how to set up and get this done correctly.
 
I have redrilled actions, I make a dummy barrel stub, about 6 inches long out of a piece of 1 1/4 straight steel, torgue it into the barrel, and set this in a trued vice, or V-Blocks. Just place a little planer jack under the tang, and secure it with a hold down clamp.

This locates the holes straight with the action's barrel shoulder and threads..

Do not use a piece of cold roll steel, as it might gall in the action. Use something like Stress Proof, or an old unlimited barrel, anything but cold roll.........jackie
 
I've been wanting to figure out how to set up and re-locate the scope base mounting screw holes and cut to 8-32 on the center axis but can't quite get a method figured out. I have a Brideport mill with a dividing head, I have a couple ideas but I can't quite work them out so I thought this would be the place for some answers on how to set up and get this done correctly.

I guess I am wondering about a few things. Why 8-32 and what do you mean by relocating?
 
The 8 is the size of the machine screw, larger than the usual #6s, and the 32 is the thread pitch, 32 threads per inch. Factory actions are notorious for their base mounting holes being out of line with each other and for the height of the tops of their receiver rings being out of spec. as to their heights relative to each other. By redoing the base mounting holes so that they line up with the CL of the action, and are perpendicular to the squared face of the action, scope mounting is greatly simplified. It may be that if the adjustment from stock is relatively minor, that the increase in screw diameter will give enough room to make the correction, perhaps with holes that are enlarged with an end mill, so that the cutting tool does not have as much of a tendency to wander, as a drill would tend to when trying to drill off center to an existing hole. Another approach, that I have heard about, is to mount blank bases with the existing holes, and then finish machining them on the action, with the assembly properly aligned in a mill.
 
Still wondering why the 8-32 and not 8-40 If he has a mill, he canset it up in a vise that is squared up and indicate in the holes with some 6-48's to see if they are indeed off. If he redoes them to 8-40, my reccomendation, he can have the receiver face trued after that and should also have the threads single pointed.
 
OK, some clarification. Sorry about the thread pitch it would indeed want to use 8-40 for base screws and by relocating I mean to correct their alignment to the action and barrel. The main goal it to have everything aligned with the center axis of the action, single point cutting the action face, threads and lug abutments are all under control and not an issue. I want the scope to be aligned with the action and barrel and I figure I would be best served by starting with the base attachment and working up from there, maybe a little OCD but it seems the more I obsess over details like this the easier and better my builds have been shooting.

How do you determine your on TDC, I can understand how to get aligned to the axis but what surface would you indicate of for TDC?
 
A simple method on a round top is to place a steel ruler on the top and with a pointed center in the chuck, lower the chuck holding the steel rule in place on the top of the action. When the pointed center is centered on the round, the steel rule will be level. A few thou to either side and you will see the rule tilted.
 
OK, some clarification.

<snip>

How do you determine your on TDC, I can understand how to get aligned to the axis but what surface would you indicate of for TDC?

OK, I've only done this once, so don't have much experience with it. The way I see it, there are two issues related to TDC:

The first is to align the receiver in the vise so that the "top" is "up". The one time I did this was on a round action so I made a tool that clamped to the bolt raceway and used that to indicat it level. It was a bit of a fussy operation, but I finally got it parallel to the top of the mill table within reason. If I was going to do it a lot, I'd make a better tool. That took care of one issue.

The second issue is to position the mill head precisely over the center of the top of the receiver. This was much easier. I used an edge finder and the DRO to center the mill over the properly oriented receiver. Absent a DRO, use the dials.

Fitch
 
Here’s another option for round actions:

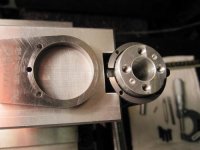
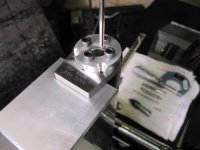
The aluminum block in the attached photos is one I made up for drilling action and recoil lugs for additional pins and reworking scope base holes. It’s reasonably square and the action screw holes are centered between two 45 degree surfaces where the action sets. The action screws holes are designed for countersunk sockets heads and that in addition to the height of the block (long screws) I believe are adequately to align the original action screw holes at bottom dead center. The block is wider than the action so that I can clamp it in the milling vice in just about any position.

Only picture I have is working on recoil lug pins

recoil lug pinning 008.jpg
recoil lug pinning 007.jpg

Bob
 
Bigngreen, the soul purpose of doing this is to cause the center of the scope and center axis of the receiver in agreement.
This allows the scope to function with full range of adjustments. Having the scope functioning on its center is where
they work best. Factory actions are notoriously not true, regarding inside and outside. The insides should be corrected first.
If the scope mounting holes are done without reguard to the thread axis/ receiver face you could actually be farther
off if action work is done later. Absolutely use 8-40 not 8-32. The 8-40 is stronger because the minor dia. is larger. It
will also allow approx .007 more offset if needed in either direction. As Boyd says, do not try to re-align with a drill bit.
Endmills can also wander, so go easy.
 
Food for thought.

On Remington actions how many times has the screw hole alignment been blamed when in reality the issue is with the rear bridge and the scope base. I say this because I have never seen a Remington that I didn't have to put a shim on the right rear corner of the rear base to get it level and parallel with the front base. I picked up on this after installing several Swarovski 6-24's that have very little windage adjustment. The rear base cants to the right and rear, the ring then cant's to the right,the scope then points left and the rifle then shoots to the right. I would invest my time in installing quality bases level and parallel first.

Dave
 
Dave,
What would you think of installing a straight, one piece, base, by first doing an epoxy bed over the rear bridge, with the back screws loose, and the front screws tight?
Boyd
 
Boyd

That would work. I've seen as much as .015" difference in the heigth of the rear bridge from action to action. Anything will improve the situation.

Thinking about the best way to do that I would put release agent on all the screws, action and the bottom of the base. I'd use 5 minute epoxy as I'm not a patient man and use the screws just for alignment not to bottom out the base on the action. Press the base down with light finger pressure to get a completely stress free job. Let it cure over night, remove screws and clean any epoxy on the screws and then tighten the screws. I would would rather have a stress free base system over one that had perfect aligment but was twisted and not torque free. Can you get both? Maybe. Tolerances stack up and we soon reach a point of diminishing returns.

Dave

I also have to wonder about how misaligned bases ending in bent scope bodies affects accuracy. Can't be good.
 
The particular action I'm doing right now is a newer Savage long action. I haven't detected a reason to mess with the base screws but I wanted to be ahead of the curve. All the bases I've mounted have been one piece and I've bedded them all, but I have ran into one that I have to run my optic way to one side, I'm far from out of windage I just wanted everything running as dead nuts as I can possible build it, most likely being a OCD.

I did have one that ate a lot of windage with a factory barrel but after chambering and installing a new barrel I gained quite bit back plus I timed it up and gained elevation as well. Maybe action and barrel alignment has more effect than a screw of a few thou.

Thanks for all the help!!
 
If you are familiar with squaring up a die in a reloading press before tightening the lock ring. The reason for this is that a die can be secured at a slight angle, because of thread slop, and the fact that there is now integral shoulder on the die. The same situation exists with a barrel nut, compounded by the fact that in many cases the facing of the action was done in a imprecise manner. I have the latter from a well known Savage specialist gunsmith.
 
In many cases with Factory actions where the total alignment is in question encluding the situation that Dave Tooley has mentioned,
Burris rings with inserts give us an option. Not only can you put the inserts in for verticle affect, they can also be installed
to allow horizontal corrections.
 
I have installed two piece bases true on out of true actions by using a good set of machined rings mounted on a precision shaft to hold things in alignment while bedding the bases.

After dry assembling everything I remove the bases, epoxy, just start the screws and remount the rings and shaft to hold everything in alignment while the epoxy sets up. Then disassemble remove clean and reinstall screws. It has worked very well but is kind of fussy to deal with.

So being that I love to design tools I drew up a tool that would hold two piece bases in alignment and allow access to the screws during bedding, but before I built it I found an almost identical tool to what I had in mind here.

http://www.basebed.com/

I haven’t purchased or used yet but I agree with the concept as long as the machining is precise.

With one piece bases it’s cake.

Bob

That tool looks like it could work. It took me a couple of minutes to figure out how one would purchase one - I went to the tacticalprecision.com web site in the instructions and finally found the price and a way to buy one online for $64. http://www.tpsproducts.com/index.php?cPath=10 I didn't order one, but I'm thinking about it.

I like the idea of bedding the scope bases to the receiver and leaving the ejection port wide open a whole lot better than lapping rings.

Fitch
 
Fitch,
I have lapped rings that were installed on an integral base. Rings that may have been perfect when they were made, can distort when clamped on the base, not much, but it is there. I have never seen a situation where a light cut with a lapping bar told me that the setup was perfect, even with one piece bases. I suppose that it could be argued by some that if I don't bed all my scope that I have not achieved perfection, but the degree of improvement, in ring interior shape, and ring to ring alignment that I see has been considerable. For my own non benchrest rifles, I have simply switched to Burris Signature Zee rings. I was at the Shot Show where they were introduced, and was able to attend the event where Burris announced them as a new product. IMO they are a really great idea. Over the years, I have been able to use them to correct for both horizontal and vertical alignment issues.
Boyd

That's good input. I've never tried the Burris rings.

I probably should, especially on my .22-250, but it's shooting so good right now, and the throat is starting to show some significant errosion, so I don't want to send any rounds out the muzzle that aren't at ground hogs. I'd like to get two more seasons out of it before I rebarrel it. I just put a new scope on it and very carefully spent 20 rounds getting it zeroed and "calibrated" out to 400 yards. It's shooting 2's and 3's but that isn't going to last more than another couple hundred rounds.

I'll get some of the Burris rings to have them on the shelf.

Thanks
Fitch
 
Back
Top