CYanchycki
Club Coordinator
Cz 452 Completed Pics
My factory CZ 452 shoots just as well as many expect them out of the box. I decided that it must have a makeover. This is something that I want to do and a lot of people are wondering about the final outcome. So here is what I have done and there is some advice I am looking for. It will never be a Anschutz, Feinwerkbau, Win 52, 40X or any of the custom aftermarket rimfires but that is ok. I know it will never be as competitve as one of the previously mentioned but it must be done.
I have a Don Stith pepper laminate stock on its way up. It is coming with his trigger guard which he has had fabricated.

I have installed an adjustable sear. Polished the trigger contact surface and installed a Eric Brooks spring on the trigger as well. It is the lightest that comes in his kit. Tested on a scale it averages at 7 oz. For as simple a design the trigger is it is pretty crisp.
A new barrel is on order. It is a Benchmark 6 groove 16.5 twist in a reverse taper. It should finish at 25" and the muzzle be around the .910-.920 diameter. The shank is going to start at a 1.100". The diameter of the action is around 1.180". I figure this way the face of the receiver can be made true and a shoulder put on the shank of the barrel.
I spent some time on Friday with my 10 year old daughter in front of the tv watching Shrek 3. I love kid movies. While doing that I lapped the bolt with Flitz. The bolt did not slide that smoothly in the receiver nor close very smoothly. When all was said and done it was 100 times better. I also polished the firing pin and did a slight modification to the angle of the firing pin in how it contacts the rim. I sanded and polished down the edges so that it would engage the inner edge of the rim B4 the outer. Taking a page out of Calfee's reads. It is just a firing pin that is easy to replace.
I also took one afternoon while I was off with the help of my doctor to fabricate a larger bolt handle. I am no gunsmith or make myself to be one but I like trying to butcher things. I hacked, angle grinded, and bench grinded the factory ball end off and threaded it to 10x28.

Made my own creation out of 1/2" aluminium rod, drill press, dremel, and sandpaper.

Not bad butchering job I thought for the high tech lathe equipment I used.
Scope rings are an issue for the 3/8 dovetail but I decided on a set of BKL rings in silver. They are cheap and look well made. I could not find anything else.
Ok, this is where you fellows come in. I want some advice on changing the mounting system of the receiver to the stock.
If any of you are familiar with the CZ 452 American, it has a bolt that goes thru the stock and into the receiver between the sear and the plastic magazine acceptor(I just bought this gun this spring) so yours may not be plastic. The second bolt goes thru the stock and is attached to the barrel. The barrel has a dovetail cut in it and a threaded bushing slid into it where the bolt attaches. Since I bedded the factory stock I did away with that attachment. From what I can see it sits rock solid with just the one bolt and fully freefloated. It shot great B4 bedding and great after so I know I did not mess it up.
Here are some pics to help you see what I am wondering.
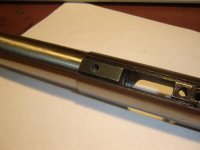
Pic 1
This is the receiver as it is out of the stock with all in place except for the dovetail bushing for the barrel. The hole between the sear and the mag acceptor screw is where the bolt goes that attaches it to the stock.

I am doing this build as a single shot so the mag acceptor will not be utilized. It will look like this.

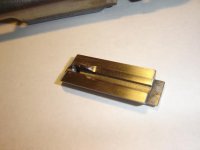
As you can see the small flathead screw is still required because there is a small piece of metal that is held in place by it on the inside of the receiver. That metal sits on siderails on the inside as well as there is a notch milled on the underside of the barrel that the front of it slides into. That metal has a small protrusion at the rear end of it that kicks the spent casing out of the port opening. Here is a picture with the parts sitting in what would be there respective places.

The silver looking piece above the receiver is the metal piece that goes inside the receiver. You can see a slight protrusion out the front of it that slides into the milled cutout on the bottom of the barrel. It fits between the barrel and the receiver.
To avoid milling the new barrel I feel the protrusion can be removed. There is support from the underside by the side rails of the receiver and the one screw that holds it in place. It must stay there because the bolt rides along the surface of it.
Sound good so far?
The thing I am now wondering about is putting a second attachment for the receiver to the stock. The new barrel will be heavier and I may end up with a tuner on it as well.
If you look at picture 2 there is the now front empty hole that used to have the screw that held the mag acceptor. It is not going to be used as I am doing it as a single shot build. My plan is to have that hole retapped to a standard thread pitch of 10X28. This can be used as the second attachment point along with the existing bolt between the sear and small flathead screw.
Sound OK?
Well someone gave me another idea that I was going to do. The thought was why not do as I planned for the front bolt but drill and tap the rear tang for the second bolt eliminating the center one completely. Sounded great to me until someone advised to not do it. I thought hey easier to bed and a wider footprint for stability doing it that way. Problems I was advised about were, there is not a lot of metal in the rear tang area maybe enough for a couple of threads and I could possibly induce more stress into the receiver by bedding it that way. I was advised to just stick with the center bolt and the front bolt. It is quite simple to put a pillar for the front bolt but a little more work for the center. The pillar has to be milled to fit in that tight spot. It can be done as I have done it on the factory stock. Doing it in that manner I was told would be similar to the Anschutz. When bedding the action I was told I should freefloat from the center action back.
What I want to know is how should I tackle the mounting job and bedding of the receiver to the stock?
How about the extractors would you recut the grooves in the new barrel or go with a reverse cone at the chamber end?
I would like your opinions.
Again, I realize this is no BR action but I must see this thru. If it ends up not shooting at least it may look good in the end and I will have learned my lesson.
Calvin
My factory CZ 452 shoots just as well as many expect them out of the box. I decided that it must have a makeover. This is something that I want to do and a lot of people are wondering about the final outcome. So here is what I have done and there is some advice I am looking for. It will never be a Anschutz, Feinwerkbau, Win 52, 40X or any of the custom aftermarket rimfires but that is ok. I know it will never be as competitve as one of the previously mentioned but it must be done.
I have a Don Stith pepper laminate stock on its way up. It is coming with his trigger guard which he has had fabricated.
I have installed an adjustable sear. Polished the trigger contact surface and installed a Eric Brooks spring on the trigger as well. It is the lightest that comes in his kit. Tested on a scale it averages at 7 oz. For as simple a design the trigger is it is pretty crisp.
A new barrel is on order. It is a Benchmark 6 groove 16.5 twist in a reverse taper. It should finish at 25" and the muzzle be around the .910-.920 diameter. The shank is going to start at a 1.100". The diameter of the action is around 1.180". I figure this way the face of the receiver can be made true and a shoulder put on the shank of the barrel.
I spent some time on Friday with my 10 year old daughter in front of the tv watching Shrek 3. I love kid movies.
While doing that I lapped the bolt with Flitz. The bolt did not slide that smoothly in the receiver nor close very smoothly. When all was said and done it was 100 times better. I also polished the firing pin and did a slight modification to the angle of the firing pin in how it contacts the rim. I sanded and polished down the edges so that it would engage the inner edge of the rim B4 the outer. Taking a page out of Calfee's reads. It is just a firing pin that is easy to replace.I also took one afternoon while I was off with the help of my doctor
to fabricate a larger bolt handle. I am no gunsmith or make myself to be one but I like trying to butcher things. I hacked, angle grinded, and bench grinded the factory ball end off and threaded it to 10x28.
Made my own creation out of 1/2" aluminium rod, drill press, dremel, and sandpaper.
Not bad butchering job I thought for the high tech lathe equipment I used.
Scope rings are an issue for the 3/8 dovetail but I decided on a set of BKL rings in silver. They are cheap and look well made. I could not find anything else.
Ok, this is where you fellows come in. I want some advice on changing the mounting system of the receiver to the stock.
If any of you are familiar with the CZ 452 American, it has a bolt that goes thru the stock and into the receiver between the sear and the plastic magazine acceptor(I just bought this gun this spring) so yours may not be plastic. The second bolt goes thru the stock and is attached to the barrel. The barrel has a dovetail cut in it and a threaded bushing slid into it where the bolt attaches. Since I bedded the factory stock I did away with that attachment. From what I can see it sits rock solid with just the one bolt and fully freefloated. It shot great B4 bedding and great after so I know I did not mess it up.
Here are some pics to help you see what I am wondering.
Pic 1
This is the receiver as it is out of the stock with all in place except for the dovetail bushing for the barrel. The hole between the sear and the mag acceptor screw is where the bolt goes that attaches it to the stock.
I am doing this build as a single shot so the mag acceptor will not be utilized. It will look like this.
As you can see the small flathead screw is still required because there is a small piece of metal that is held in place by it on the inside of the receiver. That metal sits on siderails on the inside as well as there is a notch milled on the underside of the barrel that the front of it slides into. That metal has a small protrusion at the rear end of it that kicks the spent casing out of the port opening. Here is a picture with the parts sitting in what would be there respective places.
The silver looking piece above the receiver is the metal piece that goes inside the receiver. You can see a slight protrusion out the front of it that slides into the milled cutout on the bottom of the barrel. It fits between the barrel and the receiver.
To avoid milling the new barrel I feel the protrusion can be removed. There is support from the underside by the side rails of the receiver and the one screw that holds it in place. It must stay there because the bolt rides along the surface of it.
Sound good so far?
The thing I am now wondering about is putting a second attachment for the receiver to the stock. The new barrel will be heavier and I may end up with a tuner on it as well.
If you look at picture 2 there is the now front empty hole that used to have the screw that held the mag acceptor. It is not going to be used as I am doing it as a single shot build. My plan is to have that hole retapped to a standard thread pitch of 10X28. This can be used as the second attachment point along with the existing bolt between the sear and small flathead screw.
Sound OK?
Well someone gave me another idea that I was going to do. The thought was why not do as I planned for the front bolt but drill and tap the rear tang for the second bolt eliminating the center one completely. Sounded great to me until someone advised to not do it. I thought hey easier to bed and a wider footprint for stability doing it that way. Problems I was advised about were, there is not a lot of metal in the rear tang area maybe enough for a couple of threads and I could possibly induce more stress into the receiver by bedding it that way. I was advised to just stick with the center bolt and the front bolt. It is quite simple to put a pillar for the front bolt but a little more work for the center. The pillar has to be milled to fit in that tight spot. It can be done as I have done it on the factory stock. Doing it in that manner I was told would be similar to the Anschutz. When bedding the action I was told I should freefloat from the center action back.
What I want to know is how should I tackle the mounting job and bedding of the receiver to the stock?
How about the extractors would you recut the grooves in the new barrel or go with a reverse cone at the chamber end?
I would like your opinions.
Again, I realize this is no BR action but I must see this thru. If it ends up not shooting at least it may look good in the end and I will have learned my lesson.
Calvin
Last edited: