B
Bnhpr
Guest
Rem 700 action, Krieger barrel, PTG reamer
I cut 1.5" off the muzzle In the 3 jaw first thing, clean up sharp edges.
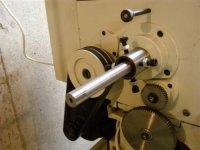
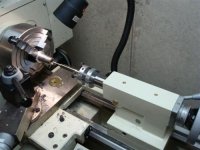
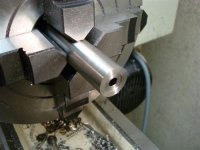
I put a dead center in the tailstock and attach 4 jaw and put the barrel through the spider Breech first, using the dead center to get me in the ball park on the 4 jaw end.
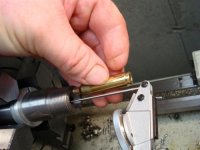
I machined a split aluminum bushing to clamp on in lieu of the shims, and copper wire, I tried those methods and found it sloppy and difficult for me, at least. (see pic)
Lathe was out of gear
I eyeballed the muzzle end the center of the spider and adjusted the spider bolts by hand, until it was in the ball park, all the time, keeping it up on the dead center.
I gently closed the 4 jaws one at a time. The tailstock was slid out of the way.
I dialed in the outside of the barrel with a dial indicator on a mag base, this takes me about 15 minutes to get both ends <.001"
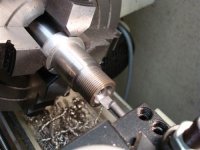
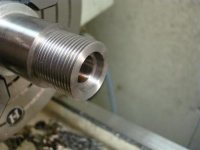
With a parting tool, I removed a 1/2" of the breech to get into fresh metal. I faced it off an cleaned it up with a small chamfer.
I then use a PTG indicator rod an test indicator to get me <.001 as near to the barrel as possible.
I then run my other test indicator with the long stylus up into the throat area. It was very close with no adjustment. I tweeked it, for 30 minutes or so, and removed the indicators.
I tape the rag over the muzzle to catch chips. And set the lathe up with a turning tool. 1.062 dia, with a clean faced shoulder. I use a depth micrometer to determine the length of the turn, adding the thickness of the recoil lug, and leaving .003" clearance.
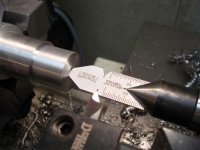
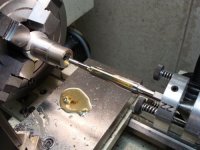
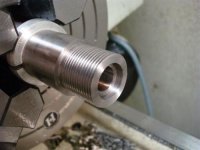
I grind a 60 deg. tool and adjust it in the lathe (see pic) Thread the tenon at 70 rpms as close to the shoulder as I dare. When I approach the calculated depth of thread, I screw the action on with some XX fine lapping cmpd and clean up the threads.
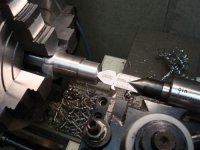
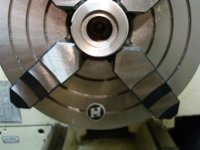
I then put in a boring tool (see pic) and cut the recess for the bolt face. I measure this from the old barrel.
I screw the action on, with the bolt and check endplay with indicator to make sure I still have .003 lug to barrel, and the bolt face is not touching first.
I clean everything up with solvent/air/rag.
I put the test indicator stylus back in and make sure it had not moved. On this barrel, it required a little tweeking. .0005" or so.
I reamed the chamber, with a finish reamer, at 70 rpms with cutting oil, .050 progression. I set the Micrometer stop on the reamer .010" short and work it, with my go gauge to get the bolt to close slightly firm, but not hard.
When i get close, I screw the barrel/recoil lug on with the go gauge in and use a feeler gauge to determine how much I need to go.
This process takes some feel and practice, but I have never had to recut a barrel in the dozen or so I've done. I just take my time and make small progressions.
I turned the barrel around and indicated the muzzle in on the ptg rod to <.001" and face off the muzzle and cut a small chamfer with a sharp tool at high speed, checking for a burr with a Q-tip. Clean up and polished a bit with steel wool...washed with lectra clean.
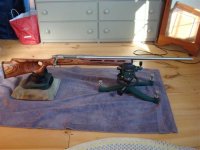
I tightened it all up and put it in a stock.
Shoots hole over hole.
Ben
I cut 1.5" off the muzzle In the 3 jaw first thing, clean up sharp edges.
I put a dead center in the tailstock and attach 4 jaw and put the barrel through the spider Breech first, using the dead center to get me in the ball park on the 4 jaw end.
I machined a split aluminum bushing to clamp on in lieu of the shims, and copper wire, I tried those methods and found it sloppy and difficult for me, at least. (see pic)
Lathe was out of gear
I eyeballed the muzzle end the center of the spider and adjusted the spider bolts by hand, until it was in the ball park, all the time, keeping it up on the dead center.
I gently closed the 4 jaws one at a time. The tailstock was slid out of the way.
I dialed in the outside of the barrel with a dial indicator on a mag base, this takes me about 15 minutes to get both ends <.001"
With a parting tool, I removed a 1/2" of the breech to get into fresh metal. I faced it off an cleaned it up with a small chamfer.
I then use a PTG indicator rod an test indicator to get me <.001 as near to the barrel as possible.
I then run my other test indicator with the long stylus up into the throat area. It was very close with no adjustment. I tweeked it, for 30 minutes or so, and removed the indicators.
I tape the rag over the muzzle to catch chips. And set the lathe up with a turning tool. 1.062 dia, with a clean faced shoulder. I use a depth micrometer to determine the length of the turn, adding the thickness of the recoil lug, and leaving .003" clearance.
I grind a 60 deg. tool and adjust it in the lathe (see pic) Thread the tenon at 70 rpms as close to the shoulder as I dare. When I approach the calculated depth of thread, I screw the action on with some XX fine lapping cmpd and clean up the threads.
I then put in a boring tool (see pic) and cut the recess for the bolt face. I measure this from the old barrel.
I screw the action on, with the bolt and check endplay with indicator to make sure I still have .003 lug to barrel, and the bolt face is not touching first.
I clean everything up with solvent/air/rag.
I put the test indicator stylus back in and make sure it had not moved. On this barrel, it required a little tweeking. .0005" or so.
I reamed the chamber, with a finish reamer, at 70 rpms with cutting oil, .050 progression. I set the Micrometer stop on the reamer .010" short and work it, with my go gauge to get the bolt to close slightly firm, but not hard.
When i get close, I screw the barrel/recoil lug on with the go gauge in and use a feeler gauge to determine how much I need to go.
This process takes some feel and practice, but I have never had to recut a barrel in the dozen or so I've done. I just take my time and make small progressions.
I turned the barrel around and indicated the muzzle in on the ptg rod to <.001" and face off the muzzle and cut a small chamfer with a sharp tool at high speed, checking for a burr with a Q-tip. Clean up and polished a bit with steel wool...washed with lectra clean.
I tightened it all up and put it in a stock.
Shoots hole over hole.
Ben