Best bench info request

Boyd Allen

Active member
A local club that I belong to is going to build a new firing line, and although I have been heavily involved in building some excellent benches in the past, they were a real bear to build, because they were cast in place of one piece, top and base. As you may imagine, the molds were a bit of a task to build, strip, clean, and reassemble. The reason for this approach was that one of the clubs that was involved in the project (of two that paid for the materials, and shared the forms) had approved the design and had a prototype already built, before I became involved, so we were obliged to make more of the same. In any case, I am requesting information and pictures of the best benches you know of, so that we can build the best benches possible. The previous project that I built forms for had limited space on the firing line, but the upcoming project has plenty. The benches that we built do not move, and are about the right height, and shape, although larger would be better, and some other refinements may be called for. In any case, whatever we build, I want it to totally rigid, so that they can be leaned on while shooting, without any movement of the cross hairs on the target. The reason for posting this on the competition forum is that I am primarily interested in the experiences of competition shooters who have shot off of numerous bench designs, although anyone can chime in. I am also looking for things to avoid, so if any designs have issues, I would like to hear about those as well. Thank you for your time.

Boyd
 
The Duke's benches on the Utopia ranch in Texas are by FAR the very best benchrest benches I ever shot on and I have shot at most of the large benchrest matches across the country.
 
I would have to say one of the most versatile and interesting bench's I have ever shot off of is the ones at WWCCA. (Western Wayne County Conservation Club.) The bench are super sturdy, and work well. They have a steel frame and a concrete top, they use a pallet jack and can freely move them around. (But they are super heavy.) My only complaint with them is they are a bit tall, and it take a tall stool to shoot off of them. https://www.facebook.com/photo.php?...691289.-2207520000.1393690965.&type=3&theater here is a picture off of there face book friends page.

I have shoot off of ones with cinderblock bases, ones with concrete poles supporting the tops, and Steel poles. I have to say the best bench's I have shot off of was ones that used steel supports under a concrete top. With the concrete base benches I always find the one that is coming apart and is moving. I have yet to find this problem with a steel bases bench.

Last off don't make the top ultra smooth. St Louis Benchrest club's bench's are nice but they are ultra smooth on top, a little dust and your rear bag will slide. I have to wet the bench down at the area of my rear bag, to keep it to sticking to the top. But super feet stick to them like glue.
 
Last edited:
Here is the website to our club. The bench's there was made many years ago, and they have held up great. They have 3 steel pipe (schedule 40 I believe.) that was laid in a jig, and welded together in a frame, and then laid in a form, and concrete was poured over the frame, forming the top. They are super sturdy, and movable. You will see the in the pictures site of the page.
http://bsrpc.org/
 
Thank Jerry for the compliment. We are in the process of rebuilding our range with 12 benches rather than the original 6.
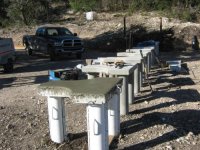
Our benches are poured in place as one piece units. What contributes heavily to the rigidity of our benches is the steel post driven down thru the legs and deeply into the earth before the pour. Then the top has a rebar reinforcement welded up to fit the top profile.
The forms we are currently using were built by Sam. The leg forms are two piece so they can be removed. The top form is also split in the middle so it can be removed. There is an additional removable piece between the front legs so the form will come off from around the legs. It works well since we have been pouring the benches one at a time. (2 old men :rolleyes: )
Our original benches that Jerry referenced were built the same way, just each one was formed up individually.

Joe
 

Attachments

  • benches.jpg
    benches.jpg
    48.1 KB · Views: 491
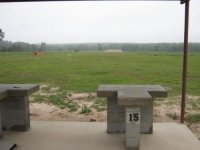
You can also build benches like these. This is Mike Cockcroft's range in Huntsville. Mike built a set of forms and poured his tops right on his slab by spreading a piece of plastic sheeting on the slab. He then built the legs from concrete blocks. I believe he used construction adhesive rather than mortar between the blocks and to secure the top as well. This works nicely when you are building on a slab.
These benches are extremely rigid as well.
Joe
 

Attachments

  • Bench2.jpg
    Bench2.jpg
    20.5 KB · Views: 468
Bench Build

A local club that I belong to is going to build a new firing line, and although I have been heavily involved in building some excellent benches in the past, they were a real bear to build, because they were cast in place of one piece, top and base. As you may imagine, the molds were a bit of a task to build, strip, clean, and reassemble. The reason for this approach was that one of the clubs that was involved in the project (of two that paid for the materials, and shared the forms) had approved the design and had a prototype already built, before I became involved, so we were obliged to make more of the same. In any case, I am requesting information and pictures of the best benches you know of, so that we can build the best benches possible. The previous project that I built forms for had limited space on the firing line, but the upcoming project has plenty. The benches that we built do not move, and are about the right height, and shape, although larger would be better, and some other refinements may be called for. In any case, whatever we build, I want it to totally rigid, so that they can be leaned on while shooting, without any movement of the cross hairs on the target. The reason for posting this on the competition forum is that I am primarily interested in the experiences of competition shooters who have shot off of numerous bench designs, although anyone can chime in. I am also looking for things to avoid, so if any designs have issues, I would like to hear about those as well. Thank you for your time.

Boyd
Boyd
I would suggest you get Mike Ratigans book.
On his chapter on range building he addresses all types of benches both their advantages and disadvantages.

I have built a range with 10 benches done 12 years ago and their all standing with no movement in any bench to date.
They have had a lot of general club use and benchrest matches both rimfire and centerfire.

We used 3 and 1/2 cement blocks (This is perfect height)for the legs which were placed on level cement slab .
We placed the blocks in a " T" configuration under center of projected top but they could be done separately under the corners (I think this way the rear blocks rub ones legs).

We poured the top separately on the cement slab using 2X4 wood forms and used the "T" shaped benches.
Once tops were cured we picked them up with a "cherry picker" and moved-rolled them over legs.
They were cemented to legs using brick-block mortar.

I have no regrets and would build the same way again.
Contact me if you want further particulars or have questions about above.
CLP
 
Last edited:
The Benches at Holton Gun and Bow club are nice.
Heard they would call the local concrete guys at the end of the day and get the leftovers. Tops were free.
The only problem was timing......Maybe Bill Gammon has more info......
 
The benches at the Minnitonka range (Elk River, MN) are my favorite.
There U shaped and the shooter sits in the middle.
Gives a bunch of extra sq.ft of bench-top space for equipment and gear.
Especially for practicing and/or load development.
 
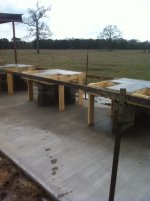
Poured 3 benches today to get my total up to 18. 32 1/2 inches from concrete slab to top of bench. 5 1/2 inch thick top. Form is split in two for removal. Top and block cells are poured together and tied together with rebar. 3 1/2 blocks high to bottom on bench top. In the past we laid the blocks with mortar, this time I glued then together. Worked great and saved a lot of time and trouble. We have set a rifle on benches with a 42 power scope and looked at target while pushing on the benches, no movement of crosshairs on target. The concrete filled blocks and top are one solid piece of concrete.
 

Attachments

  • benches poured.JPG
    benches poured.JPG
    81.4 KB · Views: 448
Last edited:
I can send you a drawing of the forms and how to make them so they can be removed from the bench after a week of drying. Any good quality exterior construction adhesive that is rated for use on concrete, brick or stone veneer will work. I spent a lot of money on the first 15 benches paying a mason to lay the blocks and had several of them come loose from being bumped before they were poured. When we set the forms a week after gluing the blocks they were very strong. Too much adhesive can be worse then too little. A 3/8 to 1/2 in. bead is plenty. The blocks will squeeze out the glue if you use too much. Stack all of them then adjust and straighten them after the top block is laid. They will slide around a little so you have plenty of time to adjust them. After I laid out the blocks on the slab I drilled a 3/8 in. hole in the slab in what will be the center of each block cell. I drive a piece of rebar into the hole tall enough to extend into the form for the top. When you cut the holes where the blocks and plywood meet, cut the hole 3/8 in. over on each side to allow for ease of setting and removing the form and leveling it. After you set them use foam Backer Rod to plug the gap around the blocks. This is very important, it allows you room to get the form off later. The front blocks are two wide so it is basically 8 x 32 inches, do not separate the front blocks, butt them up end to end, also very important.
I cut a sheet of plywood in half so each form starts out 48x48. The side forms are 1 1/2 in. so the finished top is 45x45. Seems to work with any length rifle or rests. Screw everything together so it can be taken apart easily later, no nails. After screwing the four sides of the form together screw the plywood to the side forms, the plywood will square it up. Then draw a line down the center of the plywood and cut the plywood down this line. The line will run front to back down the form, not side to side.
Been trying to post more pictures but cannot get website to take them. Don't know whats wrong.
Mike
 
Send them to me directly (at their full size) at boydallen(at)sbcglobal(dot)net
I will post any that you want, using a free hosting web site and an img link.
Thanks,
Boyd
 
Here are Mike's pictures. Wow! I'm impressed. I used Photobucket and IMG links, copied and pasted into the composition field for this reply.

 
Back
Top