Thread relief on tenon

Jim
So, you are implying that what I said is not true?

Soon will be out of service until Sunday night. Will catch up then

Jim

Not trying to imply anything. Just am really curious how you can get that close at that speed without anything other than a manual lathe using normal tooling without some sort of kick-out device.
 
A small relief does not weaken the thread if it is no deeper than the thread. If it broke at that point, it is because the
loading of pressure is higher there, not because its weaker.
 
A bunch of years ago we had a lathe operator by the name of "Snake" Winegar. When threading he would engage the half nut, lean back and sit down on the work table behind him, jump up and retract he threading tool and disengage the half nut.

He was built like the Old Time Cowboy in Tom T Halls' song Faster Horses, Younger Women, Older Whiskey, and More Money...had to drink a beer to keep his breeches on his hips.

http://www.cowboylyrics.com/lyrics/hall-tom-t/faster-horses-the-cowboy-and-the-poet-12417.html
(click on the right arrow beside the word poet)
 
Will be looking forward to seeing your method.

On the other hand, if Jackie can't do it, I probably shouldn't even think about.

A. Weldy

Actually, I believe Jackie and others here can do it. One of the biggest issues with doing it is "CONFIDENCE". 320 rpm is not actually that difficult.
Set Cross slide handle at Top Dead Center. Touch off threading tool on tenon with compound slide. Set "0" on cross slide for the TDC position.

Advance compound about .015 for fist pass. Position Thread tool about 1/4 inch behind tenon. Put left hand on cross slide handle, right hand on half nut and watch thread dial and throw half nut handle closed when correct mark is aligned and hold half nut handle and watch tool and shoulder and get a feel for when to rapidly rotate cross slide handle ccw and open half nut. Second pass .01 deep, third pass about .01 deep and then measure with thread mic or wires and take final pass to make to size

Jim
 
Thanks Jim

Very interesting. I've never tried such a challenge but the word "CONFIDENCE" says it all.

I'd never try to do this on a good barrel without proving it to myself on some scrap---just kidding about agreeing with Jackie that he couldn't do it.

A. Weldy
 
This weekend I tried it Jim's way. My normal way is to thread at ~150-200 rpm and use a dial indicator set up for ~3/4 revolution to the zero on the indicator with the zero as my disengagement point. I first cut air at 300 rpm to see how quickly I could react to the spinning needle. The fastest I could stop everything was ~.050-.060" of travel beyond my zero on the indicator. At 200 rpm I can stop it in ~.010". With the lathe at a measured 315 rpm and still cutting air I used the tip of the indicator as a stop guide (I rotated the indicator so I couldn't see the dial) and proceeded to see how quickly I could stop everything. At 315 rpm with the indicator tip as a perceived solid object to approach I could shut it down within .005-.010" consistently. With that bit of confidence I put a scrap stub in the chuck and turned a shoulder to thread up to. I tightened the tool post just snug enough to cut a thread without twisting (so if I crashed into the shoulder it would twist out of the way) and proceeded to cut a thread. I was able to cut a thread right up tight to the shoulder that looked just like the one in Jim's picture. Never thought I could thread that fast and never crashed it either. It was much harder to watch a spinning dial attempting to thread at 300 rpm than it was to anticipate a solid shoulder at the same speed.

For an action with a recoil lug where I might want an unturned section for the recoil lug I think I'd just use the tip of an indicator as my stop guide.

All this may be moot for me because my inserted tooling gives great results at 150-200 rpm. I may turn a few more threads at 300 rpm and compare the results later.
 
Last edited:
I thought everyone knew to put an indicator against the carriage when threading. Set it so that it picks up & goes 1 revolution to zero when you kick out the tool.

The other thing to do is to use a magic marker to mark the place to kick out.

Also it helps grind your tool so that the point is set off to the left so that it can run closer without crashing into the shoulder.

With these tricks, threading up to the shoulder is not a problem.

Regards, Ron
 
Actually, I believe Jackie and others here can do it. One of the biggest issues with doing it is "CONFIDENCE". 320 rpm is not actually that difficult.
Set Cross slide handle at Top Dead Center. Touch off threading tool on tenon with compound slide. Set "0" on cross slide for the TDC position.

Advance compound about .015 for fist pass. Position Thread tool about 1/4 inch behind tenon. Put left hand on cross slide handle, right hand on half nut and watch thread dial and throw half nut handle closed when correct mark is aligned and hold half nut handle and watch tool and shoulder and get a feel for when to rapidly rotate cross slide handle ccw and open half nut. Second pass .01 deep, third pass about .01 deep and then measure with thread mic or wires and take final pass to make to size

Jim

Okay, I do it pretty much the same way only I allow tworevolutions past the zero on the indicator to sorta give me a heads up what is coming, but 320 RPM is a bit hard to grasp; I guess I must be a lot older and slower. With the indicator set to a stop where I want, I can usually come within .002-.003 of where I want to withdraw. Sorta like when I was younger and a Catholic using their method.
 
Jim

One of the key things for me to be able to do it was when I QUIT using an indicator. I watch tool and shoulder and found I was more consistent doing that than with indicator. I have found that the carbide fullform tools cut awesome threads if run fast enough and 320 rpm is about lowest speed I get "shiny" smooth threads. If I run in cnc on 416 stainless, then I use 1000 rpm.

Jim
 
What I attempted to convey in my previous post was that at 300+ rpm I couldn't use the indicator and if I would have I'm sure I would have crashed into the shoulder. Somewhere upwards of a 200 rpm spindle speed that needle started flying faster than I could reliably track it. By watching the shoulder I could stop it just short of crashing and do it consistently. So after my little experiment I agree fully with Jim, If you need to thread at higher speeds ditch the indicator and watch the shoulder.

Jim, I appreciate your input. It's always a fun challenge for me to see or have someone describe something and get out to the shop and try it.
 
Last edited:
OK, guys and gals, heres the deal about high RPM threading on a manual lathe. You can use proper geometry HSS threading tools, either hand ground or in insert form and get good barrel threads at about 80-140 RPM. You can get good threads with a carbide insert tool but to get great finish it takes about 250-350 on most applications, OK??

If you crash the tool into the shoulder, or worse, into the chuck, your little ChiCom lathe at those speeds, the repair will be about equal to buying a new lathe. Most of those, or any small tool room size lathe for that matter you will suffer more damage than several barrels cost!!! Plus, you might injure yourself in the meantime. If you think it is worth it have at it, just don't just come running back to the forum with a sad story!!

I taught Machine Tool Technology (fancy college name for Machinist) for 10 years and I pretty much know what a just-in-training person is capable of and it ain't threading at 300+ RPM
 
What do you see wrong in threading upside down and backwards with a camlock chuck at 200-300 rpm?
 
Jerry, if the bottom gibs are tight, (that is what keeps the carriage from rising), then nothing.

When we bore in a lathe where there is considerable overhang, more times than not, we run the tool upside down, usually off the backside............jackie
 
I have no intention of seeing how fast I can thread... many years ago I did smack into the shoulder and after all the re-machining, etc. I decided I can do a better job a bit slower and have no worries. I am never in a rush anymore...
 
What do you see wrong in threading upside down and backwards with a camlock chuck at 200-300 rpm?

None,,There is no upside down these days. Cutting with the tool on top so the chips can take advantage of gravity is really the preferred way to machine, It's just a bit awkward to most folks.

Something to keep in mind is that the backside of the thread is the most important and needs to be the smoothest. When you are at 29.5 and taking deep cuts you are leaving steps on the back of the thread. You can take it out with a spring pass, but that can be hard on tooling. It's not unusual to see some take 10-20 passes and a couple of spring passes to cut a thread this size.
 
?

What is a negative helix??

Aside from that, the insertsI use are identicle on both sides, just stick them in a right hand holder turned upside down, and of course, run the lathe in reverse.

As for threading at 350 rpm, I do it because that is where the TiN Inserts I use cut best.......jackie
 
What is a negative helix??

Aside from that, the insertsI use are identicle on both sides, just stick them in a right hand holder turned upside down, and of course, run the lathe in reverse.

As for threading at 350 rpm, I do it because that is where the TiN Inserts I use cut best.......jackie

I've seen pictures of your thread tooling. Aren't they TNMC type inserts or are they something else?

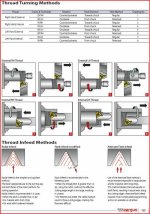
If you run what most would call laydown type insert thread tooling and using an inserted left hand toolholder used to thread away from the chuck cutting right hand threads you would need to run a negative helix anvil in the toolholder under the insert so the helix angle is correct. My mistake in my (narrow) thinking was that everybody running inserted tooling would be using laydown style inserts.
 

Attachments

  • Thread Turning Methods 2.jpg
    Thread Turning Methods 2.jpg
    71.7 KB · Views: 194
  • Thread Helix Angles.jpg
    Thread Helix Angles.jpg
    61.7 KB · Views: 181
Last edited:
None,,There is no upside down these days. Cutting with the tool on top so the chips can take advantage of gravity is really the preferred way to machine, It's just a bit awkward to most folks.

Something to keep in mind is that the backside of the thread is the most important and needs to be the smoothest. When you are at 29.5 and taking deep cuts you are leaving steps on the back of the thread. You can take it out with a spring pass, but that can be hard on tooling. It's not unusual to see some take 10-20 passes and a couple of spring passes to cut a thread this size.

Parson me as Im still learning...Is a spring pass where you make more than one pass without changing the compound?
 
Back
Top