Tapering a straight barrel.

adjustable centre

why not take 2 hours and make your self a adjustable centre then you
will have the best of both worlds. no need to move the tailstock
and you can cut it in one go between centre's.
also when you have cut the width of your tool holder you can place a piece of brass stock in the tool holder on the other side of the tool post about a thou off the barrel and that will take away the vibration.:D

regards tasy_ted
 
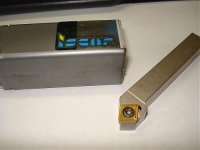
Bill, How does this tool look for 4140? (see pic)

The far end I ground to thread to a shoulder (tenon)

My main concern is chatter and/or the barrel climbing the tool. It sounds like that may not be a problem with a 1.25x30 piece of 4140?

I may try the offset method, and should know quite soon if it will not work, then, I can go back to the compound rest if I have to.

Thanks everyone.

Ben
Since Bill hasn't answered yet, I'll give you my opinion. For most any material being turned on a lathe, there needs to be a chipbreaker mainly for safety. Long stringy chips can become wrapped up in the chuck or on the workpiece. In effort to get rid of this long stringy, razor sharp, mess, many people become seriously injured.

The tool you show is a traditional tool grind from many years ago where the main materials turned were cast, mainly cast iron. Cast materials do not generate the long stringy, very sharp, chips mentioned above.

The chipbreaker would be a groove along the cutting edge instead of the flat slope shown. The groove curls the material back on itself and breaks the chip into manageable small pieces.


Yeah, I know, it's dangerous. I only use a sharp tool if I have to, and I stop the lathe and clean it off with needle nose often. I usually use Iscar tools for turning, especiall tough materials. They have a chip breaker. For barrel steel I just want an idea of what kind of tooling works best. I'd rather not find out after ruining a barrel.
 
my sense of adventure

....went out the shop window the first 3 hours of tapering a heavy contour down to about a #4 Sporter a couple years ago.:D
I'm SURE it could be done better than the way I did. I'd like to see how the barrel factorys do it so fast and cheap [what,,$30 extra I think?].
 
Yeah, I know, it's dangerous. I only use a sharp tool if I have to, and I stop the lathe and clean it off with needle nose often. I usually use Iscar tools for turning, especiall tough materials. They have a chip breaker. For barrel steel I just want an idea of what kind of tooling works best. I'd rather not find out after ruining a barrel.

As long as the tool is positive rake and as a free cutting action you will not build up stress in the barrel. Bulldozing metal off with many of the carbide insert tools will heat the barrel and build up stresses...even with flood coolant...stress is not good in a gun barrel.
 
Ben,
How does the tool look? Not worth a damn! I should figure out how to do pictures. I'll try with words.
Viewed from the top, the tool will have a leading (cutting) edge angled at about 15 degrees. The leading edge clearance should be sufficient to allow the fastest feed rate you might want to cut. The end of the tool will have clearance. Let's call it 5 degrees for those who must quantify things!
Viewed from the front, the tool will have a nearly knife edge with a "U" shaped groove approximately 1/8 inch across right behind the cutting edge and parallel to it so the cutting edge will be quite fragile in appearance. This is what I mean by a modified chip breaker. It's not so much a chip breaker as a chip curler. 416 stainless is a bit problematic in that the chip is likely to be stringy. When the feed and speed are right though, the chip should curl nicely and you can break it off when the chip is about 4 to 6 inches long (use a pair of pliers for this or a hook). A pretty good feed rate gives a better chip.
I have ground tools out of brazed carbide tools butthe carbide IS fragile so High Speed Cobalt works better. Coolant is good if you have it. The tool will last a lot longer.
Tools ground from Atlas Sabre will usually turn a couple of 1 1/4 Chromoly blanks to a #3 contour before sharpening is required. Stainless, though usually a bit softer, is harder on the tool and one barrel per sharpening is about it. This is with no coolant. With coolant flooding the tool, tool life is tripled.
I have used this type of tool (but with carbide) and setup for general machining as well when turning a long shaft or tube. A 6"x 5 1/4" tube eight feet long is a lot more prone to chatter than a 30 inch barrel. Even worse since the material is seldom stress relieved and wants to warp.
Tapering a barrel is really no big deal and is something most gunsmiths used to do as a matter of course.
I got this tool form from a Kamloops BC gunsmith named Art Bourne. Art got it from a Saskatchewan barrelmaker named Al Petersen who got it from Ackley or so I was told. Anyway, it works fine.
If a barrel shows a tendency to warp, that means it was improperly stress relieved. If this is the case, stop turning! While it isn't possible to do a proper job of stress relieving without a proper furnace, you can do reasonably well in the kitchen oven (this technique is best timed to co-incide with a day long shopping trip by your partner). Just throw it in the oven, turn it up as high as it will go and leave it for 5 or 6 hours. Then turn off the oven and remove the barrel(s) the next morning. While there will likely be some stress remaining, it will be much improved and it should be possible to do the job. Once again, this isn't something you are likely to run into; especially since you are not turning it down that much. Regards, Bill.

I'm trying not to be a pest, but would you mind grinding one and posting a pic?

Otherwise, here's what I'll probably use.
 

Attachments

  • DSC01458.jpg
    DSC01458.jpg
    17.9 KB · Views: 557
Don,

I'm with you on this. Trying to cut a barrel taper hand cranking and re-setting the compound for the length of a rifle barrel is not my idea of a good way to spend an afternoon. A few tips, or ideas if you will, about some of the recent comments on this process:

Don't worry too much about cranking the tailstock over. Place a dial indicator on the base of the tailstock and measure to the body of the tailstock. Set to a zero. Use the dial indicator to set the tailstock over to the needed taper - do the math or consult your machinist's handbook as to the amount needed. When you are done, just crank the tailstock back to original zero using the dial indicator. You need to check tailstock alignment periodically, anyway, so get used to doing it.

Another handy lathe item is a micrometer offset tailstock. Simply get a boring head, mount it to a morse taper shaft that fits your tailstock and mount a center in the boring head. Now you can offset your tailstock center very precisely using the adjustability of the boring head and never have to set over the tailstock again. This is a bit more expensive, but worth it if you do a lot of taper work.

You can make a 60 degree center cut in the end of a barrel in order to turn it, and if it is a new barrel which is going to be crowned anyway, then that is an OK way to go. The center may get wallowed out a bit when turning a taper. I usually make up a brass button that goes between the live center and the barrel. This is a short bore fitting pilot that has a shoulder and then a 60 degree center cut into it. This allows a finished barrel to be turned without damage to the crown, although I usually re-crown anyway.

I like a tool with a very sharp edge and positive rake and prefer a heavy cut but slow feed to peel the steel. This puts the force of the cut against the headstock and doesn't flex the work as much. I believe it also keeps the heat down.

Your lathe may have a speed at which it runs the smoothest. Try to use that speed for your final passes as it will help to cut down on the chatter. It will probably chatter anyway, but perhaps a bit less.

If your lathe has a coolant system, then use it.

It is definately worth the price that a barrel manufacturer charges to have the barrel profiled. It takes a lot of time to turn a barrel down from the full sized blank and the manufacturer is set up to do this quickly. I do think it is worthwhile to check the barrel makers precision, however. Sometimes the bore and turned O.D. are off a bit as received from the maker, probably from having the centers wallow a bit. This needs to be corrected as when a barrel heats it will grow more on the thicker side than on the thin side and this force will push the muzzle crooked and walk the shots. This shows up more on thin sporter barrels. A check with a dial indicator or a skim cut in the lathe will identify and correct things.

Scott
 
Don't worry too much about cranking the tailstock over. Place a dial indicator on the base of the tailstock and measure to the body of the tailstock. Set to a zero. Use the dial indicator to set the tailstock over to the needed taper - do the math or consult your machinist's handbook as to the amount needed. When you are done, just crank the tailstock back to original zero using the dial indicator. You need to check tailstock alignment periodically, anyway, so get used to doing it.

Scott

The easiest tailstock repositioning method that I have found is to install a tapered dowell pin between the 2 tailstock body halves at center position. Return the tailstock to approximate center position, install taper pin, tighten tailstock.........done. No need for remeasuring, indicators, or all kinds of other fancy accessories..............Don
 
If you really want to get serious,You can buy a special tool that goes into the tailstock & can be moved in thousands .I have one ,it is English made.It has a live center & a graduated scale on the dovetail slide,I have turned hundreds of barrels & it makes things easy,because you know the exact taper & set it according. Mine has a # 3 morse taper on the arbor. BILL
 
Ok, Uncle!...Uncle!.. submission! I give in!

1. My next barrel will be pretapered. These two CM barrels I have, I'll turn myself, even under heavy criticism. (sorry)

2. Bill, I'll put the chipbreaker on. But "Not worth a damn" was pretty tough, especially with no pics.

3. I'll try to cut it with an offset tailstock. If I can't manage it, I'll crank the compound.

By the time I buy the micrometer tailstock, I'd be better off throwing these bbls in the trash and buying a tapered one.

It's only two barrels.

Ben
 
Ben,

Ok, Uncle!...Uncle!.. submission! I give in!

1. My next barrel will be pretapered. These two CM barrels I have, I'll turn myself, even under heavy criticism. (sorry)

2. Bill, I'll put the chipbreaker on. But "Not worth a damn" was pretty tough, especially with no pics.

3. I'll try to cut it with an offset tailstock. If I can't manage it, I'll crank the compound.

By the time I buy the micrometer tailstock, I'd be better off throwing these bbls in the trash and buying a tapered one.

It's only two barrels.

Ben


How did your two barrels turn out. I've been reading the archives and came across this thread and found it interesting. I have a barrel blank and will try tapering it, it wasn't available contoured.

Bill, It's not clear to me how you grind your toolbit, do you now have the ability to post a picture to clear things up for me? There is a picture of P.O. Ackley's tool in "Gunsmiths Kinks" version 1, but I can't make heads nor tails of that either. Any further clarification would be greatly appreciated.

Ridz
 
I have done this many times. Some barrels shoot and some don't when your done. I don't believe all barrels which are stress relieved actually become
free of stress. Any ways, you don't need to move your tailstock. Work
out the difference in Breech and muzzle diameter first. Starting about
3 inches from the muzzle end, mark the barrel every half inch . Now feeding
towards the tailstock step cut lightly adding at each mark. Repeat this
starting 3 inches closer to the headstock. When you are done, a long angle lathe file will make short work of the steps. Watch the tailstock pressure
and don't allow the barrel to get real hot. But like I say, some barrels
get better and some don't. You must recrown afterwards
 
A long time ago, I remember an experienced local gunsmith telling someone, who was going to try this for the first time, to use a very sharp pointed HSS tool and move it down the barrel rapidly, using shallow cuts, to prevent heating. The finish was like awful looking shallow threads, but it didn't matter, since he had a floor mounted long belt sander, and a barrel spinner. The most important thing was to keep the barrel as cool as possible.
 
How did your two barrels turn out. I've been reading the archives and came across this thread and found it interesting. I have a barrel blank and will try tapering it, it wasn't available contoured.

Bill, It's not clear to me how you grind your toolbit, do you now have the ability to post a picture to clear things up for me? There is a picture of P.O. Ackley's tool in "Gunsmiths Kinks" version 1, but I can't make heads nor tails of that either. Any further clarification would be greatly appreciated.

Ridz

Well...I only tapered one SS Shilen barel .308 from straight 1.250 to a #7 contour.

I offset the tailstock and went for it.

It was hell to turn, with chatter, constant tool sharpening, etc etc. All the problems as predicted. Lots of work with a flat file and sanding to remove chatter.

I've vowed never to do it again.

At the end of the day, the barrel shot fine. Not a record breaker, but hole touching hole no problem.

Ben
 
Ben,

Did you ever figure out what Bill Leeper was recommending for a HSS tool grind or did you go with the carbide you had in the picture?

I do have a pneumatic follow rest to hopefully eliminate chatter.
Ridz
 
Tracer attachment, follower rest behind the tool. Regarding stress, it's been my experience that any machine operation relieves stress from the material being whittled on. It will all move to some degree. Just be careful with tool pressure, depth of cut, and HEAT buildup as all of these will only amplify the effect. What your trying to avoid is altering the internal bore dimensions. If it turns out like a banana that's ok, if it turns out like a snake that ate a dozen eggs, then your quite possibly going to have "minute of backstop" groups.

Afterthought:

Not exactly clear on how a guy could rig this up without fussing with it, but on some of the newer dual turret type CNC machines you can actually rough and finish with two tools, both positioned 180* apart from one another, simultaneously. In essence it ends up having the same effect as if you used a follower rest. It'd be tricky to do on a manual since it'd be tough to move one tool independent of the other, but with a little creative machine work I bet a guy could sort it out. It's a little "star trek" but possible I think.

Good luck.

Chad
 
Last edited by a moderator:
Back
Top