Stumped on a Sako

B

Bluefield

Guest
I am taking a part a Sako L691 bolt in order to open up the bolt face diameter. I can not determine how to take off the bolt guide rib. Some of the part diagrams show a cross pin through the side of the rib. I see none on this one. Just two small holes on top of the rib near the bolt rib collars. Anyone ever do a Sako bolt bolt face? I have done Remington's and Mausers. First time with a Sako. Reason for this work is that UPS tore open the package of this rifle and lost the bolt. Bolt and scope were wrapped in bubble wrap and packing tape wrapped to the barrel. It took some doing to tear it loose. The only replacement bolt I could find has a small 30/06 size bolt face. Your consideration of my question is appreciated.
 
Just looked at my L461 bolt. It has a pin going right through the rib just behind the bolt rib collar. However, the pin has dropped over time & the end has worn flush with the bottom edge of the rib. Any chance yours has done that so you can't see the join line?
 
Turn the guide rib to where it is not behind a lug and see if you can slide it forward towards the end of the bolt nose.
 
John, I can not see a pin. Even with a magnifying glass
Mike, I tried that and no movement. I tried to compress the collars, as on a Mauser, but still no movement.
 
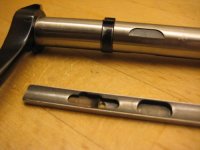
Finally got it. I had to stick a small eyeglass screw driver in the holes in the rib and lift up the flat springs end so the collars "ears" could slide past it and the rib moved forward. The flat springs keep the collars ears locked into the dovetail groove. Also the rib has to be in a just right position so the guide rib stop plunger is not in the stop cut on the bolt. Photo attached. I hope! Thank you for your suggestions and assistance.
 

Attachments

  • Sako rib.jpg
    Sako rib.jpg
    21.6 KB · Views: 2,341
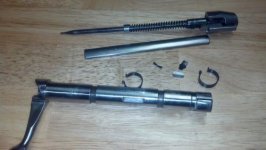
I got mine apart this far. I need to practice putting it together and get good at it before I put the finish on it. Now for stripping the firing pin...
Can anyone explain the disassembly procedure?
 

Attachments

  • IMG_20140517_204322_887.jpg
    IMG_20140517_204322_887.jpg
    21.4 KB · Views: 3,661
The few Sako's that I've seen have the firing pin come out of the cocking piece by turning the firing pin a 1/4 turn in either direction. Of course, it's spring loaded so is under pressure.
 
The few Sako's that I've seen have the firing pin come out of the cocking piece by turning the firing pin a 1/4 turn in either direction. Of course, it's spring loaded so is under pressure.

Thanks Mike, but I tried that already. I very well could be missing something because all I have ever done with a Sako is shoot it and rebarrel it. I got one here I want to Cerakote and it's looking like I might have to ask a favor from a more experienced smith.
There is a pin visable on the bottom side of the shroud looks like one that has to be driven into the shroud only to be recovered on disassembly to be reused for assembly. But the hole has been peened over. I'll have to mill my way in to the pin before I can drive it out.
 
Last edited:
I bring this thread back up for anyone that was following it wanting learn from it.
After disassembling the guide from the bolt I searched for any schematic I could find to disassemble the cocking piece/ firing pin assembly. I found out there is one part number for the whole assembly. They never intended for these parts to be disassembled. To replace a firing pin or spring you buy the whole firing pin, cocking piece, shroud assembly. All the parts were sold off when Beretta took over and none of the pre Beretta arms are supported by Beretta.
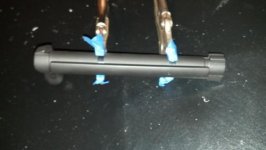
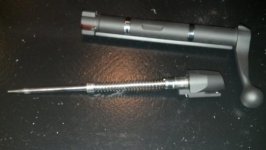
I got a good matte finish on mine. Leaving only the retaining rings and extractor in there original blue finish. I masked the jaws of 2 pair of vice grips to hold the retaining rings tight and the guide and all its little keepers was slid back over the retainers.
Pics attached.
 

Attachments

  • IMG_20141216_212231_704.jpg
    IMG_20141216_212231_704.jpg
    15 KB · Views: 1,158
  • IMG_20141216_213533_873.jpg
    IMG_20141216_213533_873.jpg
    15.3 KB · Views: 1,518
Last edited:
The firing pin assembly does come apart. Ahead of the spring, there is a collar that holds the spring back. If you slide the collar back, under spring pressure mind you, you will see a small groove in the pin. In the groove there is a retaining ring, a small coil. It is similar to the one that CLymer used to hold his floating pilots on. If you remove that coil, the firing pin can be removed. Mind you, that is a helluva job to remove that ring and harder to put it back when re-assembling; the collar slides over the collar. Once you get that apart, you must address the bolt shroud. That is peened to the cocking piece. It must be rotated a 1/4 turn against the peened area and slid off. Quite ingenious I must say and really not meant to be taken apart but needs to be done when refinishing.
 
Last edited:
Where have you been all year? I might have took this as incentive to take apart further if I would have read it in May. I slid the collar back and saw the retainer. On this rifle it is a piece of wire in a groove not a circlip. I considered taking that apart to remove the firing pin spring but didn't have enough hands and opted out of making a spring compressor for this one job. Now that I've done this by carefully masking it off and giving it a good cleaning afterwards I don't know that I would do it any different on the next one. Maybe coat the bolt guide retainers and extractor next time but I don't know how well those thin retainers will hold up to being blasted and baked.
I'm OK with what I have this time and maybe I'll find a good buy on a Sako at a auction some day so I can use it as a Ginny pig to learn on. This rifle belongs to some else.
What do you use for a spring compressor?
 
What are the advantages of CeraKote? Are they worth the hassle? I don't think I would consider any of the various paint jobs, except in the case of rust pitting, etc. Or maybe on a barrel. JMO!
 
Durable and slick are the best reasons I know of to use Cerakote. I use it because it's something I can do. I can do it in one side of my garage anytime I want without fuming up the rest of the garage so bad I can't stay in it.
For bluing I would have to put up a shed down at the far end of my property to use it and then have several different tanks of chemical to blue stainless or to parkerize or to do regular blue for chromoly. With Cerakote I can coat all surfaces the same color. Chromoly action stainless barrel aluminum bottom metal and muzzle brake can all be baked black and you cannot tell one bit of difference even the stock can be made to match if one didn't mind the one solid color look.
 
Last edited:
Interesting, I think I should give it a try. Always wondered about electroless nickle, too...
 
Jim Kobe
The Sako I worked on earlier this year is a L61. I will include a pic of the firing pin / cocking piece shroud. Notice the pin? There's no where to drive the pin to. I only see the option of drilling it out or milling in from top of the cocking piece to expose the pin so it can be driven out through the top of the cocking piece.
The only gun smith I found in the country that knows of at least one that has been taken apart tells me that there was problems with keeping it together after it was reassembled.
You seem to be in the know about Sako is there anything more you can tell about disassembling the cocking piece?
 
The pin could be EDM'd out. Then might-could drill the hole all the way through.
F1
 
That is what I was referring to on a earlier post in response to Bryant's comments. There's a similar pin in the safety on a model 70 Winchester you drive it in and recover it upon disassembly to reuse it on reassembly. I don't know if that is the case on this Sako part. I doubt it is. There ain't enough room to drive it in.
My work on this one is done now but my research has uncovered the fact that there isn't many in the trade that know about the disassembly of a Sako firing pin assembly.
Some big names in the business won't take a job if it's a Sako.
There's a lot of them in the States that will need service and parts some day. Now is a good time for someone to be figuring out how to fix or retro fit other parts into them so they will remain serviceable firearms for decades to come.
 
Last edited:
Back
Top