R
Reynard
Guest
Hi Guys
I have been lurking on this forum for quite some time, decided to take the plunge and ask a question.
Firstly a bit about myself, I am 46y old, married, living on a sheep farm way up in the hills in the Scottish Borders.
I finally got around to putting a concrete floor in my workshop to be, I have my Harrison M300 sat in a corner, I have used this lathe to screw-cut barrels for moderators. Up until about 4 years ago I had never used a lathe since school, I sure enjoy cutting metal.
I have been coming to this forum and absorbing all the information from you guys, that are so willing to part with knowledge that usually only gets past from father to son, In my country people are very wary of giving away their knowledge freely.
I would like to take my lathe work a step further and at some point have a go at truing an action.
I bought the John L Hinnant book which arrived by post today, It is full of so much useful information, I am going to enjoy reading it from front to back, at least twice. I printed of the tool sharpening pages, which I then laminated.
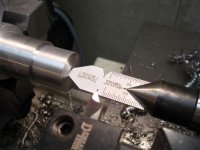
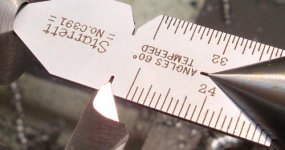
My question relates to shaping a 60 degree tool for cutting UNF threads, in Mr Hinnants book he shows 6 degree relief cut on both sides of the threading tool from top to bottom on both sides, I was wondering if this is a crucial step or can it be done without it. stupid question probably he obviously has it there for a reason.
I went out to my workshop this evening and played about with my knife grinder, finding the right angle so that the point of my 60 d threading tool would fit snugly into the little 60d threading tool guide, I was amazed how quickly I was able to achieve my task, I did cut to shape 5 tools that fit snug into the thread guide, I have not put a 5d relief on the front yet, I will complete them in the morning, then get practising on some old barrels.
I previously only threaded with inserts. I have never threaded an internal thread yet, looking forward to having a go at that.
Any other members using a M300, any tips or modifications that would be helpful, would be gratefully appreciated.
Thank you in advance for any replies
Ian
I have been lurking on this forum for quite some time, decided to take the plunge and ask a question.
Firstly a bit about myself, I am 46y old, married, living on a sheep farm way up in the hills in the Scottish Borders.
I finally got around to putting a concrete floor in my workshop to be, I have my Harrison M300 sat in a corner, I have used this lathe to screw-cut barrels for moderators. Up until about 4 years ago I had never used a lathe since school, I sure enjoy cutting metal.
I have been coming to this forum and absorbing all the information from you guys, that are so willing to part with knowledge that usually only gets past from father to son, In my country people are very wary of giving away their knowledge freely.
I would like to take my lathe work a step further and at some point have a go at truing an action.
I bought the John L Hinnant book which arrived by post today, It is full of so much useful information, I am going to enjoy reading it from front to back, at least twice. I printed of the tool sharpening pages, which I then laminated.
My question relates to shaping a 60 degree tool for cutting UNF threads, in Mr Hinnants book he shows 6 degree relief cut on both sides of the threading tool from top to bottom on both sides, I was wondering if this is a crucial step or can it be done without it. stupid question probably he obviously has it there for a reason.
I went out to my workshop this evening and played about with my knife grinder, finding the right angle so that the point of my 60 d threading tool would fit snugly into the little 60d threading tool guide, I was amazed how quickly I was able to achieve my task, I did cut to shape 5 tools that fit snug into the thread guide, I have not put a 5d relief on the front yet, I will complete them in the morning, then get practising on some old barrels.
I previously only threaded with inserts. I have never threaded an internal thread yet, looking forward to having a go at that.
Any other members using a M300, any tips or modifications that would be helpful, would be gratefully appreciated.
Thank you in advance for any replies
Ian
")
![GJ-01b[1].jpg](/forum/data/attachments/1/1909-9559199a272cf4f175842212ae512376.jpg)
![GJ-frontX[1].jpg](/forum/data/attachments/1/1910-e85500d6d1d7fe15fd3c1a385c461fa9.jpg)