How To: Retap to 8-40

P

PEI Rob

Guest
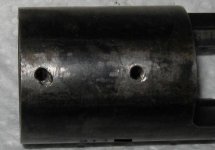
The old 700 I'm rebarrelling for a buddy has 2 buggered up base threads and Bubba didn't drill out a broken stud properly so 1/2 of the front hole is pooched.

I placed it in a friends fairly rugged mill/drill and used a 6-48 tap in each hole and a pin in the chuck to align the angles. I used the "no decernable movement" method when running in the 6-48 tap so as to be directly over center, rechecking several times turning the tap. I didn't plunge in a small end mill as all I had is a good #28 drill bit. I removed the drive belt and spun the head by finger tip to tap the hole.

The base has slotted holes and requires fillister head screws not the weaver/angled type so I was confident it would turn out well.

I really should have asked first but how is this proceedure done properly?

Cheers,
Rob
 
Carefully located bushings for the new drill size would have been nice but it sounds like you did OK if the base lines up, the threads are good and the screws hold it tight. You can make the drill jig from the old base since its likely buggered up. Buy or make the appropriate bushings for your new drill size.

Did you get a nice clean new hole on the one that had a broken "stud" (I think you mean a piece of the old base screw?)? If you have any doubt about the fit of your new screws and holes put some 5 minute epoxy under the base when you mount the scope. To take it off requires maybe 200-250 degrees of heat. I mount all my bases this way even if the holes are fine. Bases mounted this way do not come loose until you take them off.
 
The action arrived as a barrelled action with trigger and bolt only, not stock, bottom metal or bases and all the holes were empty. The new base is a Nightforce with an integral lug that contacts the front bridge/port so cannot creep forwards. The holes in the base are slots to allow fore and aft tolerances. Considering this and the use of flat screws I figured it would be difficult to mess this one up. The base lines up very well.

I like bedding the base as well and do this almost every time. Being a little paranoid, I use release agent on the screws and after curing I'll use blue loc-tite. The front hole did not clean up but the epoxy should/will have to suffice. I add a pic when I get home.

I did search around on the net for alignment or drill jigs for this but didn't see any. I'm not happy with this method and have 3 more actions to do now and at least 2 will have the weaver angle screws. With the amount of variance factory actions have I'm sure this works OK but it seems this method wouldn't be up to a pro's standards. Does anyone have any pics of their process?

henrya, not sure what you mean with the carefully placed bushings. I do have 4 of each taps and when installed in the action they did not line up well to each other. I picked the straightest one and went off it.
 

Attachments

  • Oct 15 2008 004b.jpg
    Oct 15 2008 004b.jpg
    19.2 KB · Views: 385
Last edited by a moderator:
That's a hell of a butcher job shown in your picture. Will that clean up with a 8X40 screw?

What I refer too is making a jig from an old one piece base that fits the action you're working on. Like in the old days for Mausers and Springfields and no milling machine maybe done with a hand drill motor or drill press if you had one. You bought a jig with bushings to guide the drill.

Like this:
http://www.brownells.com/aspx/ns/st...?p=1752&title=B-SQUARE PROFESSIONAL DRILL JIG

But you use an old base to make your own.
 
Back
Top