Fixtures!! Woo hoo!

N

NesikaChad

Guest
I gotz (purchased) my old fixtures from Nesika last Friday. I made all these about six years ago when I first got there. Just spent the afternoon tearing them down, cleaning them up, chasing all the tapped holes and reassembling.

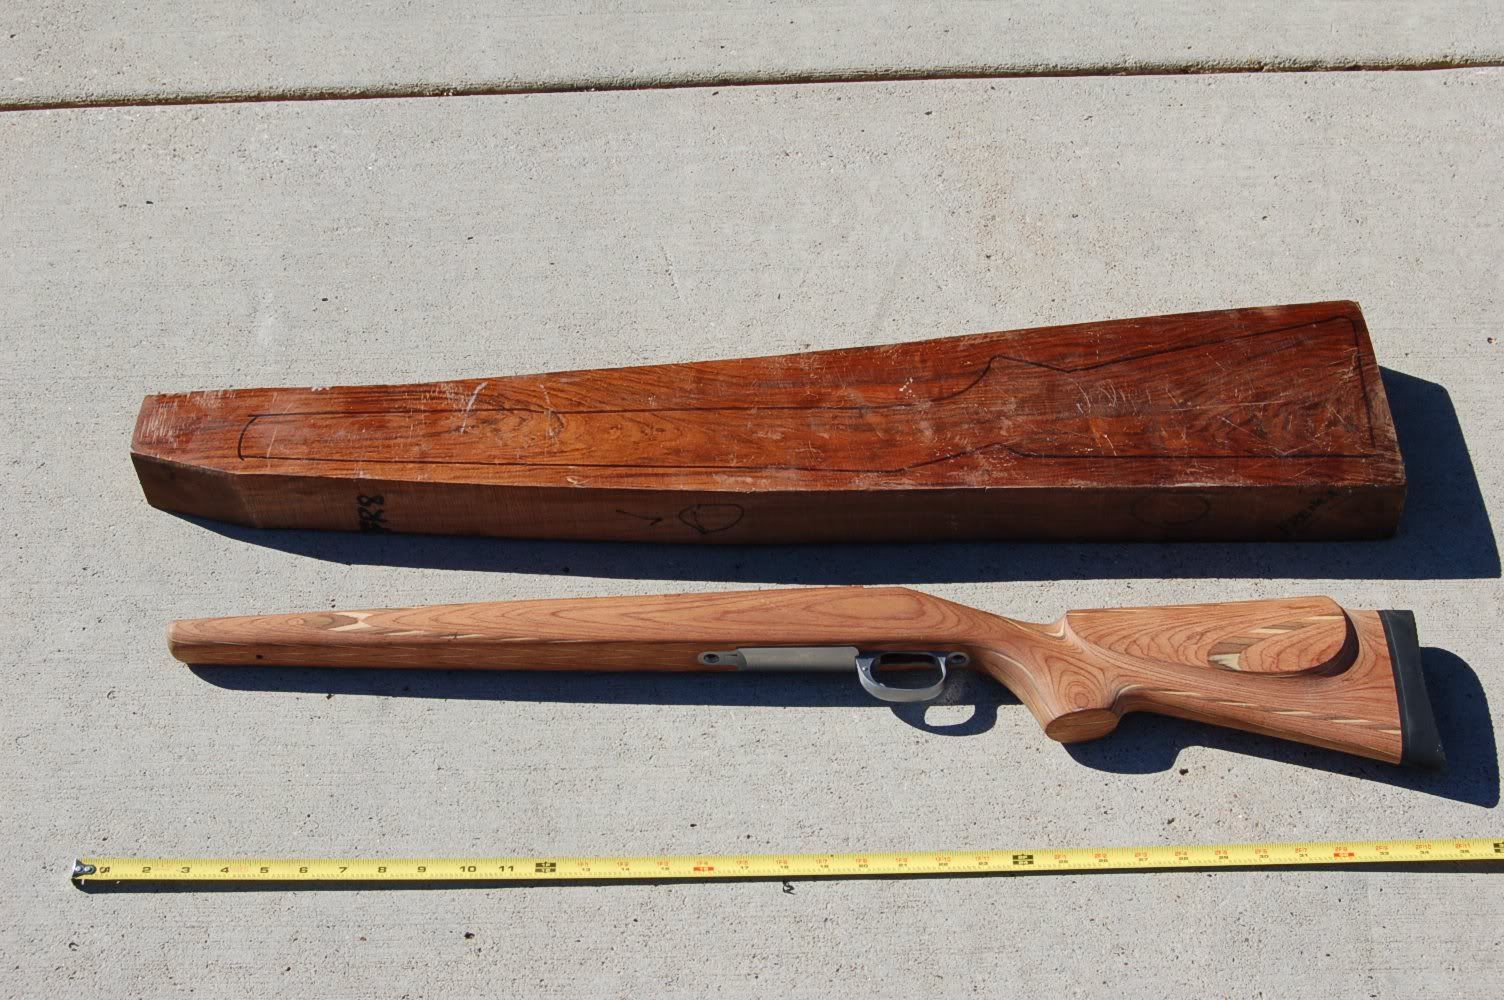
Me'sa very, very happy right now as it means I don't have to make this $%#@ all over again. See that last photo? NO BEDDING in the floor metal. One to one fit! Love that!

Woo Hoo!!:D:D

DSC_0006-2.jpg


DSC_0007-1.jpg


DSC_0008-1.jpg


DSC_0004-3.jpg
 
Last edited by a moderator:
nice one

hope you dont mind if i poche some of your idears :)
 
Well, they weren't actually for sale per say.

I'm a tenacious whiner when I want something and I wanted these pretty bad so I think they gave in just to shut me up.

Ok, not really.

I left Nesika in June of 06. The last Nesika gunmaker employee left in Dec/Jan of 06/07. After that rifle production all but ceased to exist. The Dakota/Nesika relationship historically always had a big yellow line drawn on the floor of the shop due to the vastly different philosophies on how guns get built. Not saying one is better than the other, they both have their place and respective markets/followings. They were just different.

What it boiled down to is nobody there had any interest in using the fixtures and they'd sat collecting dust for almost three years. I think they were happy to get the shelf space and make a few bucks in the process.
 
Chad,

fortuitiously I happen to be in the middle of making a fixture myownself, mine has screw jacks bearing from one side like your big one.

Now, on the liddle upsidedowney one for the floorplate, how do you tighten it? Clamps or fingers or nothing at all????

al
 
Bolts to the mill table using standard boring t nuts. One side of the fixture plate has a pair of ground hardened flat washers held on by a pair of cap screws. These hang below the deck surface and marry up against a slot on the table. This way there's no fiddling with indicators to know if the fixture is straight or not with the X axis.

Then I sweep a qualified hole with a COAX indicator to find my Datum. All my programming starts from this point. From there I drop a pin in this hole that also locates the rear guard screw hole. I have a sliding block with another hole to orientate the front guard screw. From there the stock is now sitting straight with the X axis and square with the Y. Clamp her in using the bridge up front and the leather padded feet and give her hell. Because I know (part of the initial process) that my pillar holes are perfectly square with the stock's showline I know that when I flip it over like this the pillar holes are pointing straight up. This is important because anything less results in the fixture being a real pain in the arse to use as hardened tool steel pins don't like to bend or kink.

Works great and is VERY fast to set up. From one stock to the next it's less than five minutes on the CNC as all your doing is jacking your G54 Z offset around to accommodate any difference in stock height.
 
Last edited by a moderator:
engineer gun smith v tradtionale gun smith

sounds to me like dakota are every much traditionalists and engineer's but head with them ! (engineer like thing more right only speaking for my self here)
i like walnut and tradtionale stuff like hand checkering , ebony forend tip's ect

but modern engineering will always work better, i think tring to blened the two is hard!
 
Last edited by a moderator:
Actually that's a big NO on the blend because it's what I do.

My Palma Rifle is built on a $1200 piece of Exhibition English. I love wood. What I don't like though is a digitized stock on a CNC because the ball mill used to machine it runs perpendicular to the material. This is because a digitized object is a "point cloud" in the machine's control. You can't manipulate a point cloud or assign any tools that are not the exact radius of the stylus used during digitizing. It's a series of line movements in 3 axis. Also not cool because now your hammering on the servos and that is hard on machine ball screws and the servo drives.

Any machinist will tell you that a ball mill can spin at a million rpm yet the center of the tool isn't cutting, it's compressing and displacing material. Now when you go to add finish you swell those compressed fibers and your stock has lines down it's length that need to be sanded out before you go any further. That adds time and costs money. The margins in guns are slim enough as it is. The margins in custom guns is even slimmer in most cases.

Rolling the cutter off axis to a tangent arc to take advantage of the shearing effect that surface speed creates requires the use of software and some gray matter.

Its topics like these that created the riffs because of the "well we'ved done it like this for 25 years. . ." mentality. it's also things like fitting the primary extraction with a mallet and a file. A $250,000 4 axis mill with CAT50 spindle is capable of making a turbine blade from inconnel that is 100% right off the machine yet it can't cut a helical ramp?

I'm not buying it.

Hand fitting has it's place in the gun industry no doubt, but a properly tooled and programmed machining center is a tough nut to crack. If that weren't the case, a lot more stuff would still be done by hand.
 
sorry i missed my owen piont

all i was tring to get at was that some thing have moved one but but you alway get some people who well not

like for example bedding a action to a stock, why would any one do wood to metal fit , when a epoxy bedding job will aways give a better job if done right

any way i like you think there is a place for both tration and engineer
but i find tha i alway come up against the '' i have done it like this for ever so it most be right '' atittude

me ill try anything if the end results is the best one for the job at hand !

thanks
 
Kinda off topic, but who cares? It's my thread right?

You mentioned bedding. Here's a few samples of how I do it. Nothing remarkable or "NASA"-ish. Just labor intensive work to get the results I'm satisfied with.

FWIW all this work was/is done on the fixtures shown at the top of the thread.

beddingII.jpg


MyPalmariflebedding.jpg


Notice the LACK of bedding here:

Floorinletwood.jpg
 
Last stock

Do you have any more pics of that last stock. What kinda of Laminated wood is in that thing?
 
The stock wood is from Bill Shehane. It's called "Indian Blanket". Very, very pretty when oil finished. It comes out with a real rich/deep luster. Doesn't checker very well though. Too soft. The first and last photo are of the same stock. The middle is my Palma Rifle.

It's a little soft and kinda spongy to machine. Very prone to splits and splinters so if a guy uses it, be careful as there is a learning curve. It took a few trials to learn how to work with it.

These photos are quite old. It's "stock" footage from when I was at Nesika. I say this because the material could very well have changed or been altered and I'm not aware of it. I've built a few guns using it. Mostly sporters but a few bag guns as well.

They all shot well enough so I don't think a guy has to be too apprehensive about using it. Just be nice to it when working it and it'll be nice to you with a really unique look when finished.

Cheers,

C


I had the same problem with Claro walnut some of it has hard and soft spots. What works for me but does not make any friends with the folks that do checkering work is to fill the wood with Accra glass using the flock. This will wear out tooling fast but gives them and even surface to work with.
 
Chad you seem to be as up to speed on the possiblities with CNC equipment as any one I have ever seen, so I have a question for you.

Is it possible to cut the bolt cams in the front of an action with a 3 axis cnc mill and if so how would you do it and what tooling would you use?

Nice bedding and inletting!

Thanks Gary
 
Short answer. YES.

A couple different options. One requires the use of a rigid tapping cycle. You plunge in Z with the "pitch" of the helix, then pull up, have the program reset a Z depth which changes the entry point of the tool into the part and then just keep repeating along until your there. The change in Z height means the tool will enter the part at a different clock position as the rigid tapping cycle is going to start at the same clock position each time. Since the part isn't actually moving, it's a slightly different rotation point on the part with each stroke. This works but it's kinky to get set up because your shaving material with an almost rapid rate of travel in Z. Get it wrong or get the Z height off/too aggressive and your going to have some very violent copulation between tool and receiver bore.

2nd option is using a 4th axis set face up. You incrementally rotate the part slightly with each stroke in Z until you get what your after. I've never done it this way but I'd have to speculate that its a much kindler/gentler way to get the job done.

Tooling:

The tool essentially takes on the geometry of a shaper. Your scrubbing a few thousanths off with each stroke/rotation in Z. The geometry is very important as the relief angles and what not get a little kinky with the rotation of the tool as it scrapes material off the lug surface. That and to achieve a "true" helical form that is parallel to the bolt lugs (very important if the action is partial cock on open and close) along their rotation into battery. If it's a cock on open only type receiver then it all kinda becomes irrelevant as it's there for clearance more than anything.

Hope this helped.

C
 
Last edited by a moderator:
So we are talking a stationary tool with the spindle locked and just spiraling down to shave a little off at a time.

That is what I thought, but I was looking at a Savage target action and it looks like they have done it with a round rotating tool of some sort.

Thanks for the help! Gary
 
savage is a savage way of doing it

hi gary
the way savage do it looks like it done with a 3/8 ish end mill and circialer interprulation (G02/G03) in X and Y while Z feeds down, but the result is a dished finish on the camming face ,this would be very fast but not the best way because of the dishing

i have savage taget action and it shocked me to see how they cut the cams, if you cheack the the corners of your bolt lugs they strat to round after 300-500 rounds
 
Back
Top