Etch-o-Matic

parshal

Member
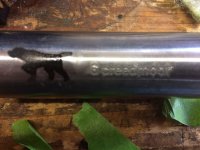
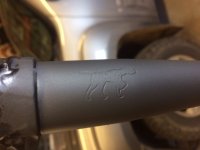
I bought their kit and made up a few stencils and did some etching on a spare barrel. I'm surprised at how easy it was to make stencils. The very first one turned out great. I realize their model doesn't etch as deep as the Marking Methods one but I'd seen some old posts where "superman" was using the etch-o-matic and got some nice deep etchings. See this thread. I tried etching for two minutes and it was definitely deeper but I can't imagine it's deep enough for cerakoting over the barrel. He mentioned painting it and wiping it off to give it the distinctive mark.

I'm looking to see for those using the etch-o-matic how deep they've been able to achieve and how long of a dwell time they're using. I'm also interested in seeing what others have been able to do with a cerakoted barrel.
 
Here's the last one I did. The dog on point was just done and is still a little wet. Even after letting dry the black wipes right off when using the cleaning solution. I can always paint it, though.
 

Attachments

  • marked.jpg
    marked.jpg
    478.2 KB · Views: 466
The stencils are clean and crisp even under a loupe. I'm thinking that's due to too long of a dwell time with the letters and ghosting? I did a few others after that pic with shorter dwell times and they seem a bit more crisp. I'll have to keep playing around with it.
 
etching

regarding the etch depth,

when i bought mine, the information with the device told the etching depth, the lesser depth method resulting in a gray etch and the "greater" depth method results in a black text... I've had mine 18yrs or so, so i can't remember the exact depths, but it was plainly stated with the "directions". As far as ragged letters are concerned, this happens when one leaves the etcher in contact with the stencil too long, A nice smooth rolling of the pad across the stencil makes the sharper letters. I've used it on at least 50 barrels & have had no complaints. I've not tried any photo type etching at all.

Kirk
 
Last edited:
OK, I've playing around with thing a lot more now. I've been unable to consistently get sharp edges on the mark. I had the printing on the transparency done a higher end printer and the transparency now has sharp edges compared to my personal laser printer. I talked to the manufacturer and they said the greyed edges are from too much etching fluid or pressing too hard on the etcher and that the weight of the etcher is enough pressure. I've monkeyed around with the amount of fluid and little pressure and still getting the same thing.

I'll keep trying different things and report back here just in case anyone finds this thread in the future.
 
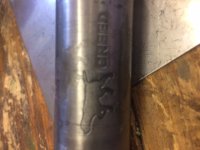
All right, I think I might have it now. In order to get a deeper etch I had to use more electrolyte and wipe the moisture from top of the stencil every 3-4 seconds. I frequently dabbed the etcher pad on a paper towel as I was working through the etch to remove excess electrolyte. I had to hear it buzzing while etching, too.

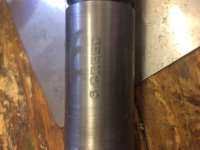
I ran the pointing dog outline for nearly four minutes. I ran the one that says 6 creed for three minutes. I polished each with steel wool when done. I also put a paper towel swipe of WD40 on the metal before taping on the stencil. That came from the manufacturer and it does seem to work.

You can definitely smell when you're burning the stencil. Removing the etcher frequently cuts down on that but you have to be careful. I think you might be able to get three good deep etches with one stencil.

I still need some more practice but I'm getting there.

dog.jpg
creed.jpg
 
Last edited:
etcher

All right, I think I might have it now. In order to get a deeper etch I had to use more electrolyte and wipe the moisture from top of the stencil every 3-4 seconds. I frequently dabbed the etcher pad on a paper towel as I was working through the etch to remove excess electrolyte. I had to hear it buzzing while etching, too.

I ran the pointing dog outline for nearly four minutes. I ran the one that says 6 creed for three minutes. I polished each with steel wool when done. I also put a paper towel swipe of WD40 on the metal before taping on the stencil. That came from the manufacturer and it does seem to work.

You can definitely smell when you're burning the stencil. Removing the etcher frequently cuts down on that but you have to be careful. I think you might be able to get three good deep etches with one stencil.

I still need some more practice but I'm getting there.

View attachment 19039
View attachment 19040

Try blotting the etcher on a paper towel several times before going to the stencil (you may already be doing this?). it takes much less electrolyte than you are using, this excess causes the bleed under the stencil which results in the "ragged" letters. Try going over the stencil several times lightly until you get the desired darkness. I learned early that pressing hard & a soaked etcher pad are not on track. I think you will end up with a satisfactory "etch" with a little more practice. I always know its working when i hear the sound you describe. for me, i just want the etching pad slightly damp. if you are wiping off the stencil too much electrolyte is being used. If any fluid can squeeze out when you touch your stencil, your already beat. it will bleed under the stencil for a blurry or ragged look. I get great results with a very light even roll of the etcher with no excess coming out on the stencil.. there probably are several ways to skin this cat however.?
kirk
 
Last edited:
Back
Top