Gents,
For your consideration...
Along with eating and drinking too much over the recent Thanksgiving holidays, I spent a goodly amount of time in the shop making things, specifically, a new action truing set-up. None of it is revolutionary, but I've incorporated one step that I've never seen elsewhere that makes my life easier, so I thought I would pass it along.
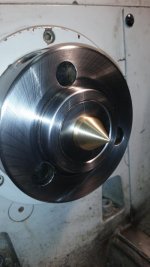
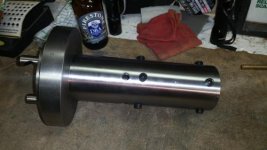
Picture #1 is of my truing fixture. It is made up from a "thick" D1-3 back plate I bought from South Bend, and a piece of 3" OD x 2" ID DOM tubing I bought from Speedy Metals. The back plate was faced, and then bored to 2.500 ID, 1.100 deep. The tubing was turned to 2.503 OD, 1.090 in length. Three sets of holes were drilled and tapped for adjustment screws, 1/2 x 20, laid out for long and short action 700's. Set screws are copper tipped and came from McMaster-Carr...I was too lazy to make em' myself. The tubing was put in the freezer overnight, and then pressed into the back plate up to and against the shoulder. It went in fairly easy, which made me think I should have gone a bit bigger than the 2.503 OD on the tubing. More on that later. It was left to set overnight, and then put in the lathe, turned and polished...because shiny stuff works better. Length from back plate to far end of fixture is 9".
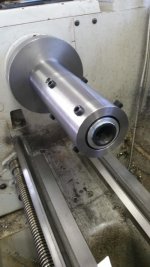
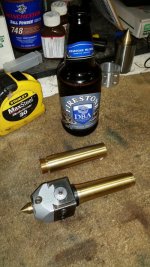
Picture #2 is my solution to a tailstock that sits high or low. Again, a #3 Morse taper was machined on a piece of 360 brass, and shoved into a 5 to 3 Morse taper sleeve, which was then shoved in the headstock. It was then turned and threaded to fit an extra Criterion boring head I had lying around. Another piece of 360 was machined into a center that fits in the boring head. All of the above is placed in the tailstock, and a machinist level is placed on the boring head so as to level it. I chuck-up on my Co-Ax, and dial it in the tailstock as close as I can get it...up/down with the boring head, fore/aft with the tailstock. The bottle in the background contains my preferred drilling and tapping fluid, while the tape measure is used for high-tolerance work.
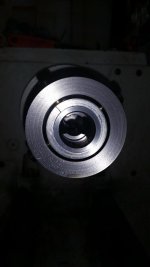
Picture #3 is my little spin on things. That is a 5 to 3 Morse taper sleeve holding a #3 Morse taper center I machined out of 360 brass. It's purpose is as follows: With the truing fixture in place on the lathe, the mandrel that is used to indicate the action in, slides through the action and centers up my brass center in the headstock. The other end of the mandrel goes into the center in the previously dialed in tailstock. The action is slid into place within the truing mandrel, the adjustment screws carefully tightened, and the tailstock moved away. If done with care, I'm usually within a couple thou' or so from being dead nuts. From there, it's dialed in the rest of the way and trued. To me, this is far easier than just sticking an action and mandrel in the truing jig and going from there...dialing in an action like that is NOT my strongpoint. I struggle with it, so this is what I came up with. I found it to save a considerable amount of time.
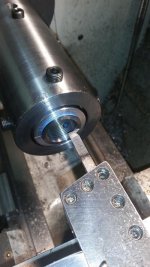
Picture #4 is the fixture on the lathe, with and XP-100 action contained within. You can see the split bushings I made out of aluminum to go around the action. My thinking was that this would help distribute clamping forces from the screws, as well as being a bit more "tackier" than the action itself, thus preventing any slippage. I once dialed in a Model 70 action to durn' near perfect only to find I couldn't get the &%@#!$*^ mandrel out due to the screws distorting the action! LOTS of bad language ensued...
Picture #5 is the action with action face and lug recesses faced.
Picture #6 is my threading tool. I decided to try something different. Instead of threading in, I thought I would try threading out. I went in with the tool to a bit behind the last thread and zeroed. I picked up the thread from there. Once that was done, I went back to zero and started a groove with my threading tool. This groove was home. I would make the groove about .005 deeper than the thread as I progressed through the threading/chasing process. When it was done, I had a groove .005 deeper than my threads...which I don't think is going to hurt anything. Everything machine-wise, of course, was run in reverse. The threading tool, by the way, was ground by my dad...probably before I was even born!
Once the threading was done, the first two threads were removed using the threading tool set at the same depth as used for the final thread pass, thus giving me the major diameter of the threaded section.
Some thoughts:
To use my "system", wherein a center is used in the headstock for the mandrel to center-up on, the truing fixture has to be a mite longer than normal. The possible deflection issue concerned me, so I put an indicator on the fixture, and attached a scale I use to check the pull weight on my recurve bows to the end of the fixture. I pulled up until I got to 40 pounds. It deflected .001. I later checked my old aluminum truing fixture, which is 3.5 OD, 2.6 ID, and 9" long the same way. Chucked up good and solid in my 6 jaw, it deflected .0025 with the same 40 pounds. Since I'm not removing much metal when truing an action, I don't THINK I need to worry about the .001 deflection. If somebody with more smarts than I possess think I do, I can run it in my steady rest, which should help. I probably could have gone .005 over on my tubing to back plate press fit and been fine...I don't know if it would have made much difference on the deflection, though. Sucker is pretty solid. I would be interested to know how much an action fixture like Mike Bryant uses deflects, if at all.
My choice of 360 brass for the centers and such was based on the fact that it is easy to machine, and it won't be taking any sort of real load, or acting in the typical dead-center capacity. Plus my buddy who owns a machine shop has a bunch of it laying around.
I am comfortable threading in, whilst truing an action, but found my blood pressure to be lower when threading out. I found it more user friendly than threading in. And it is FAR easier to pick up the existing thread as you can see the tool and thread without having to hang half-ways upside down over your lathe. My back appreciated that. I do think it might take a bit longer to thread out though, as you have to make a new, albeit short, section of thread. When threading in, you can start well in to the existing thread, so there are fewer passes.
Ideally, we wouldn't mess with this, and would just buy a custom action. But we have lathes, and Remington's are plentiful. Another option would be that genius, adjustable chuck affair that I can't remember the name of. But those buggers are expensive and I don't true actions for a living. I think my mandrel/center method may have some merit. I found it easier...maybe you will to. Or maybe I provided a solution to a non-existent problem. I dunno...you tell me.
There it is fellas...have at it. I look forward to your thoughts, opinions, ridicule, ideas, etc.
Justin
Attachments
Last edited:


