Update!
G'day all
Well some of you may have read about my plans to build my own action (Cuz I’m too damn cheep to buy a ready made one

). So I thought I’d post a log of my progress as I go along.
So where to begin... Well I won't bore you with the 3 odd months of evenings I spent in front of the computer designing and drawing my action. Significant time was also spent researching materials and heat treatment etc.
I got lots of advice on the best steels and what hardness (and hence tensile strength) to heat treat it to. Of course most of it was contradictory and in the end I made up my own mind based on the requirements of the task.
I really like the looks of blued steel so I decided to steer away from the stainless steels and go for a chrome molly steel.
Lots of actions are made from the ubiquitous 4140 chrome molly steel. It's strong (Once heat treated) and it's relatively cheep.
The only drawback was it needed to be heat treated. Now I’ve worked as a machinist for a long time and the number of jobs I’ve seen come back into the workshop to be re-done because of bad heat treatment would surprise you. So for me heat treatment was to be avoided if possible. That ruled out 4140 as I couldn't get it in the right hardness for the job.
So what is the right hardness you ask? Well depends on the steel in question but for 4140 or similar low alloy steels somewhere around 37 to 45 HRC is about right.
Next up on my list of steels is 4340. It's a little bit stronger than 4140, mostly due to it's higher hardness in it's as supplied state but is also a little bit tougher than 4140. I checked with our steel suppliers for a piece at 37+ HRC but no luck, all there stock was around 32 to 35 HRC. I then enquired about some EN26 which is even stronger again than 4340. I finially got a length of 66 dia for the Receiver at 38 HRC and a length of 32 dia at 40 HRC for the bolt. I had the stock independently hardness tested and the results were all good.
So now I have materials out of the way what about the design? Well I wanted an action to build a new long range / BR rifle on. So it’s going to be big and beefy full bridge design able to take a long heavy contour barrel easily. I looked at a lot of other actions and picked the features I liked from each...
It’s basically a 3 lug “fat bolt” design. Like the new TC Icon action. This was chosen as I didn’t have access to the right equipment to cut or broach action raceways. Everything had to be able to be done by me with the equipment I had access to. I have a manual lathe and mill at home, but at work I have access to a 4 axis Extron CNC mill. This machine makes life much easier so most of the hard work would be done on this.
It finished action will look something like this…
http://www.roedale.de/epages/roedale.htm
Some of the design features;
• 3 lug “Fat Bolt” with 60 deg bolt lift and fast lock time.
• full bridge design with flat bottom and sides for better bedding
• built to suit up to 308 sized cartridges (Prototype to be 6mm BR)
• Remington compatible trigger
• Easy bolt disassembly ala sako “Insert and twist”.
• Flat top for easy scope base mounting.
• Designed to safely use a Sako extractor
Here is the action blanks being “Pilot” drilled with a 400mm (16")long CoHss drill. The machine allows an automatic “Peck” drilling cycle and it runs at about 300 RPM and feed only 2.5 (0.1")mm before retracting to clear the chips. Due to the hardness of the material this took almost 45 minuets to drill the 250mm (10")blank. The only problems encountered was that sometimes not all the swarf would get out and would then be chewed up at the start of the next cut. (A bit scary as it makes a terrible noise and that drill is worth $220!) In case you are wondering the green rag arround the drill helps to stop it chattering untill it's is deep enough in it's own hole.
Next is rough drilling to 20.5 (0.807") dia and then finial step drilling to 21.5mm (0.846")(Finished size is 22mm (0.866")).
And finialy finish reaming.
The 22 dia hole was then given a honing. This makes the hole uniform in dia allong it entire length and gives a better smoother surface finish. Finished dia ended up being 22.06 mm(0.8685").
Now because of the depth of the holes (250mm- 10") some run out is very likely and in fact the pilot drill ran off almost 0.2mm or 8 thow. So before the next step I needed to get the outside of the blank running true with the newly drilled, reamed and honed hole.
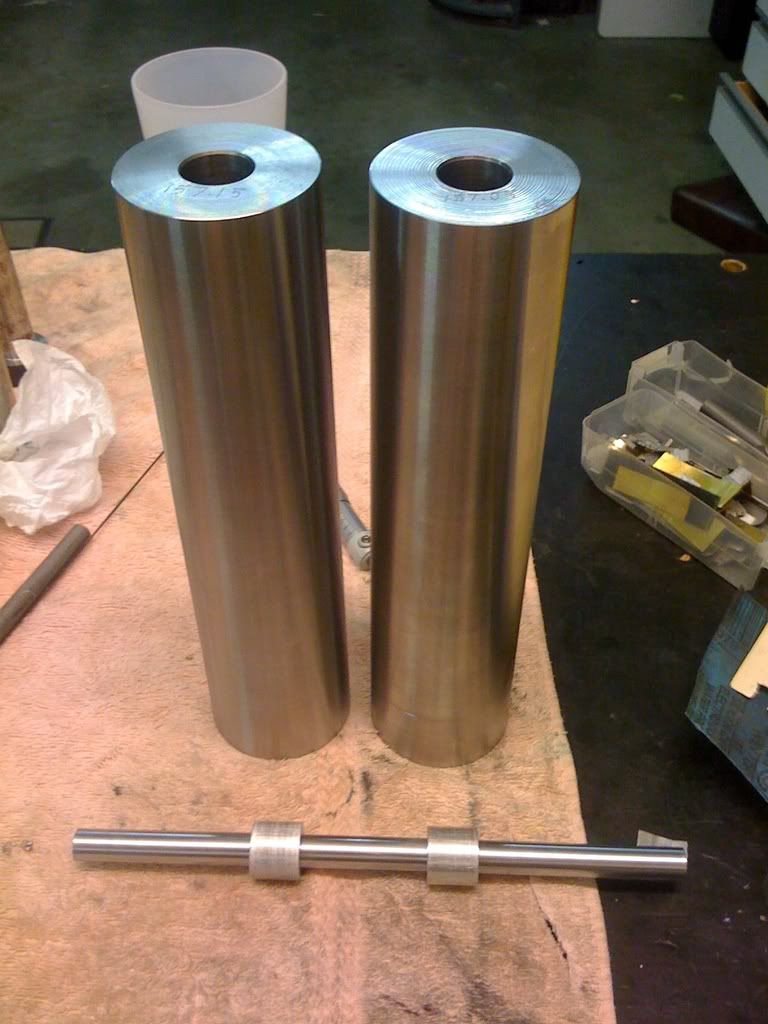
This was done by making up two bushes to suit a ½” test bar I have. They were made to be a tap fit in the 22 (0.866")dia hole.
[The whole assembly then placed in the lathe and dialed up to run true.
Once true a chamfer was cut at 60 deg on the hole and the live center placed in. A truing cut was then taken over most of the length of bar. It was then turned around and dialed up again and the remaining end was trued.
Finished receiver blanks ready for the next stage profiling..
I have an RDO on Monday and should get the profiling done.
Update will follow soon..
Cheers
Leeroy


