Ugly threads

adamsgt

Jerry Adams
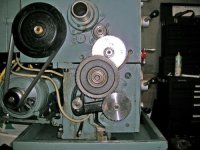
After looking at Bob Pastors videos I decided to get off my butt and try threading on my lathe. I'd bought this used lathe 2-3 years ago but put off changing the threading gears to match the inch configuration


DSCN0652_edited.jpg DSCN0661.jpg


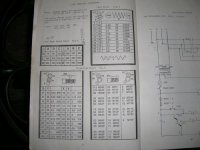
I needed to change the two top and one bottom gears to match the "N" configuration iin the lower right box.

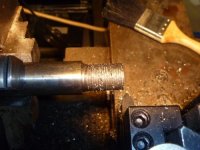
So, after watching Bob's video I decide to try cuting some threads at 16 tpi. I set my compound at 29 1/2 degrees and set up my crosslide and compound dials to zero and proceeded to cut threads. So, here's the result:

P1000203.jpg

Pretty ugly. I was using cutoff barrel stubs and tried different toolbits, including partial profile, with the same results. I had some other pictures that I guess were too big to load but they showed basically the same thing. I kept the cut to 3-5 thousandths and used the same number on the threading dial to engage the half nuts. Used plenty of cutting oil and used the lowest speed, about 70rpm.

Just wondering if I'm missing something fundamental or if there's a problem with the lathe. If there is a problem with the lathe, what would most likely be the cause?
 
I am no machinist by any means....
What happened to me my first time to thread. I also set my compound to what i thought was 291/2 degrees but i was wrong. I also got munged up threads...

I set it 29 1/2 degrees from the wrong centerline. The mark was not even on my lathe i needed for 29 1/2 degrees. I used a protractor and marked my cpd with a center punch for 29 1/2. Reset my compound to the new 29 1/2 and the threading went great! joe
 
I am guessing not enough clearance cut on the 60 degree tool... and/or the tool is too high...
 
Hi Jerry,

Joe might not claim to be a machinist but he's only trying to fool us. He is right on with his post. Make certain your compound is really set at 29.5 degrees and your tool is set at the proper height. Use a good high sulfur cutting oil and the rest will take care of itself. If you are still having problems give me a call. 1-269-521-3671

Bob

P.S. sorry Dennis, we must have been typing at the same time.
 
Last edited:
Jerry,

I just took a close look at the photo of your threads. Are you cutting from the chuck side and moving to your right?

The reason I ask is because your tool shows metal build up on the right side of the cutting edge. That would indicate you are moving in a left to right direction. If this is the case and you have your compound turned the wrong way, then your trying to cut a left hand thread and feeding in the compound from the wrong direction and actually under cutting the thread pattern .
 
Last edited:
If you have a Chinese lathe try setting the compound to 59.5 degrees, has to do with where they put the witness mark. That is what the first thread looked like on my Birmingham until I did some research.
 
Got any 1" or larger delrin rod laying around? That's what I started with when learning to thread. Also practiced picking up the thread, etc. Once you've got all the basics figured out then threading steel won't be so traumatic. I also thread at 200 rpm or more. You get a better cut but you gotta have a good grasp of the basics.
 
You mentioned setting up to thread "inch configuration" was it set up to thread metric previously? Is it possible that your lathe has a metric lead screw? If you cant get it worked out with the above suggestions try threading without disengaging the halfnut. Engage the halfnut make a pass on the part,withdraw the crosslide to clear the shoulder and reverse the lathe rotation do not disengage the halfnut once your tool has passed the starting point stop the lathe reset the crosslide to 0 advance the compound and make another pass repeat until the thread is complete. I prefer threading this way when circumstances allow. On my machine it is necessary to thread this way when cutting a metric thread since I have a english leadscrew. The first time I tried a metric thread my results were similar to yours
 
Last edited:
It would be nice to know what lathe you have and what type of thread dial you have. If you have a lathe that is made to metric standards even though you may have a 4tpi lead screw you may have to engage the half nuts on specific numbers on the dial like 1 or 8 for a 16tpi thread. Also you could double check your pick-off gears to make sure that they are correct and the feed selector levers are set correctly. You are somehow washing your threads out. It is probably something simple. If you wish you can pm me. I would be happy to assist you any way I can. I am just south of you.

Good Luck,

Joe
 
Great, lot of responses in a short time.
Joe, the only witness line is under the compound towards the user but the scale is on the left side. The scale runs either side of zero for 45 degrees. I thought I had the angle correct using a scribe point to hold a reference but I didn't use a protractor. I will try that.

Dennis, I used a small metal rule and pinched it between the tool bit and the piece, it was vertical so I think I was OK there. I got the same bad results using an indexable threading tool. The last bit I used was one I ground 25 years ago when I had better eyes.

Bob, I was cutting from right to left using a heavy cutting oil. The compound is rotated what I thought was 29 1/2 degrees to the left (CCW). I aligned the bit using a thread gauge.

crb, don't have any delrin, but that's a good idea and I'll acquire some.

David and colchester. According to the data plate the Rutland lathe was made in Taiwan in 1993. The threading gear configuration didn't match anything in the skimpy users guide, so I assumed the previous owner didn't do any threading. I also assumed that it was an imperial lead screw. That may be an erroneous assumption. I'll try your recommendation tomorrow.

jdh, the thread dial goes from 1 to 4. As Bob did in his video I engaged the half nuts on 4 each pass. I couldn't post the picture of my last attempt as the file was over 2MB but it did look as if the threads were being over cut each pass. After I informed my wife of the problems I was having I told her that I might have to buy a new lathe. It's amazing what women can say with just the look in their eyes. :eek:
 
Do yourself a favor and go buy a nice indexable threading tool w/inserts. MSC or Enco runs specials every month. Life is too short for using a hand ground tool for a thread you really want to look beautiful. Once you have the basic mechanics down, increase the speed as far as you can go without crashing the lathe. The tools are intended to cut at speeds way faster than you can achieve on an engine lathe, but they'll do a nice job all the same. They just won't live as long, that's all. I thread at 3000rpms and the threads look like they came out of a thread grinder. But I'm afraid trying that by hand will be a bit tricky. Also, I think a much finer grinding wheel is needed to make a tool that won't lay up material like the way you show in the photo. Then too, go by hand and stone off that point so you have a radius on the tool rather than grinding to a sharp point. Use a very very fine stone, and just remove that point (with proper relief angles applied). Don't try to do it with the grinder or you'll just make a big mess.
 
Last edited by a moderator:
4mesh

I have a Carmex partial profile indexable threading kit and it was the second thing I tried. Had the same ugly results. Either there's something fundamentally wrong with my setup or there's something wrong with the lathe. If I had to put money on it, I'd bet that my setup is wrong somehow. :confused:

You know, it's not that I've never threaded before, I have. I've profiled, threaded and chambered for Mauser actions and last summer at the NRA summer school I threaded and chambered a half octagon/half round barrel I made for a falling block action. But those were all done on Southbend lathes. Somehow I can't get this lathe to work for me.
 
Last edited:
With delrin you can set the compound at 90 degrees and just advance straight in [ actually Jackie says he cuts his bbl tenons straight in ]. This way all you are really checking is that your lathe is properly picking up the thread. Once you have this verified then you can mess with the 29 degree setting.

My Grizzly was one of the ones that came with a 15t gear on the thread dial. I had done several threading jobs including a couple of bbls with no sign of an issue. I went to cut some 1/2x13 threads and all hell broke loose. The thing wouldn't pickup the thread !!! I then remembered a thread here on BRC about the thread dial gear and figured it out. The gear should have been a 16T as the lead screw is 4 or 8 [ crs ].
 
From what you say your gearing must be incorrect in some way. Your pickoff gears must match the chart on the lathe and your feed dials must be in the correct places for the gearing to match up. From what you say your procedure is correct. You say that the "threading gear configuration didn't match anything in the skimpy users guide". Therein lies the rub. You probably do not need a new lathe perhaps just a few more gears.
 
From what you say your gearing must be incorrect in some way. Your pickoff gears must match the chart on the lathe and your feed dials must be in the correct places for the gearing to match up. From what you say your procedure is correct. You say that the "threading gear configuration didn't match anything in the skimpy users guide". Therein lies the rub. You probably do not need a new lathe perhaps just a few more gears.

jdh, the lathe when I got it didn't match any configuration in the manual. When I finally decided to start using it for threading I configured the threading gears per the "inch" chart depicted in the lower right box in picture two. It's kind of hard to read but I set it up for configuration "N" where 16 tpi is largest pitch. The lever settings are T1F which I set. The first scratch cut I made appeared to be 16 tpi as measured by my pitch gage but everything went downhill on subsequent passes until I just had a mess. You"re right that I probably don't NEED a new lathe but I keep looking at the Grizzly 9036 13 X 40 Gear Head Floor lathe and my gun show money starts burning a hole in my pocket.
 
OK, you've gotten a bunch of ideas :)

A bunch of good ideas.

But I'm going to try come in fresh. NOTHING in my post is in reference to any other post here but is directed at the op.

Jerry,

As one who's gone through the same thing over the last 6mo maybe I can give a newb perspective. Like you I have prior "experience" but in my case it was gunsmithing school almost 30yrs ago. Top notch equipment, professionally set up, everything was by-the-book easy-peasy. I was "head of the class" and did real good in school, even went to competition and did well.... until they kicked me out (I wasn't a very good conformist back then either)............. but what I learned about "running machinery" was about as usable as the stuff about "running a business."

Getting your own lathe and dialing it in is a hole nuther canna' worms.

I'm gonna' go off here on another "Alinwa Opinion Rampage" so if'n you're one of those who find my style offensive, oh well. I tried. And if it bores you maybe it'll help someone else.


While I was still in gunsmithing school I met a local guy who had a lathe and did chambering and stuff. He wasn't in the class but we spent time together sharing info. I remember his little belt drive antique table-top lathe. And I distinctly remember thinking "what a piece of crap. He can't POSSIBLY do real quality work. When I get set up I'll have XXXX "Professional" setup and be much better than this hacker."

WHY??? Why you ask did I feel this way?

Because I was an ignorant ASS. I was a student, he was a real man working in the real world and using real equipment. I had "dreams" while he had a real lathe.

So now, thirty yrs later, I too have a little lathe. And it's paid for.

And it's capable of fine work. As was his.

These little lathes though are flimsy and shakey..... the bits are small and poorly supported and heat is always a problem.

So's we need to outsmart them.

We simply CAN'T get by with pulling the stuff that the quarter-million-dollar setups allow. It helps to set down and figure out HOW the tool cuts. For me this means drawing pictures...... (I do this a lot ;) ) ..... links like this one help me to work it out in my head. http://www.sherline.com/grinding.htm there are many others. We have to learn HOW the tool cuts best and work with it. First of all, the tool wants to cut on only one edge whenever possible, and it wants to "shear" if possible instead of just hooking metal off by main force. And it wants plenty of clearance away from the cutting edge.

Now here's the crux.......

For presentation and clearance you want a long slim needle-like "tooth" like the tip of a chisel. And to present this in such a way that it smoothly peels off steel.

But for strength and more importantly for cooling you need to keep some mass out near that working edge. You sharpen that thing to look like your hunting knife and it'll heat, curl, burn and chip..... and chatter from the get-go because it's too wimpy.

Sooo, you need clearance and beef. Two innovative ways I've seen recently are the Diamond Tool Holder and Bob Pastor's HSS bit system. Both are awesome..... but there are other ways too. For us hobbyists.

Which brings up another point. Most of these guys here are real machinists. They do this stuff for a living and they have good equipment but more importantly they've FORGOTTEN more than you and I know. Really.... they've FORGOTTEN why they know what they know, they just DO IT.

SOOOO, First of all..... let's get into the WHY of the fabled 29 or 29 1/2 degrees......

We do it because we want to cut with only ONE EDGE. Sharpening a bit like the prow of a Viking ship and ramming straight into the cut works OK if your lathe weighs in like a Supertanker, make a lathe stout enough and it'll make threads by displacement if nothing else! A "displacement hull" bit.....But you're looking to sneak in and pull out the excess steel without waking the neighbors, without flexing the system. So's we cut out threads sideways, kinda' sidle into them, extending the rear of the thread back and back while hoping to leave a nicely polished bearing surface.

Let's look at the 29 1/2 degrees......

First of all, from your description you've got it backwards. BUT!!! This doesn't mean it IS backwards, just that I'm reading it backwards. So again, let's draw pixtures. Let's understand what we're trying to accomplish.

Draw threads from right-to-left on the paper, like you're looking down on the cutter bit. Try to make the drawing kinda' accurate so you can see the 30 degrees. Or just PRETEND that it's 30 degrees....... zig-zag zig-zag ziggy zaggy like a sawblade.

Now (look over your shoulder first to be sure no one's watching) cut out a little lathe bit and drive it like a toy truck..... brrrrbrrrmmm brrmmm ...... or use your pencil and pretend it's the cutter bit..... but angles are important here...

Drive it in at 30 degrees. Your feeding it remember with the compound which is set at 30 (actually 29 1/2) degrees. The bit is advancing SIDEWAYS and in, angled, not straight in like the cross slide.....so it's only cutting the REAR surface of the thread. It's just rubbing on the right side of the groove, passing by it. ((((Actually, I'm again running a risk using "rear" and "front" but bear with me. I'm calling the surface to the left of the point the "rear."))))

Now change you angle..... Drive it in at 29 1/2 degrees

you gotta' stop and THINK here. 29 1/2 degrees from WHAT????

What you're looking for is a little more clearance. You don't WANT it to be rubbing on the right side of the thread groove. If it's rubbing it's heating up. If it's rubbing and heating up it's wanting to move. It's wanting to gall. it's wanting MORE CLEARANCE. The 29 1/2 degrees is whichever way CLEARS the slope as you advance the compound as opposed to digging into it.

kapische???

We want only ONE SURFACE, one edge doing the cutting.

The other edge is just coasting.....

With pictures it soon becomes apparent that we don't even need a fancy-schmancy 60 degree grind on our bit. ALL we need is an advancing cutting edge that's set at 30* off perpendicular and our compound slide set to 30 degrees (actually 29 1/2... for clearance) and we're getting a nice 60 degree thread BUT ONLY CUTTING ONE SIDE! The left side of the groove.

We're coming in from right-to-left

We're threading from right-to-left

As the thread cuts deeper the advancement is in and LEFT so that it's only cutting the LEFT edge of the groove or slot. So the bit needs to be ground for the surface it's approaching.

The right side of the bit doesn't matter much.

The LEFT side though is crucial..... and remember the TIP or so-called tip, the cutting edge, is the LEFT SIDE of the cutter bit. If you've figured out how to approach the workpiece for TURNING a nice finish then you must get that same approach on that crucial left side.

I've been playing with grinding parting blades for threading. They're AWEsome for threading up to the shoulder.....And they allow you to extend out and away from the toolpost so's you can play with grind and feed angles. I can actually set up to grind only ONE angle on a parting tool bit and feed in parallel to the blade......

But the kicker is, figure out WHERE the actual cutting edge engages the work and grind to pull steel gently out of the groove and sweep it off the face of the thread. Get the TIP high and remember, the LEFT FACE is the actual cutting edge. It's almost like the "top rake" or the "chip breaker" surface is being used for the cutter face. It cuts the "face" of the left thread back and in.

And you FEED IN at 29 1/2 degrees to make the other side. NO cutting going on on the right side of the groove.

And the left face if the bit has to have BACK and SIDE rake as well as BOTTOM clearance just like it were the front face. Which it now is.... And the cutting face must CUT AT 30 DEGREES to perpendicular. The rake angle is now the cutter angle.

(((pictures might help??? drawings again!)))

And of course you use the actual cross slide only to reset the operation. And you zero it every time.

This is crucial. the cross slide must be ZERO'D each time.

This is again the sort of step that the real machinists just "know"......

And I do mean zero'd. any sort of sloppiness when resetting the cross or in feed back to zero wipes out your threads.

I accomplish this by setting the crossfeed handle close and with the handle at the bottom of the stroke, now rotate the dial to zero and go back to it every time. Go back to it FROM THE SAME SIDE OF THE LASH. If you go too far you must back off 10-20-30 numbers and come back in. When you hit the end you back OUT a turn, roll back to start and back IN that exact same turn. Then you advance the compound slide a couple-three or ten thou for your next pass.

Soooo, you get CLOSE with the crossfeed and sneak in to start the cut with the compound. And you do all the cutting advancement with the compound. And when you get CLOSE on the crossfeed make sure you stop it with the hannle on the bottom and zero it. This way your compound feed advances correctly, FROM THE SAME STARTING POINT.

For cutting the even numbered thread you can theoretically drop the threading lever (half nut) on every line but maybe you'd better try simplifying....You can try dropping the handle on exactly the same number every time. And try backing off a little extra far so if your drop misses you have time to ABORT! before hitting steel....

But I really think that once you picture HOW the bit is approaching the surface and engaging the cut it'll start to take shape.

I hope this helps you out.... and if it doesn't just ask me to and I'll (try) to clarify my verbiage.

I tend to get windy.

LOL

But I am getting threads that need very little dressing up.

al

"The person who learns "how" will always have a job. The person who learns "why" will always be his boss."

Diane Ravitch
 
Man I could go on and on here but I gotta' add one more little tip. First of all I made a massive and heavy dealio which is permanently SET to the centerline ht of the headstock...... the "center" of up and down for the bit. The thing you're trying to find with the pinched piece of flatstock. My heightt tool is flat bottomed and heavy and I can set it on the apron of the cross slide and quickly find center or set a tip to height.

But here's the deal....this center is just a rough-in place to start. I've had best luck threading with the bit just ABOVE center. It really makes no difference to the workpiece where "center" is and setting the tooltip high gives some easy relief. It's the same thing as grinding more back rake and it's easy to lean around and check for tool clearance. I will say that if you use "flat" tooling bits like the ones recently featured by Bob Pastor then you'll find a real gain in setting up high.

But I think this stuff will work itself out once you figger out WHY you're getting fuzz.

hth

al
 
And BTW Jerry.... I realize that some of my post is a repeat of stuff you already covered back in your op but I tried to make my post kindofa' standalone piece so that as I tried to explain how to get the bit presented it was clear what I was referring to. Sorry for repeating stuff that you'd already clearly understood. :)

al
 
Back
Top