Tool Grinding

I think I have your old favorite marked in this attachment.

"Over the course of many years I found the best of the bunch for roughing and with a small radius on the end, finish, a cutter that will have about .100 of a 45 deg. angle on the tip. As I stated earlier, it must have about 10 degrees relief under the leading edge and 15 - 20 on the top."

and

"There is one in that group a REX AAA - 2nd from the left end that is a Regular, (it's older than dirt) there is nearly no chip management with that tool, and will cut forever nearly."

Did I get it?
 

Attachments

  • lathe tool 2.jpeg
    lathe tool 2.jpeg
    109 KB · Views: 342
Here's a link that gives you the basic info needed to machine about anything on a manual lathe.

http://www.americanmachinetools.com/how_to_use_a_lathe.htm


Also, There are a few other tools you will need. See pics.

Boring bar, indicator etc. Buy your boring tools (carbide) and some 3/8" unground tool bits from MSC and just grind threading and turning tools.

Ignore the notion that a beginner needs to buy some complex insert tooling system for gunsmithing. You'll just get a headache looking at ISCAR catalogs.
 

Attachments

  • Boring bars.JPG
    Boring bars.JPG
    30.8 KB · Views: 319
  • Threading.jpg
    Threading.jpg
    21.1 KB · Views: 339
  • Tool.jpg
    Tool.jpg
    13.1 KB · Views: 350
  • Chipbreaker tool.pdf
    133.8 KB · Views: 259
  • DSC01460.jpg
    DSC01460.jpg
    12.3 KB · Views: 316
Last edited:
Nope - Wrong one. . .

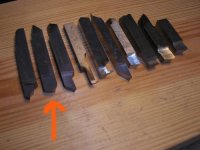
Henrya. . . . No, it's the one on the other end of the picture, that is a 3/8" radius tool. It is kind of hard to see, I will take another picture and attach it. Lathe tools-4.jpg 
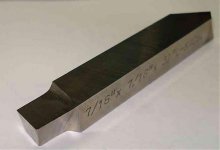
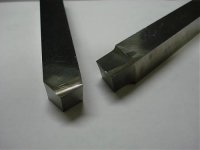
Does this give you a better idea of the tool, all three are set with the cutting edge at the bottom. I have 4-5 of these tools so I set them up in all three directions. On one of the post above they show a cutter with a radius cut in the leading edge of the tool. That is a great tool if you want to take a deep cut and remove a lot of material, but because of the radi it has to move slow, nice chip management, but kind of slow. The nice thing about the cut on the tool I have here is that if you grind it correctly, and that may take some practice, you can turn and face with the same tool, kind of handy if you are facing a part and then going to rough in the OD. It is a good finish tool, but at the stop point you will have a 45 deg. angle to come back and take out with a pointed tool.

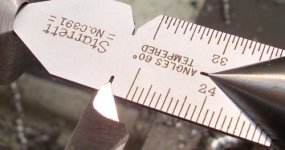
There is alot to be said about the insert tooling, if you are doing a lot of the same thing (over and over) that is the tooling, but if you are doing one piece at a time, you can't beat the High Speed tool bit. The investment in the holders (Kits) is kind of pricy, and you could by a box of HS tools for that initial out lay. Really, it comes down to how you feel about the tool you are going to use to do a certain job. If you have a lot of threading to do, by all means get the insert tooling, but if you are doing one at a time over 2 or 3 weeks or longer, does the investment in the tooling justify it? Learning to make a threading tool isn't rocket science, just get a threading guage that is shown it the replys above and learn to make the tool. As I stated above, you only have to be really close, it isn't going to be Quality Controled Inspected an rejected for a 1 or 2 deg. error. I would suggest that you grind a tool - set it up - and put a piece of CRS in the machine and practice with it once to make sure you have it correct. Most of the time you have a receiver or a part that is already threaded and if you do it correctly you will make them interface correctly.

The lathe is best suited to the threading, turning and boring is just getting the feel for holding dimensions. Basically learing that .001 on the dial is either .001 or .002, depending on the graduations on the dial. But, threading will either make or break you, learn to do it right and make the threads look good, if they are tore up or rough you are not doing something right. The leading edge of the threading tool is all that is doing the cutting, the back is just following and if it is draging on the back of the tool it is tearing up material and will ruin the threads, that is the area that is usually going to be where the load is applied, so make it look good. If you have a book on how to set up up for threads, use it. The 30 deg. on the compound is there for a reason, to allow the thread to be controled through the process.

I may have gone overboard on this, but, if you are have a lathe and don't know how to grind your tools - may I suggest that you learn, it is very rewarding to have that ability, then your possibilities are unlimited by your tooling.

Phantom
 
Adding to the one above. . . .

Going back over the post on this, one of the guys put a link to a lathe manual, that is a good link!!! http://www.arwarnerco.com/warner_pro...ts_boring.html
Most of the information is older than I am, ooops, but still applies to the work being done on a lathe. In my edition of Machinery's Handbook, 21 edition, pg. 1674 it show how to grind lathe tools, that gives the aproximate clearances for HSS tools, it will keep you from dragging the heal on them. But most of todays lathes come with quick change tooling and the tools are set parallel to the bed of the carrage, so some of the clearances don't have to be as much as shown, 6 deg. is good though. The one important thing that is stressed there is that the cutter needs to be as close to the CL of the work as possible.

Another guy said to buy Carbide Boring bars, I prefer the HSS ones, they have a rake to the leading edge and can be reground in the Home shop if needed. I don't have a diamond wheel for my grinder, may end up getting one in the near future, but regrinding a carbide isn't done on a standard grinding wheel. High Speed Steel boring bars are really good, especially when you need a really good finish, like I said above carbide doesn't have a rake to the cutting edge, it plows material instead of cutting it.

enough . . . Phantom
 
OK, I got it now. Those tools have lots of support to the edge and plenty of clearance. I think now I see how they cut and not dig. I'll work on grinding some like that.

And you're not going overboard.
This thread has 905 views at this point so lots of people are following it.
 
Don't overlook good ole GOOGLE try a search on "how to grind lathe tool bits"
or other wording for lots of information.

when I typed this in, one of the possibilities when I got to "HOW TO" was "Kiss" with over 67 million hits on that one. For 65 years I always wondered if I was doing that right.

OK.... back to grinding Lathe Tool Bits.
 
phantom496, thanks for all the good info. The Lathe I purchased came with a fair amount of tooling. However I would like to learn to grind them myself.. Keep the good info coming.
 
Dying Breed . .

There are not many of us left around, I am retired and do some receiver and barrel work for a hobby, nearly full time now. I do it for fun and friends and to keep me off the sofa. With HSS tools you can make any kind of a tool you need to do any aplication, I had to make a couple of parts for an "Old Sharps" a few weeks ago and they have a cross pin that holds the parts in the receiver. That pin goes through the Ejector/Extractor and the part has a 9 deg. angle in it, if you make it a straight hole, it is too big and slops around in the receiver and doesn't go back into place like it is supposed to, causing a jam when the receiver is being closed. I had to rebarrel the receiver and then the new cartridge was too small for the Old Ejector/Extractor, facilitating making a new one. The pin is tapered at the point that this part interfaces with it, so I had to grind a rough 9 deg angle on a HSS Boring bar and set up - dial in the hole and cut the angle in it. Now if you are making a part and don't have one of the HSS tools to grind on, What do you do ? Sharps-04-a.jpg[/ATTACH] There is only one way to do this with a tool you make yourself. Measuring the angle is the hard part, you have to trust some unusual measuring devices or do the Trig to get it, did both. As you can see I still have some Dykem in the chamber, still a work in progress, but it works. You can also see with the other two pictures that even though it looks like a simple part is is actually very detailed, and it has to fit. The Radius for the cartridge on the end has to be exactly in place - or it won't eject the spent cartridge. I actually used a Boring Head to do those, I had to set it up in a "V" block and dial in the exact dimension for the base and the head, made two seperate cuts.Sharps-02.jpg So without tooling that you can make yourself, you have limitations to your ability. It continues to amaze me that they did such fine work with the crude tooling and machines that they had back then, wow!! This part took me the better part of 3 days to make and get it in where it would work. It has some very exacting dimensions to hold, the center line of the the barrel relief and the exact point of the hole to the tang that ejects the shell, to the reliefs cut in for the head of the shell. It was just about all my little machine is capable of for dimensions.

The Inserted tooling is really set up for the CNC world, not the single point. It is made so that they can have a set point for the CNC machine program and give it a dimension and, if it breaks or wears down they can replace it and be back on line in a matter of minutes - rather than hours. The Speeds and Feeds can be set much higher and the carbide tools with last longer in that enviorment than HSS will. Besides they are running with a flood of coolant, which not many of the little machines are set up for . . messy. There are some mist devices out there that will allow you to not have to run coolant on a part, not too expensive. But for the most part if you are running something that hot in a small machine, you need a bigger machine set up for the mess that coolant makes. Time is $$ in the manufacturing world, it is to us also, but not to the point that we loose $,$$$.00 . . . .

Phantom
 
Phantom,

Thanks for your posts. I am an old timer myself and have spoken about grinding HSS bits to fit some applications on this site. I have sometimes gotten responses stating that what they want is a carbide insert tool with the insert number and they want it right now, so they can do a great job on threading and installing a barrel.

Things like knowing how to machine metal don't come overnight, and without taking the time to pay your dues, you won't be sucessful with the best of tooling. Again, thanks for your taking the time to educate.

Scott
 
Thank you . .

As I said I am retired from the working class now, but I have paid my dues on the metal. I guess the best education I ever got was contracting with a fellow in Ca. making Die Cast Molds. He was a Genius, and he didn't mind imparting some of the ability to me and others, I am forever grateful to him for the education he gave me working metal - H-13 Steel. That particular metal is a high nickel material and gets hard as the hubs of Hell when heat treated. I had a complete machine shop at my disposal, and when I didn't have a contract I had the time to make "Personal Tools". Some of them have served me well over the years, even to others copying them. He taught me that you are only limited by your imigination to do something - anything, and gave me the confidence to go on to other jobs and excel at what ever I did. Enough confidence that after going to work for a major DOD contractor I was incharge of the model shop within 2 years, and retired from that position.

Phantom
 
I personaly enjoy grinding tools. It's kinda fun to grind one up for a specific application and have it do just what you want it to. My crowning tool is hand ground HSS that I've stoned dead sharp...and it only gets used to crown. I've also ground a boring bar out of HSS to true up Remington bolt faces with the extractor still in place. Works like a charm.

My dad, who started in the machinist trade in the early 60's around the job shops of San Fernando Valley, has made some phenomenal looking hand ground tools. They look like pieces of art. He said he would use a surface grinder alot of the time for reducing diameters, making square toolbits round, etc., then head over to the tool grinder. I have all his tool bits, and like phantom said, there's about a bazillion different shapes, sizes, radi, etc. Most were ground for a specific task. He got so proficient at it that he was tasked with grinding alot of the shops tools for the other machinists. He said he'd spend hours at night, grinding tools, getting covered in green dust from the wheels, and the day shift @$$holes (his words) would break them all!

I think one would be well served to learn to grind his own tool bits.

Justin


Justin,

I've been crowning with a high rake, sharp HSS tool as well, but took some grief over it. Not that a reamer is better or worse in my opinion, but everyone that spoke up said I should use a reamer to chamfer. Do you chamfer with it or just flat face off?

On grinding tool bits... when I took Machine tool operations I, 20 years ago, the first weeks were focused on hand tools in the shop, and then grinding tool bits. Last I heard, the course is still taught the same way today.

Fundementals for the machinist.
 
Last edited:
Barrel Crowns. . .

Are you refering to the Radius on a Barrel Crown or Flat Crown or 11 Deg. Crown?? In the past 8 or so years I don't Radius a Crown, the reason being that the 11 Deg. Crown seems to shoot better. Most of the people that I do that for want the Radius taken off and the 11 Deg. put on. You can even do an 11 Deg. inside a recess if you know what you are doing. For the most part about all you will ever mess up on a crown is the outer edge of the barrel, leaning it against something or it falling over . . ouch. The 11 deg. seems to be the best for shooting the BoatTail bullets, it gives the bullet and even-exact exit, no side play or influence to the bullet. IF, the barrel is "0" in the lathe to the bore of the barrel, it will be a perfect exit. I always set up and cut it with the compound set at the angle and cut from the bore OUT, not in, it will roll a burr into the bore no matter what you do to it. 11 deg Crown.jpg On the bigger barrels I do like the picture attached, abreviate it, don't go all the way to the edge, on the smaller barrels I take it out to within .040 or so of the edge and then champher the outer edge of the barrel to about a 45 deg. This is done even on the hunting rifles, I have guys come in and want the rounded one taken off and the 11 deg put on . . ok!!

There has been a bunch of research by bench rest shooters on this subject, some of it is kind of interesting reading, but most have found that the 11 deg Crown is about as good as it gets. Remington for years did a Flat Crown on it's 40X rifles, with just a very small under cut on the rifling. I guess from what I have read and seen of them they shot just fine. It is an interesting subject - do some research for yourself and see what you come up with.

To get a barrel dead "0" in the lathe I make an Alum plug that will just go into the bore, measure it and make a stepped plug, then dial it in to "0" - Both ends. When you turn it around in the machine and the chamber is done, you should have an under cut that you did with the threads, dial that in, it should be as close to the bore as you will be able to get, that is if you set it up correctly. Setup-2.jpg Here is a picture of the set up for doing the crown in my little lathe, notice indicators on both ends, both will be "0" when I do the chamber and the crown. The one thing that I looked for when I went looking for a lathe was one that I could get at least a 20" - 1.25 dia. barrel through the Headstock. As you can see the barrel will go through and I can dial both ends back to "0" to do the crown. If both ends are not "0" then the exit end (muzzle) will not be 90 to the bore. Does shooting around corners come to mind . . :). That little Enco may not be the best in the world, but it repeats every time, and I can hold as good of tolerances as any machine I have ever run. I have run Monarchs that didn't run as good as this machine that cost what the Monarch paid in sales tax for it.

Phantom
 
When I was serving my apprenticeship during the 70's our teacher/instructor told us repeatedly that a good machinist can always make do with the machinery he has. That was one smart(Brilliant) German-American machinist. Like you Phantom, I have a lower end 12x36 and can't more pleased with the accuracy.
 
Can you post or email a pic/grinding diagram of your crowning tool?
Thanks
Justin
 
Crowning Tool . . .

This link keeps logging me out in the middle of making a reply, what is going on with it ??? I had a message nearly complete and when I went to read over it - it had logged me out . . again. :mad::mad::mad:

Here is a picture of the Crowning Tool that I use. The first picture is of the set up of the barrel and the compound to 11 Deg. You can see the Alum piece I use to dial into, Barrel SU-2a.jpg. Next is the Complete set up from a different angle Barrel SU-4.jpg. Next is the tool ready to cut/finish the end of the barrel, you will notice that it is set up to cut from the bore out, not in Barrel SU-3.jpg. There is also a very generous radius on the tool, that is ground on and then Stoned to a finish. The stoning will take all of the grind marks off of the tool and will make a very fine finish on the end of the barrel. You don't want to make the end of the barrel look like someone tried to thread it, make it pretty, crank out slowly. As I said earlier most of the people I am doing this for want the 11 deg not the radius, so I don't usually do them, but I will explain below how to do it if you need that kind of Crown.

If you wish to do a radius on the end of a barrel, I would suggest that you take a Dremel with a stone larger than the radius that you wish to make and grind it with one of the Square carbide stones that come with it to the dia of the radius you wish to make. Then rough out a HSS cutter on a grinder and finish it with the Dremel grining stone. Then after you are pleased with the radius take a fine stone and stone both of the cutting edges of the cutter, that will remove all of the stoning marks and make a very fine finish on the barrel, if it doesn't chatter too much. :rolleyes:

The orginal tool I was trying to describe to this post is Ole Reliable. .Ole Rely (1)a.jpg I had a part to make this morning and since it was in use I took some pictures of it. The nice thing about this tool is that it will feed the chip into the work, and you can see some of the small chips below, there is very low chip manintainence. You can see by the angle of the cutter if it is set up so that the face doesn't drag on the cross feed, you can face and Turn with out moving the tool. I don't usually finish with this tool, I set up another tool with a small radius on it and finish with it. Part of the magic with grinding tools is to make a good finish with them, and stoning them to finish will make you look like you know what you are doing. After all, you can see Ice Boxes to Eskimos if they are pretty . . . :D

Phantom
 
henrya....

I bought one of the T15 insert kits from Warner not long after I got my lathe - got the 1/4" holders so I could also use them on Dad's old Atlas lathe. I've had fairly good results with them, but Warner makes their T15 inserts with a rather oddball hold down screw size, and I've not been able to find carbide inserts that'll fit the Warner holders. Since Warner gets a premium price for replacement T15 inserts, I'd considered using carbide inserts with their holders instead.

Most of my tooling is indexable carbide, and serves me well. However, as Phantom has pointed out, sooner or later, you'll run into a situation where you're going to have to grind your own tools -either HSS or T15 - to get a job done. I bought one of the Harbor Freight carbide grinders that have been mentioned already in this thread, then swapped out the junk green wheels that it came with for a good white AO wheel for HSS, and a diamond wheel for carbide. IIRC, I paid $125 for the grinder, and quite a bit more than that for the two replacement wheels. I still think it was money well spent.

One of the first things I did to my heavy Jet 13x40 was swap out the OEM toolpost for a Phase II wedge-style QC post, then shop around for reasonably priced extra toolholders. My machine uses the BXA size QC toolpost, and I've been able to find extra toolholders for around $15 ea. Yeah, they're all made in Twina, but they work, and having a QC post without extra holders makes about as much sense as having a fine repeating rifle with only one cartridge case. But, as Phantom has already mentioned, there's no way to adjust the rake of the tool with a QC toolpost, so if you're going to depend on indexable carbide tooling, you're going to want to look for inserts with a positive 7* or more clearance, and a chipbreaker design that will provide some top rake for finishing steel or turning aluminum w/o having to deal with build-up on the tool. I've bought a lot of surplus inserts in the past on e-bay, but their politics have put me off, so if I can get what I want from Carbide Depot, I'd rather deal with them.
 
Hey HenryA . . .

The QC I have on my Enco only came with 5 of the Dovetail holders, and I have been looking for more of them, to no avail. I hate having to keep changing the tool every time I get one set. I got used to having a bunch of them in the shop and would just mark them SETUP and no one would mess with them until I was finished. What is the name of the tool holder you have, and is there a link that I can get to to find some or replace this one I have ???

The T15 tool is as good as it gets for HSS tools. That is the material that they use for the Acme-Gridley Automatic Screw Machines tooling. I used to know the owner of the co. that had the patten on that material. Everytime I go into some place that has a bunch of old tools I go through it and if I find one of them . . I buy it no matter what the cost. You can grind that tool and give it a nice rake to the cutting edge and cut under welding, where carbide will break because of the interupted cut. I used to have a bunch of it, but have nearly used all of it up . . 45 years of tooling has taken it tole on my cutters. :)

Phantom
 
Phantom...

The outfit I've bought extra holders from most recently is CDCO Machinery Corp. in Schaumburg, Ill. Try www.cdcotools.com
One of the last batch of BXA holders I got from them is ground incorrectly, because to tighten it in the QC toolpost, the handle winds up pointed towards the headstock. Not really a problem unless you're working very close to the chuck with a large workpiece, but it pointed out that their QC isn't foolproof. I have no complaints on any of the other stuff (V-blocks & clamps, 5" sine vise, etc.) I've gotten from them, and am sure they'd replace the 'faulty' toolholder, but since it's usable, I haven't bothered to return it.


I buy T15 blanks from Enco when they run a sale on them. It's a little tougher to grind than HSS, but it's good stuff. Most of the tools I've bought at the surplus yard were Momax cobalt - probably 5-10% instead of the 15% in T15, but still better I think than straight HSS.
 
Back
Top