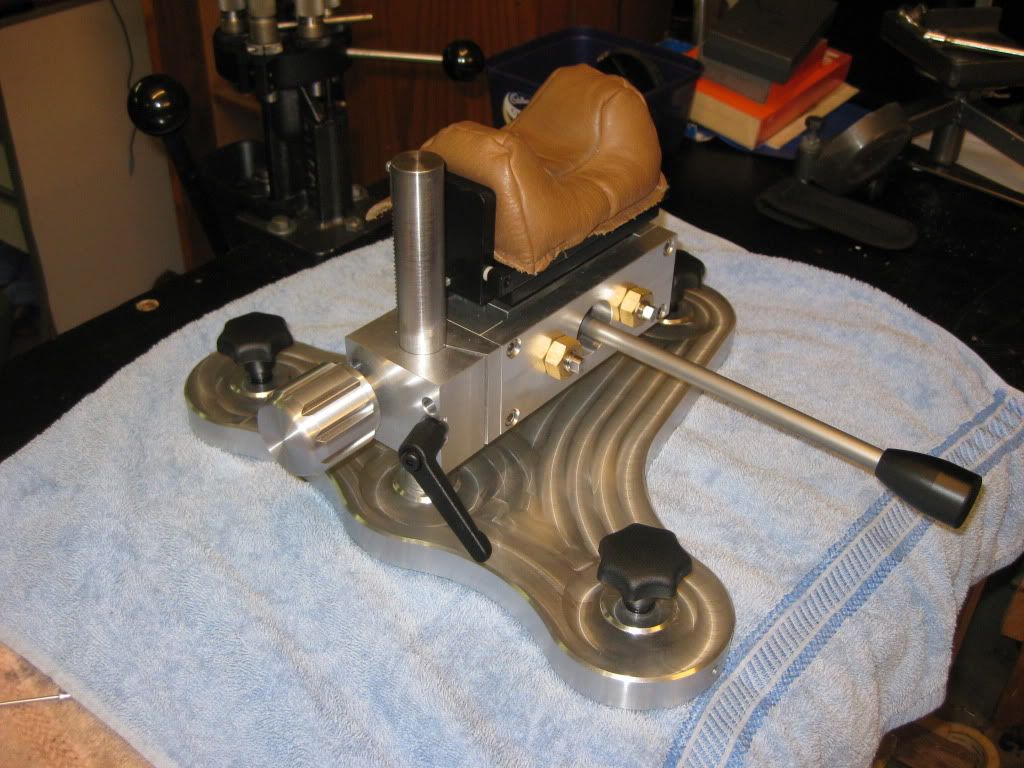
My new Coaxial rest

Leeroy

Machinest / Gunsmith
G'day fellas

Well it's now been 3 months since i sent off my actions to be registered and i'm still waiting for my State firearms registry to get it sorted out....... I've been told that the officer in charge of my applications will be in contact with me next week so hopefully some progress can finialy be made..

So in the mean time i've been keeping my self busy in the workshop building my self a new co-axial bench rest.
I've been attending the 1000 Yd benchrest shoots for the last 12 months and have been drooling over the Farley Coaxial rests a few of the boys have. A few quotes of arround the $1500 mark landed had me thinking i can do better than that..
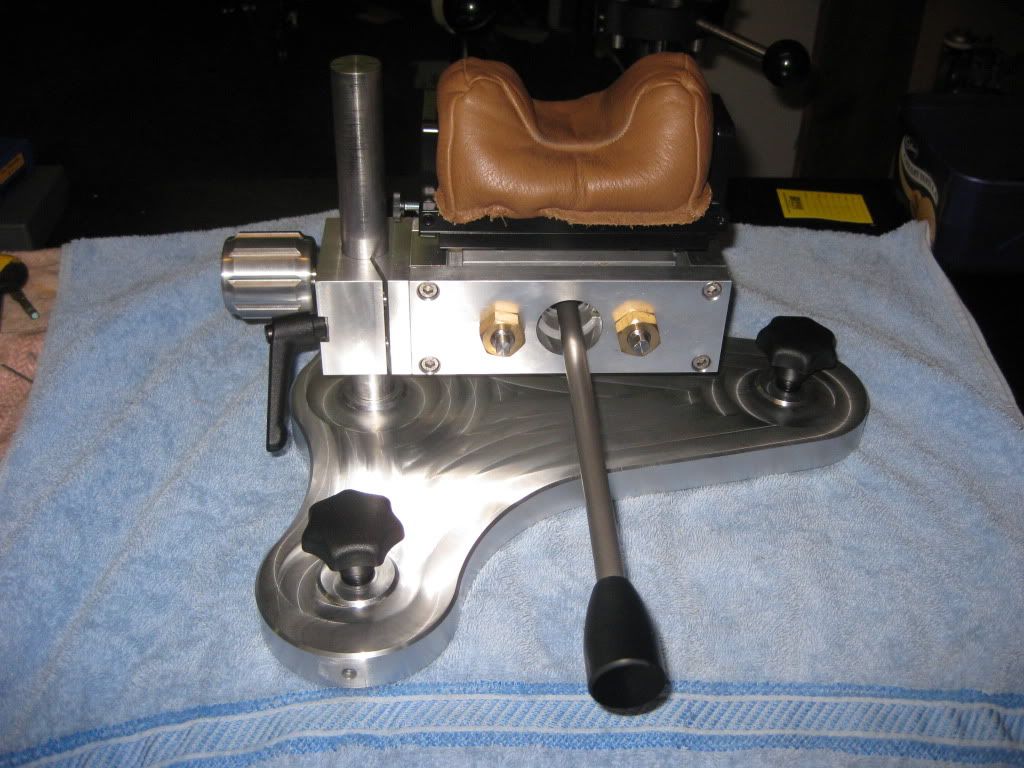
Well he's the results. About $250 in materials and a few hours of a night over that last 3 weeks..
IMG004.jpg

IMG005.jpg

IMG007.jpg

All CNC'd of course from Aircraft grade aluminium and stainless steel.


Cheers
Leeroy
 
Last edited:
Great Job

Leeroy,

Great looking rest. I have thought about building one myself, but I have never had the opportunity to see the internal working of a Farley or SEB rest.
I think I have just about figured out how to go about it, and when I have a little extra time I am going to give it a try. I don't think mine will turn out as nice looking as yours, but as long as it functions well I will be happy.

Again Great Job
Todd
 
I have made a couple Farley clones. The internals are very simple and that is what makes it great. The center to center distance in the vee grooves in the sliding plates are critical and need to be within +- .001 to be smooth in the vertical. The rest of the dimensions are pretty loose.
What type bearings did you use and what type of tension screws did you use?
Butch
 
The internals for my rest were pretty simple also. I didn't use "V" grooves but instead clamped the two plates together with a 1/16 alloy shim in between and then drilled and reamed two 8mm holes down the center. When they were seperated i was left with two circular grooves precisly matched to oneanother. The whole unit slides on teflon sheet, pins and blocks.
Bearings were dificalt to get in any kind of quality. I ended up using a $25 teflon coated bearing. These still however have about 1 thow clearence and are very sloppy. The secret here is to split the outer casing with a dremmle saw and then press them into a 1 thow undersize hole... Volla no more clearence... The two screws simply apply pressure to the plates.
There are also no tension springs at all. It relys on the springiness of the teflon and the body itself.

Cheers
Leeroy
 
Leroy,
You are saying that your 2 screws apply pressure to the plate and keeps it tight to the other plate? Do you have teflon or delrin buttons on your screws?
Butch
 
For the 'home builders' I have some info. In experimenting with my Seb rest I have come to the conclusion that a counterbalance weight is a great addition. The CBW allows you to use very little tension screw. This can dramatically reduce the force needed to move the knob. All you need is just enough tension to keep all the sliding bits in contact with one another.

The CBW balances the weight of the rifle. With the correct amount of CBW the knob will remain stationary when you let go of it. For a 'reversed' action rest like the small Farley or reversed Seb the CBW would be on the joystick. For 'normal' action rests like the big Farley or Shadetree the CBW would need to be on a shaft extension on the opposite side. The Seb already has a shaft extension and just needs the CBW. Seb is now selling these for his rests.

I also think that one of the smart features on the Farley is the large size of the sperical bearings. There are no downsides to the larger bearings [ except the cost :eek:].
 
Do you have teflon or delrin buttons on your screws?

Yes there are teflon blocks on the ends of the screws which ride in a slot cut in the first plate..

Cheers
Leeroy
 
In experimenting with my Seb rest I have come to the conclusion that a counterbalance weight is a great addition. The CBW allows you to use very little tension screw. This can dramatically reduce the force needed to move the knob. All you need is just enough tension to keep all the sliding bits in contact with one another.

That sounds like a great idea.. I've never seen one with a counter weight. I will have a play with this also when i get some more time shooting over the rest..

Cheers
Leeroy
 
CRB,
A counter weight is not needed on the Shadetree as it will hold a 25# rifle as is with very little tension. There are other ways to fix it other than a counterweight. If you take your load bearing sliding plate and drill and counter bore 2 holes, one on each side. Machine 2 delrin buttons to bear on the bottom housing. Put 2 springs to bear on the delrin buttons and capture your springs with the bag plate. If you use 2- 8# springs, it will give you 16# lift on the fore end of your rifle. That allows you to use very little tension on your tension screws and gives a very light feel.
Butch
 
Nice looking rest Leeroy. I'm jealous of people who can do nice work with metal or wood. I can recognize metal and wood which means I'm about as smart as my dog. :D
 
Guys,
The counter balance weight has no moving parts, no sliding/rubbing parts, requires no maintanence or lubrication and is easily tunable for different weight rifles without disassembling the rest. It's only downside is that it is a new and not well understood concept.

I had replaced the bearings in my Seb and when I first reassembled it I set it up with minimum tension. Super smooth joystick movement but when you set the rifle on the bag it went to the full down position. The additional force needed to move the stick was noticable and of course when you released the knob to load the rifle, clank, full down [ knob full up with my preferred 'reversed' action ].

I had read a prior thread where the CBW was discussed and I just happened to have some one pound lead ingots available so I taped one to the joystick shaft. Presto ! Now the knob didn't move when you let go of it and the force needed to move the joystick was reduced. I was quite surprised at how well it worked.

I then took some .5" brass rod and made a new joystick. MSC has threaded brass knobs in a variety of sizes so I ordered one. The resulting weight is still a bit too light. I will either put on a larger brass knob and/or a movable weight on the shaft. The movable weight on the shaft would allow me to slide it back and forth to accomdate the weight of different rifles.
 
, but I have never had the opportunity to see the internal working of a Farley or SEB rest.Todd


Todd,
I haven't seen the inside of a big Farley but the concept should be the same. It's a simple lever. The fixed pivot fulcrum point is mounted in the main body of the rest top. The moving pivot is mounted in the sliding plate that the bag is mounted to. High quality sperical bearings are the best bet for the pivots. If you place the fixed bearing behind the moving bearing [ ie on the joystick side ] you have a 'reversed action'. Fixed bearing on the target side of the body for 'normal action '.

The shaft that goes through the bearings has to be a precision fit. The slightest bit of clearance is magnified by the length of the joystick. The shaft has to be fixed to one bearing and a smooth sliding fit in the other because the bearings' distance between one another is constantly changing as you move the stick. I used Loctite bushing mount to fix the shaft to the fixed bearing. Some sort of screw together scheme for the shaft fixing would be a boon to the tinkerer.


The design requires a good balance between the total travel of the sliding plate and the force required to move the stick. The distance between the bearings is what determines this.

The tricky part is keeping the bag mounting plate from moving forward or backward or side to side or tilting during the firing cycle. All this while still being easily and smoothly moved by the joystick.
 
Thanks

Thanks crb,

I have kind of visualized how the internal parts had to work, and you a pretty much confirmed what I was thinking. It would still be nice to pull one apart or at least see some pictures of the internals.

Thanks again
Todd
 
I think it would be a bit unfair to the Manufacturers to post pictures of the inside of their wares :eek:

Also, the issue of the fixing of the shaft to the fixed bearing means that disassembling a Seb is not something done on a lark. IIRC, the Shadetree uses a screw to fix the stick to the bearing so it is easy to take apart.
 
I think it would be a bit unfair to the Manufacturers to post pictures of the inside of their wares :eek:

I agree, And as to how the shaft is attached in the SEB rest, I didn't know since the only ones I have ever seen are pics on the web.

Thanks
 
The shaft fixing is one aspect that I think would be simplified by using a larger sized sperical bearing . Seb uses an 8MM bearing [ app 5/16" ] and I think a 10 or even 12mm [1/2" app ] bore would be a worthwhile upgrade. The small Farley uses a 3/8" bore bearing.

Having the shaft stick out both sides of the rest body as the Seb does is going to require some creativity to fix the shaft any way other than glueing it.
 
The bearings used in my rest were 30mm OD and 17mm ID. Thats about
1 3/16 OD and 11/16 ID. I had pleanty of meat to drill and tap each side for the handle and the counter weight.
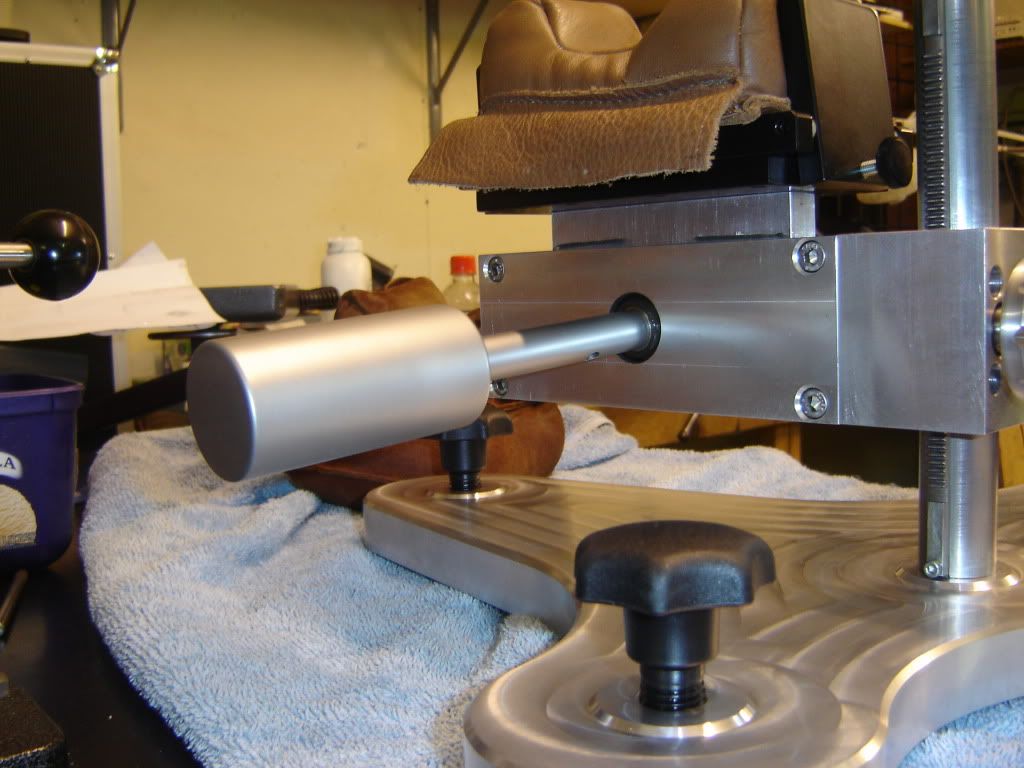
I had some time today and made up a suitable counter weight.

IMG007.jpg


What a difference... With the weight added and my 17 lb light gun on the rest i could reduce the tenstion on the screws to the point where it was almost sloppy. With just enough tenstion to keep things tight it's a smooth as silk to operate the leaver. I couldn't be more chuffed.
The only thing i have to do now is replace the crappy sinclare rest stop with something a little more suitable..

Cheers
Leeroy
 
Back
Top