Does my method look sound?

B

bigngreen

Guest
I need some feed back on this, what I have is a Savage long action on a PTG mandrel with ground tapered bushings. I have a dead center in the 4-jaw on one end and a live center in the tail stock, I adjusted the chuck and tail stock till I had zero run out on the mandrel on both ends then checked the face of the action and had .0013 of run out. Is my method sound or is it all jacked up?
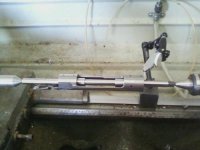
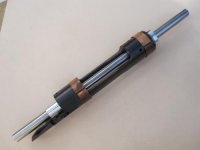
action mandrel.jpg
 
Sure, as long as the mandrel is truly straight, you can check the face in relation to the bolt way. Checking the threads is a different story.............jackie
 
I think that you method is OK BUT, if you are turning the mandrel on the centers (just fine) All that your indicator is showing, when on the ends of the mandrel, and the chuck is stationary, is how close to center the ends of the mandrel were drilled for the centers. If you are turning the mandrel, the alignment of the centers (in the chuck and tailstock) need only be fairly close.
 
To be more clear the mandrel is turning with the dead center in the chuck as I turn it with the indicator running on the face of the action. I was expecting more run out than .0013, the OD of the action had only a couple thou of run out which I expected to be much more. Just want to make sure I'm not giving myself bogus numbers before laying into it :cool:
 
Tapered bushings can cause you to be not actually on axis of the action. They would be ok if you were making contact with a round hole at each end. The feed ramp area at front will have bushing contacting against a non-perpendicular are-which can cause some error.
 
Jim makes a good point. Not sure just how the PTG mandrel is made, but Dave knows this stuff pretty well, and I would think he would make the design as such so as to not induce a false reading.......jackie
 
Aligning actions on a mandrel

My set up is simular but I have 1" bushings in ODs .699, .6995, .700, .7005, in half thousants increments through .7045. Dave Kiff once told me that independent bushings would be more accurate than tapered bushings like Dave Manson offers. I have never compared the two.

I do know more bolt races are different in the rear and the front than not. Dave Kiffs Bolt Race reamer with independent bushings will make them the same in both ends. Then an oversized replacement bolt will take out all of the slop.

Nat Lambeth
 
I think I'll set it back up and move the front bushing to other side and see what happens, I can see what Jim is getting at. The mandrel is the 1/2 x 12" made by PTG and the bushings are made for it as well, the fit is very good but never binds even when the bushing are tight, the bushings taper from .700 to .705. I tried to get this set up from Manson but they would not help unless I used the race way reamer, at this time I don't want to ream the race way. My thought is if I do that and buy a bolt or sleeve it I would be better of to step up to a custom action at that point.
Thanks very much for the input!!!
 
Guys, you can make your own mandrel and avoid the problems with bushings and generic fits............http://benchrest.com/showthread.php...est-On-My-Old-Remington-721-I-Just-Bought/pag

Go to post 35 for the pictures. That type of mandrel has just enough clearance to slip into the action body, with a slight amout of taper to sug it so it seats firmly. As the pictures show, I also use it to check the action trueness after the required machining operations are performed.

.........jackie
 
Last edited:
Both Dave Kiff and Dave Manson and I have talked their kits with the tapered bushings. The intent is to have a kit that keeps cost down and gives "close enough" accuracy for getting job done. I have never been in that "close enough" club. Dave Kiff also offers bushings at various sizes (I believe .0005 increments) so you can get good fit at front and rear and be fairly well assured that the mandrel is on actual centerline of your bolt race. Also look at your opening at rear of port-if the magazine well is to the rear of the front edge of the top of the receiver ring-you will also have a compromised bushing seat on a tapered bushing at that end.

If this is a one time use-you could make your own bushings by drilling an dreaming some drill rod or 4340 and then turn the outside to various diameters so you could have a set of bushings to fit the action.

Jim
 
A good surface finish makes a nice tool. The inside of the action isn't burr free and alters the true centerline. Also, the action is warped a little so you normally won't get a single sized home made tool to fit all the way through and be tight on both ends. Carefully examining the raceway and removing burrs doesn't take very long. The PT&G tool with straight bushings in half thou increments should be the superior tool IMO. If the bolt isn`t bushed or replaced I really don`t think it would matter what method you use. In your setup, you can have the tailstock off center but the mandrel would not show runout, you probably know that but there it is.

If yor Savage has a digitized number sequence under the tang do not true it, it was made in a CNC center and the lugs, threads and face are all cut in one set up. The only runout possible would be from heat treating and over such a short distance it would be very low.
 
According to a good friend of mine who toured through the Savage factory, they use a big hammer and vee blocks to adjust the straightness of barreled actions. If you want a thrill screw some factory barrels on a custom action you know to be straight and check them and then do the same with a barrel you know to be straight and some factory actions. Makes you wonder why anyone would build a custom gun on something like that when a good action really does not cost that much more when all is said and done.
 
0.005" tapered bushings?? That's scary. Use the 0.0005" increment ones to at least get a half-decent sort of reading. I have done alot of the remington actions with the PTG 0.705 reamer/mandrel and bushings, but none of the savages. Don't know if they are as bowed as the remington ones, but you can bet there will likely be at least some degree of warpage or error due to heat treating, even if the machining stage was done reasonably well.
 
Tooling to consider would include Greg Tannel's system. I once got up with him about truing an older Savage 110 single shot. He felt that what was worth doing was to recut the raceway, face off the front of the action, recut the threads & I can't remember if he wanted to just check the lugs, or take a small cut. Since you're there, why not? IIRC he recommended putting a bushing only in the rear of the bolt. It would be hard to put one up front, and the floating lugs pretty much remove the need for it.

I've not used the GreTan system, but it looks, from a "theoretical" position, to be the best engineered if you don't want to make your own tooling.
 
Ian, that seems a little far fetched.........jackie

with today's CNC machining, and assuming that the machine was properly aligned when it was set; you should see something well under .0015" when you look at the size of the part. There is very little parts warpage these days from heat treat due to vast advancments in quench processes (should be less than .00075"). Tobe exact if the machine was strait and they finished reamed it with a Mapol reamer, I doubt you'd see .0004" in it. But after broaching the error should increase a little bit. Mapol reamers are fairly common these days and often as accurate as you can finish grind.
gary
 
A slightly different approach

I did something similar to earlier post but with a few tweaks. I first machined a spacer in one setup to fit the front of the action. This spacer was threaded for a snug fit in the action threads. I then bored the spacer for a very close fit to a 12" Thomson precision ground shaft. I want to stress I did not bottom out the threads at either end, the spacer centered on the existing thread profile only. I know, I know if the original threads were out of alignment I would not be able to use this piece for action raceway indicating. Not a complete waste of time though because I needed the spacer for another use.

I then machined a rear spacer in one setup for a very close fit to the action raceway at the rear and a very close fit to the precision shaft. Before going any further I install the spacers and tried to slide the shaft from end to end to get and indication of the alignment of things. I got lucky, the shaft would slide from one spacer through the other with zero resistance. Spacer snug in action and less than .0005" clearance to shaft.

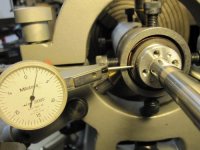
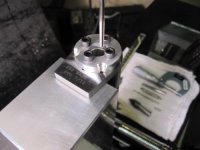
It was simple matter at this stage to true up the action in an action spider indicating off the shaft and cut the front face true. Had the threads been out I would have made a front spacer like the rear and trued the threads and the face in the same setup. And the threaded spacer would not have been a waste as pictures show.

action truing indicating rod 001.jpgaction truing indicating 012.jpg

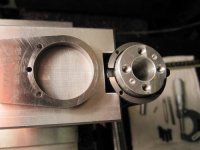
recoil lug pinning 007.jpgrecoil lug pinning 008.jpg

Bob
 
Thanks, you guys have given me a lot to look over. I think I'll set it back up and mark the high and low spot then change the bushing positions and see if it is repeatable or not. I think I'll put some layout blue to the bushings to see just how they are making contact with the action.
One thing I don't understand though is why since it is a Savage and made on modern CNC equipment should that mean I shouldn't attempt to measure and fix any flaw within my capability, wouldn't it be prudent to try to find and fix anything no mater the action?
Thanks again this has been most helpful!!!
 
Couple of comments:

First, why put the dead center in a chuck? Why not put the dead center in a MT sleeve in the headstock? That gets it centered more than well enough for what you are doing.

Second, with some attention to the details, it's not hard to make yourself a set of bushings in 1/2 thou or smaller increments. It takes a little time, but once made they are good for a life time of use. I posted the details of how I did it in post #13 of this thread: http://benchrest.com/showthread.php?73476-What-tool-for-centering-up-action-in-jig&highlight=

Fitch
 
Back
Top