You are using an out of date browser. It may not display this or other websites correctly.
You should upgrade or use an alternative browser.
You should upgrade or use an alternative browser.
DIY Stock
- Thread starter bisley
- Start date
Well I'll be switched...... I'd never heard of this stuff
http://www.foamboardsource.com/sintra-pvc-foam.html
http://www.foamboardsource.com/sintra-pvc-foam.html
David Halblom
Flying Fish Fundamentals
ask around
for a product called Komotex, another brand of expanded PVC
Can't find any stockist of freekote release agent this side of the pond.
And nobody stocks Sinatra,found some thing simular called flames.
for a product called Komotex, another brand of expanded PVC
I
Ian Robertson
Guest
Freekote
Freekote is probably available, made by Henkel and if not there are other makers. Not normally sold in hobby shop it is a commercial product. It is moisture cure and considered permanent unless you scratch it off.
UK site for Henkel
http://www.henkel.co.uk/813_UKE_HTM...0000380&redDotUID=8000000380&brand=0000000383
Foamex does appear to be the same stuff, you could even use solid pvc but the foam is much easier to work with hand tools.
http://www.par-group.co.uk/engineering-plastics/Foamex-Foam-PVC.aspx
If you buy a large sheet you can usually get it cut no charge into easier to handle pieces. I think 3mm Sintra is about $35 for a 4x8 sheet, in Canada.
Last edited by a moderator:
I
Ian Robertson
Guest
Hot Box
While you are thinking about the mould you can build a hot box. Buy some 1/2 or 3/4 plywood or MDF or whatever. Build a box about 24" wide and 16" high, or larger if you like with a hinged door on one of the sides. Insulate it with 1" of styrofoam. The simplest heat source is a couple of 40W lightbulbs and you will also need a small fan that must run all the time to mix the heat around. I get a bit paranoid about fire so you may wish to line it with something fire proof especially if you run bigger bulbs for more heat. You can always use a pid controller but the fan must run all the time. Two 40W bulbs will give about 140F.
The box will be used to speed the cure when making stocks and doing a post cure. Epoxy gains more strength when post cured for at least 24 hours, often double. Of course you can use the box for rust bluing, cooking stock finishes, warming up bedding epoxy in the winter and generally speeding many different operations. Some will even put a bedded rifle in to cook and speed up the cure although I think this is better than putting heat on the action alone but I wait for an initial cure before I cook bedding.
Forgot to mention, Sintra is great for making butt spacers.
The Frekote I used is 770-NC, they have lots of variety.
Last edited by a moderator:
Fergus Bailey
New member
Hi Ian
Thanks for the detailed description. Its very helpful. I am struggling to visualise everything you described, so would really appreciate whatever pictures you can post.
Thanks for the detailed description. Its very helpful. I am struggling to visualise everything you described, so would really appreciate whatever pictures you can post.
I
Ian Robertson
Guest
Sandpaper
I normally use dry paper which can be had to 1000x. You can use wet or dry but it really needs water and some materials you don't want to get wet like if your plug is wood. The Frekote release will even give release from wood and other porous materials but it will take a lot of coats, maybe twenty of so, but this does not take too long because it cures rapidly.
I normally use dry paper which can be had to 1000x. You can use wet or dry but it really needs water and some materials you don't want to get wet like if your plug is wood. The Frekote release will even give release from wood and other porous materials but it will take a lot of coats, maybe twenty of so, but this does not take too long because it cures rapidly.
Been ringing around the last couple of day's, no look in finding frekote 770 nc.
Phoned Locite and they passed me to there UK distributer, good news and bad news.
They do stock frekote 770 nc ,but not in aerosol cans.
The minimum order they will ship is $160 ,the sales guy didn't really want to entertain me.
I guest I could easily get the $160 minium order,If I ordered resin,catalist, and matting from this company.
And there is a paint shop near me that will put anything in rattle can.
Is there anything simular to frekote770 nc ?
A few year's ago I was trying to find Marine Tex epoxy, never found it so used JB Weld instead.
I
Ian Robertson
Guest
Frekote
You don't need Frekote in spray cans and in fact it is better if not in a spray. Use a tissue to wipe it onto the part. It is thinner than water. As far as mat goes you won't be using any in the stock just bid cloth. You will also just be using epoxy, not polyester.
You don't need Frekote in spray cans and in fact it is better if not in a spray. Use a tissue to wipe it onto the part. It is thinner than water. As far as mat goes you won't be using any in the stock just bid cloth. You will also just be using epoxy, not polyester.
I
Ian Robertson
Guest
Pictures
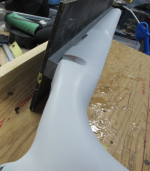
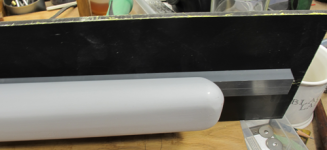
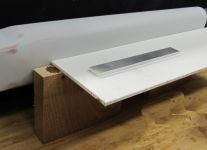
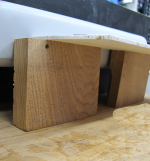
Here are some pictures. I threw the parts together just to show how it's done. The first side of the mould is made and then all this stuff is ripped off, the plug put back in and then the second side is made to the first side.
Here are some pictures. I threw the parts together just to show how it's done. The first side of the mould is made and then all this stuff is ripped off, the plug put back in and then the second side is made to the first side.
Attachments
I
Ian Robertson
Guest
Hardener
Ideally you need an epoxy that can use two different hardeners, one fast and one very slow. The slow is used to fill the stock. Done with fast the exothermic reaction would generate enough heat to destroy both the part and the mould. Vac bagging a part like this is very difficult due to the small size and complex shape, hand layup is the way to go.
Ideally you need an epoxy that can use two different hardeners, one fast and one very slow. The slow is used to fill the stock. Done with fast the exothermic reaction would generate enough heat to destroy both the part and the mould. Vac bagging a part like this is very difficult due to the small size and complex shape, hand layup is the way to go.
safetygeek here......A'gain....sigh.....
Sorry guys but if you're working with the variable catalyst systems you may run acros't some that use MEKP (methyl/ethyl/ketone/peroxide) which is similar to MEK but with this difference, IF YOU GET IT IN YOUR EYES YOU WILL GO IRREPARABLY BLIND
It works great, it allows reactions from sssssllllooowwww to faST!! in temps from 50F to 110F but it comes in little squirt/drip bottles and you must be extremely careful with it. We wear GOGGLES for mixing.
MEK, solvent for cleanup
MEKP, catalyst, blinding
rant OFF
al
dalewoolumjr
Member
ok I have a question
Ian~
I have worked in composites for quite some time and wanted to build a stock.
For the tool layup I used iso npg gelcoat tooling red (keep it around) and a combination of chopped strand mat and woven fabric for the first few layers of the tool with polyester resin. Then whipped out the chopper gun and built up several layers to increase the tool thickness. My tool is 4 pieces Right, left, top, and back.
The first stock I layed up each half and cut them flush with the flanges green in the tool. Bolted the tool back together and put layers of mat and resin to bond the 2 halves together all polyester resin. This is a butt to roll out. What is the best way to lay up the laminate schedule in the tool for a stock?
Thank you,
Dale Woolum Jr.
dalewoolumjr
Member
And for you Al. Come by my old shop. The Mexican laborers would wash their faces in acetone. Polyester resin out of a chopper gun goes everywhere.
We also put a red dye in the MEKP for a few reasons:
1. To show it is catalyst
2. It shows that the lay up is catalyzed. Also the dye turns clear after the exothermic cycle.
3. To not clean the tools with MEKP (it has happened way to many times).
Dale
We also put a red dye in the MEKP for a few reasons:
1. To show it is catalyst
2. It shows that the lay up is catalyzed. Also the dye turns clear after the exothermic cycle.
3. To not clean the tools with MEKP (it has happened way to many times).
Dale
And for you Al. Come by my old shop. The Mexican laborers would wash their faces in acetone. Polyester resin out of a chopper gun goes everywhere.
We also put a red dye in the MEKP for a few reasons:
1. To show it is catalyst
2. It shows that the lay up is catalyzed. Also the dye turns clear after the exothermic cycle.
3. To not clean the tools with MEKP (it has happened way to many times).
Dale
SHIVER!!
You ever met one of the fat mechanics with the skinny, veiny forearms and hands??? Some of those guys have had their hands so deep in the parts wash for so long they've got steps in their arms where the fats stop......
Not this feller, I know way too many dead people. When I taste solvent in my coffee or wake up tasting solvent I change something.
I wear safety glasses
I wear hearing protection
I wear gloves in solvents
I wear a mask when appropriate
And I fire guys who can't abide my safety rules.
Life Is Short
Then You Die
al
I want to build a stock
G'day all.
This thread is quite interesting, in fact it has promoted a desire to build a laminated stock. Are there any pointers to an online resource with a few practical pointers as to how to start such a project? I am quite familiar with working with wood and epoxy/carbon fibre are not a problem. The metal inserts, and where to put them are an unknown though.
We are talking about a .22 at this stage, not a centerfire. We all have to start somewhere.
Regards * Danny *
I
Ian Robertson
Guest
Epoxy
Many years ago I built some stocks using polyester, not good.
Many reasons to use epoxy over polyester, stronger, doesn't stink, better bonds, able to get insurance on a commercial level, doesn't stink,etc.
To make a production mould we used tooling gelcoat and lam resin from the same company for making tools. The gelcoat was filled with silicon carbide to increase cut resistance and this stuff was much more stable and could go in and out of a hot box 1000's of time and not distort and was cheaper to buy. For a quick one or two off mould we would use the regular epoxy that we made stocks from.
Never used mat or a chopper gun to build stocks. Although mat may seem stiff and strong it is not as strong as woven cloth by a long shot. Also important is that whatever fabric you use must be sized with a chemical compatible with epoxy. The sizing helps it stay together until wet out. Remember that all the strength comes from the fabric not the resin (more or less).
The main cloth was a 7500 weave tooling cloth in six and ten oz weights. We also used six oz cf bid and uni. Bid = bidirectional and uni = unidirectional. We also used a number of bulking fabrics for making moulds, the names of which escape me right now. This is all fairly high tech stuff you can't buy at a boat shop. For small quantities Aircraft Spruce and Speciality is a good source and they also sell small bits of 4140 sorts of steel if you need it for anything. We used an aircraft approved epoxy and although expensive the cost per unit was not too bad buying it by the drum.
Measuring epoxy is best done on a scale although small quantities can be dispensed with an epoxy pump which is very accurate for small amounts. If you don't want to spend money on a pump buy a small electronic scale for <$20. I always work in grams because it is simpler to work in whole numbers all the time instead of fractions, not an imperial vs metric thing, just easier. If the seller of the epoxy you use can't tell you the ratio by weight then buy from someone else. Figure out what the ratio is as 100:x. For example Marine Tex says the by weight ratio is 6.3:1. Hard to work with but if you turn it into a percentage ratio it's easy. 6.3:1 = 100:15.873 or 100:16 should be close enough. Put any old container on the scale, zero it, put in the resin you will need then add 16% to the weight using a calculator and add hardener to this number. The lam epoxy I use is 100:38 so to get about an ounce (for those die hards) I would add 25g of resin and then add hardener at 38% up to 34.5g. Perfect every time. Mix the living crap out of it and if mixing something thick like Marine Tex: mix well, dump it into a clean cup, mix well again with a clean stick and then use another clean stick to apply it. You only need one screwed up job to make all this mixing worthwhile.
Last edited by a moderator:


