
adamsgt
Jerry Adams
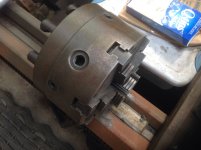
I am finally getting around to mounting my Bison 6" Set-Tru chuck. The adjustment screws are not 90 degrees apart. I have to believe that this is deliberate. Therefore there must be a particular technique to use when using these screws. Any advice? The four adjustment screws are located in pairs that are 3.75" CTC and the pairs are 6.5" apart outside to outside.
Last edited:
 I'm not very good at explaining stuff like this but maybe someone else will chime in.