Centering a hole on a action

bob3700

Member
What is the most sure fire method to locate an action mounting screw hole on a round receiver?

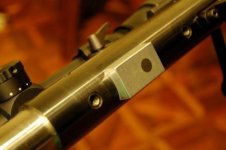
I want to install a third action mounting screw on my RPA Quadlite action (it only came with two). What method would assure that I locate and drill the third hole in line with the other two.

Once the hole is lay out, I would think that spot facing the receiver so the the drill doesn't walk would be the hot setup. I just need some help with precision layout.

Thanks

Bob
 
If I were to do it the easy way I'd thread me a short piece of drill rod that would fit one of the existing holes and screw it into the hole snugly. Then, with a small machinist's square you could get the hole dead nuts plumb by holding the square against the drill rod. Then all you have to do would be to decide just where you wanted the extra hole.

I know this method will keep a real machinist awake at night with beads of sweat running down their foreheads but just what popped into my mind. Probably a more self satisfying method would be to indicate around the rod to get it centered to satisfy your machine shop instructor. Then just spot it with a center drill and you're good to go.
 
I don't know it this is exact enough for you but it is for me...

I chuck a 6 x 48 tap upside down... a tap that has a factory ground point on it.

I balance a 6 inch steel thin ruler on the round.

I lower the chuck holding the point hard against the ruler.

I move the feed in or out so the ruler appears very level when viewed from the end of the round. Get right in line with the action and look at it. It takes very little movement of the cross feed to tile the ruler.

You can do this with a longer ruler for more accuracy.

leveling.jpg
 
I'd do it in a mill. If you don't have a mill do it on your drill press with a compound vise. Once you have the existing holes perfectly centered and vertical you would have to work hard to get the third hole out of line or at an angle.

JMHO

Ray
 
Run tapped rods into both holes. Straightedge along exch side & scribe. Halve the distance between scribe marks.
 
Gents,

Thanks for your help.

A friend who dabbles in this sort of thing offered this idea as well.

Take a headless action screw and screw it tight into the action.

With the chuck open and loose, insert the action into the mill vise, Adjust the action until the screw is centered into the mill chuck.

I like the drill rod into the chuck and the screw into the action method. I will give that a try for a setup.

Will let you know how it turns out. Always a little pucker factor drilling holes into a $1000 action!

Bob
 
Just wondering

why you want or think you need a third screw? most cutom actions I have seen only have two. I do remembering seeing some with 3 on a site but unless the action is very long, I wouldn't see the need but what do I know? :D
 
Bob

I was thinking the same thing as Pete but didn't bring it up since you didn't ask. But now that Pete has opened the door I'll ask too - why? I have a couple of actions with 3 screws and neither of them will shoot worth a damn with all three screws tightened. One of the screws is always left loose, either the middle or front one, so to me, at least, there is not much to be gained with the extra screw. One of my rifles is a long range BR in an 11" sleeve in a loudenboomer chambering so I don't need the extra screw for holding everything together, in case that is your goal.

JMHO

Ray
 
Pete and Ray,

The third screw hole will actually be for a recoil bedding block. I am not going to use the sandwich style recoil lug and will put this recoil block in the middle of the action.

That will allow me to switch bbls without even taking the metal out of the stock.

There will be those who will say to just pin the recoil lug, but I like this method much better. Al Warner uses it on his Barnard actions and a friend of mine has two of them. They perform very well and are switch bbl rifles.

Bob
 
Bob, you probably are worrying too much about recoil affects..I shoot a Hall "M" action (2 screw) that is bedded/screwed not glued..NO recoil lug...the rear of the tang is the only vertical surface to take recoil..I shoot it as a 30BR and 6ppc...it shoots very well...I can't justify a recoil lug when the rifle shoots as well as it does...:)
 
What Happen to measuring and drilling.

Measure the diameter of the action.

Assuming it is a round action. Use a V block to hold it in the vice.

Also assuming your mill has been tramed.

Get your both your horizontal and vertical alignment straight with the other screws with a square, and straight edge.

Use dykem to mark the distance from the existing hole. Get the mill on that axis.

With your action in the V block and the vice use a wiggler (edge finder) to identify the edge of the action. Keep track of your loaction on your hand wheel if you don't have a DRO. Raise your wiggler up and over to the other side of the action. Find the edge. Raise the wigler and go back half the distance between your edges. You should be dead nuts in the middle if you did it right.

Mickey this is how I was taught in machining school to find the center on a round piece of stock. Don't worry I have not and want loose any sleep doing it your way. I can't say one way is any better than another.

I never trusted those wigglers but they never let me down either.

Rustystud
 
been a class a machinist for over thirty years and have drilled alot of holes to match up with exsisting holes the simple quick ways your thinking of trying could work if you get lucky if not the holes will be out of alignment and cause a bind and possibly affect accuracy if you truely want and need third hole
take it to some one equiped to do precision work
 
I would suggest

that a hole with which to attach a recoil lug could be off a thou or two without causing many problems. One would want to provide some side clearance in the lug cavity anyway wouldn't one? The lug wouldn't be nearly as critical as an action screw placement; of course we want everything to be perfect, don't we?
 
Last edited:
I'd machine the beddding block for the action, use the existing front action screw to hold in place while epoxying it to the action. The front action screw will help hold the block in place when tighhtened to the stock.

Advantages of this method, no whole to inadventenly get off the centerline of the action and cause undesired torque on the action. No extra hole to decrease the value of the action. If you don't the bedding block method, it is easily heated and removed from the action with no damage to the action.
 
Here is what I am talking about. An elegant solution to a recoil lug situation.

Bob
 

Attachments

  • Warner_Barnard_Lug__1.jpg
    Warner_Barnard_Lug__1.jpg
    17.9 KB · Views: 231
Bob,
The third action screw (middle actually) in a Quadlite is located 3.250 in front of the rear screw. The bolt hole that is recessed for a "lug" is located 4.937 in front of the rear screw. I don't know if these are the dimensions you're looking for or not, but there you go.
 
Some of the single shot custom actions have a flat machined into the bottom of the receiver that acts like a recoil lug. The ends of the flat are angled to facilitate removal and replacing the receiver into the stock. The flat is probably about 2" long, IIRC.
There is nothing elegant about a washer style recoil lug, pinned or not.

Opinion of one,
 
Back
Top