Bolt Shrouds

Pete Wass

Well-known member
Several months ago there was a lot of activity on the forums about the ills of the current crop of Remington Clone bolt shrouds. Has anyone come up with a better system for tightening them up other than Feflon Tape or Shrink Wrap? I tried the shrink wrap but the stuff I bought would not shring enough to be effective and the Teflon tape seems to wear out, if you will.
 
A friend did some research and found that the teflon tape that is made for natural gas piping is about twice as thick as the thin white stuff that is commonly used for water pipe. It is yellow. He said that it lasts longer on shroud threads.
 
Last edited:
I woulda thought

by now that some enterprising person would be offering either a kit or actually re-doing the threads and making shrouds that fit. Seemed like a positive thing to do to me.
 
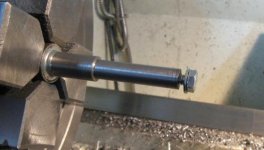
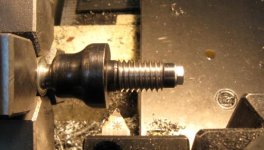
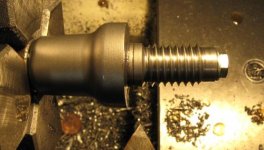
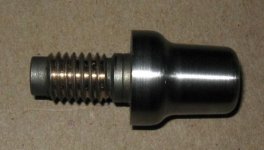
Made the tool in the chuck. Trued the shroud threads on a couple. Silver soldered over the threads. Recut the threads to match the bolt body for a nice tight fit. The way I see it, they are now much better than before and it won't hurt anything.
 

Attachments

  • Shroud 1.jpg
    Shroud 1.jpg
    19.5 KB · Views: 520
  • Shroud 2.jpg
    Shroud 2.jpg
    25.4 KB · Views: 511
  • Shroud 3.jpg
    Shroud 3.jpg
    25.3 KB · Views: 482
  • Shroud 4.jpg
    Shroud 4.jpg
    18.9 KB · Views: 512
Last edited:
My interest is for

The Remington Clone Benchrest Actioned Rifles I have. I don't have either the ability or the equipment to make my own shrouds. If there is something to be gained here I think lots of us would be VERY INTERESTED in swapping our Loose Ones for some Tight Ones.
 
Last edited:
Shrouds

I wonder if Dave Kiff would sell us his shroud without the threads and then those of us with a lathe could cut the threads tighter or to our own specs?
We could make the mandrel like PEI Rob made.
I would do the same as he did but I can't silver solder worth a crap.

Larry
 
Just wondering, couldn’t you take an aluminum shroud or steel for that matter and fill the threads with Devcon Steel then cut new threads?? Devcon is pretty tough stuff and if you use Titanium putty it might even be better…..just my 2 cents ..

Rick
 
Last edited:
What is the issue, exactly

is it a big variation in the threads from bolt to bolt that causes shroud makers to cut turn the threads so much smaller or is it simply something makers have always done? I find it interesting that BAT seems to be way out ahead on this particular detail.
 
Pete Wass

A bolt shroud can easily be made with the nose of the shroud
slightly longer and of such diameter to act as a bearing within
the bolt. The non threaded area at the large end can be done the same .
Both areas will center and eliminate the tilt of the shroud, which causes
binding of the pin. The thread fit should not be not be loose, but can be
free when the shroud is supported at both ends. The bolt should be
bored slightly over to get bothe of the new bearing surfaces true.
This really is not special work. The pin bore could actually be put in last
leaving it true with no binding. I may have time this week to make one.
 
Last edited:
Larry, just coat it and keep your little wire brush handy to wipe off the mess while its still liquid. No need to be good at it apparently ;) The PT&G bolt threads I checked were larger than the factory Rem and they don't OFFER special fit shrouds, I asked. I didn't ask about no threads because it was easier for both of us for me to silver solder. The PT&G shrouds are made to fit the Rem bolts and are not a tight fit to their bolts. I was hoping they would match their shroud and bolts, maybe Dave can be pressured enough to do this.

Rick, I didn't use epoxy beacuse the machining effort was the same and the stuff often flakes off, especially when thin. You can braze the CM shrouds.

Cheers,
Rob
 
I got this idea (tape on shroud threads) when casting about for a readily accessible method to tighten the fit of the shroud on an old 722 action. The best way to evaluate the fit is to disassemble the striker assembly and then screw the shroud (no firing pin, spring or cocking piece) into the bolt, and then back it out to the same position as when the bolt is cocked. Mine was very loose, and I don't have a lathe. I wrapped the part of the threads between the end of the cocking piece notch, and where the threads end at the front of the shroud with several wraps of the thin white teflon tape, stretching the tape so that it formed into the threads. There was some resistance as I put the striker assembly into the bolt. After reassembling the bolt, the thing that I noticed was that the sound of dry firing was greatly reduced. It was my thought that reducing the vibration produced before the bullet exits might be a good thing. The other shroud mod I got from Jim Borden. It was to limit the shroud's rotation while the bolt is being opened and closed. This can be done by more than one method. A friend did his by epoxying shim stock to the flats on the bottom of the shroud to minimize the clearance between them and the bottoms of the lug raceways. This keeps the cocking piece in better alignment, closer to vertical, reducing the chance of its rubbing the trigger side plate and improving the consistency and correctness of its contact with the trigger's top lever. In any case, I think that all of the efforts toward improving shroud fit that have been reported in this thread and in the one that Lynn deleted are interesting. As to results, a friend, who did the tape and shims told me that his 6BR seemed to be more consistent after the modifications. His rifle is based on a sleeved 700, and gives a good account of itself. He is not one to try everything that comes along, or to see results where they don't really exist. I know that the tape has to be replaced every so often, but since I do have a Kleindorst tool for removing striker assemblies, this is no big deal. Lynn's report of improving accuracy by replacing striker springs interests me. I would like to hear from others on this. Also, the idea of shimming springs is of some interest. Remingtons use the fit at the front shoulder of the firing pin to guide the firing pin and if the fit is too loose with the bolt body the pin has to slide on the tapered section farther forward to "find" the hole in the bolt face. This may cause a vibration that is counterproductive. Designers of custom actions and some of those who bush firing pin holes have made the bore for the tip and the length of the parallel part of the tip long enough so that the tip doesn't back out of the corresponding part of the hole as the rifle is cocked, to address this situation. Maybe a shim could be fitted to the front of the spring that would improve the centering of the pin, and reduce another source of inconsistent vibration.
 
It just occured to me

that the bent pin I experienced on one of my bolts may have been the result of this situation. I couldn't believe what I saw whan I took the pin out to clean it, it's tip was bent quite severely. I straightned it and checked it after using it again to find it bent.

I purchased a new one which has, so far , stayed straight.
 
Pete,
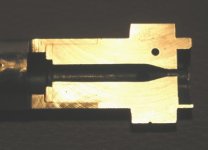
In a conversation with a very well known and respected Benchrest gunsmith, he mentioned bending the front of the pin... intentionally, so that it would be aligned with the center of the bolt face. determining this involved looking down the hole in the bolt face (probably with strong light and magnification) to see if the entire tip of the pin was visible, in cocked position. Because the pin is kept from rotating by the cocking piece and shroud, the alignment of the pin should remain constant, whether good or bad. We were discussing Remingtons. If anyone is able to duplicate this inspection, I would be interested in what you find. Isn't it probable that the ID of the bolt is drilled from the rear except for the short section that pierces the bolt face? What is the chance of these two sections being exactly aligned?
 
Last edited:
Dennis posted this pic of a sectioned 700 bolt front end.
 

Attachments

  • sectioned 700 bolt head.jpg
    sectioned 700 bolt head.jpg
    15.2 KB · Views: 332
Back
Top