The angular setting question has been satisfied I think. Regarding thread fit.
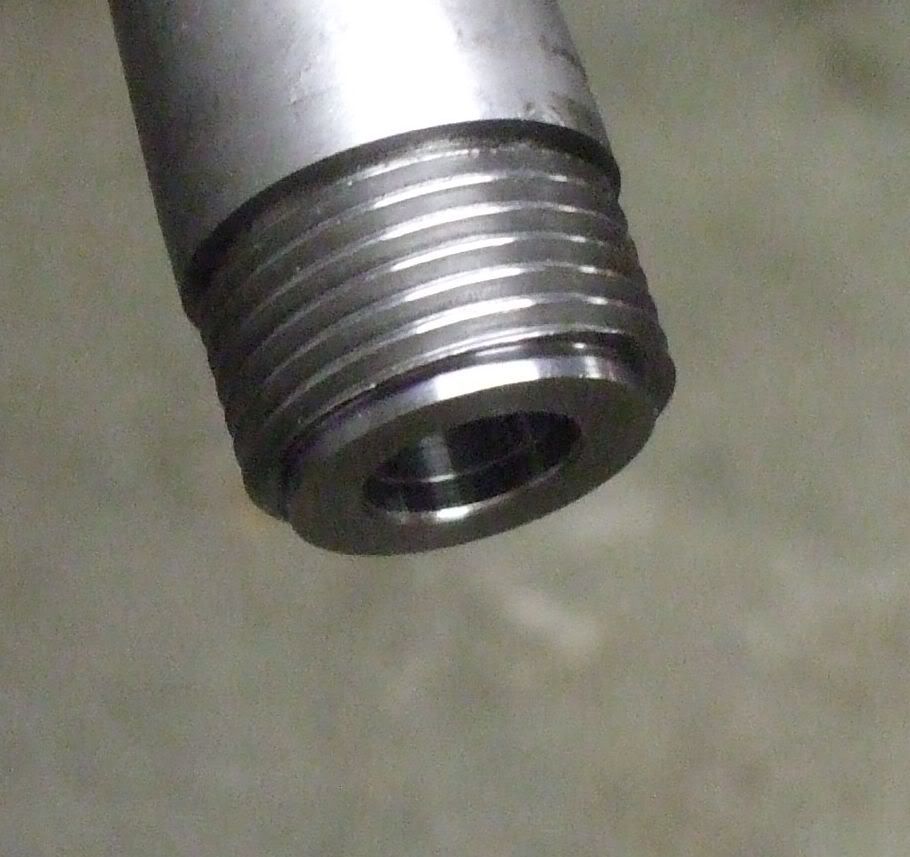
IMO it becomes a function of surface finish. If your using HSS tooling that's ground by hand and qualified with a thread fish then you'll likely need to keep your spindle RPM pretty conservative to avoid burning up the tool. It's also because it can be tough to grind the proper geometry by hand. It's an art that is starting to become lost as CNC's and insert tooling takes much of the guesswork out.
If your able to use insert carbide then it is in your best interest to practice making tennons until you can comfortably run your spindle speed at 1000+ rpm. It sounds daunting but I promise you can do it if you just practice it. It's all about cadence. buy a stick of 12L leaded round stock and devote a weekend to it. About the time your sick of doing it is when they'll start to look impressive. (honest injun!) A water soluble cutting oil is fine. You won't need the stinky high sulfur stuff. Save that for chambering. One thing to keep in mind is mist cooling. With carbide its almost always one or the other. Either flood it or run it dry. The thermal shock loading caused from the intermittent cooling delivered by misters will fracture the insert and accelerate its wear. At $20 bucks a piece it compels a guy to listen to the spec sheets.
The reason for the high rpm is this is where the carbide actually works as designed. Insert cutters aren't sharp because they actually depend on the material going molten. they are designed to put the bulk of the heat in the chip being sloughed off. A sharp edge would break down rather quickly as the coatings used don't adhere well to corners and it's a great place for heat to loiter around and start tearing stuff up. The molten state is what your after because it'll produce nice bright shiny threads on your tennon. This (with practice) will allow you to close up the fit between the receiver. I can't help but think this is a good thing as it helps to solidify the joint and help ensure the barrel is pointing where the scope/sights tell it to.
The surface finish is the key. If threads look like they are cut with an axe then they are more prone to "bubble gumming" with the receiver. If they are bright then they have a lower friction coefficient and will tolerate the closer fit better. Regardless a good thread lubricant is an essential component. Many use antiseize compounds. I'd gone to a synthetic grease called "TRI FLOW". It's popular with RC helicopter guys. Heliproz.com in Billings MT sells it. (good stuff!) The reason is a bit complicated. I once had a very high minded discussion with a guy who makes a very good living designing fasteners for the aerospace industry. (this means his mind was the high one and I just closed the pie hole and opened the ears)
")
Antiseize is designed to prevent two materials from sticking together. Heat, friction, corrosion all play into this. So does the tensile loading placed on the fastener when it's tightened up.
A thread lubricant should promote the joint being able to develop the tensile loading on the threads so that it becomes secure. It should not encourage the joint to slip over time due to heat and vibration. As a punk kid I loitered around race engine shops all over southern CA. Never once saw an engine builder use anti seize on connecting rod bolts or main cap studs.
You want that "bite" so the tennon doesn't slip. Least that's how I approach it. If your a BR guy who changes barrels like underwear then maybe it's not so critical since you get the luxury of lots of sighters. A course gun or hunting rifle is more dependent upon group center holding day to day.
Hope this helped and good luck.
C